Sommaire
Why use PureRAW ?
DxO PureRAW is a demosaicing software that uses the PhotoLab Elite engine. It allows you to benefit from the correction of lens defects according to DxO and digital noise processing of raw files.
The output files can be sent to the user’s usual software where the processing will be finalized.
PhotoLab Elite users have no interest in using PureRAW.
PhotoLab has the same functions, with additional and customizable settings.
Workflow for an optimized file
PureRAW produces an optimized JPEG, TIFF or DNG output file.
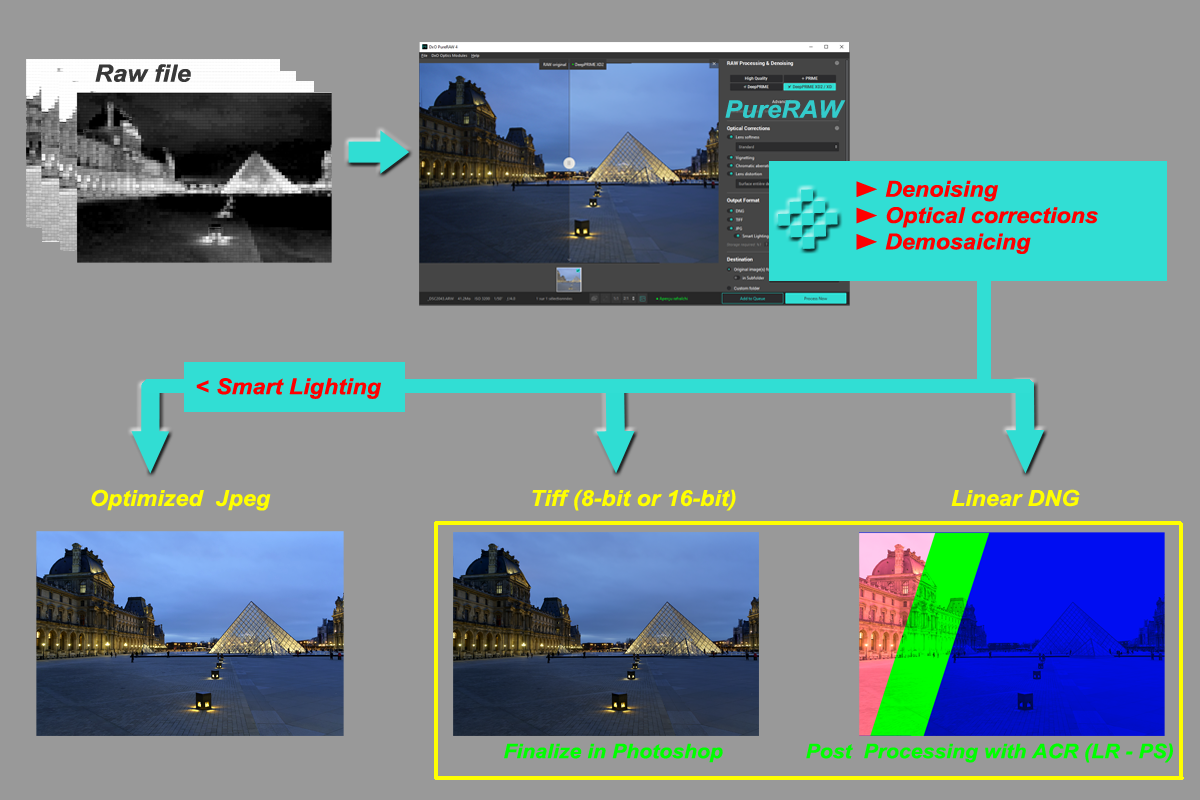
The choice of image type depends on its destination.
* JPEG files are usually used as is, without post-processing. PureRAW can improve them by applying an additional automatic brightness correction, the DxO SmartLighting
* TIFF files are ideal for finalization in bitmap image editing software (PhotoShop, Affinity photo or GIMP for the most common). Their large size is the condition for a qualitative treatment
* Linear DNG files are to be preferred in a workflow with a development software (Adobe Camera Raw = Lightroom and Photoshop, Capture One).
Although demosaicing, these files look like a raw file with the same correction potential; the three RGB layers are separated. Because of this characteristic, their size is about three times that of an uncompressed raw file.
See the tutorial “Mastery of PhotoLab – Two export modes to DNG“
PureRAW Interface
Images selection
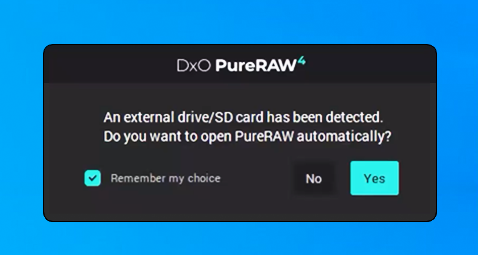
When a memory card or USB disk is inserted, a widget offers to open PureRAW automatically.
– This optional feature must be set in the préférences.
* From Lightroom Classic :
This widget is useless for users who manage their photo library with Lr tools and run PureRAW as a plugin.
* Inserting an external drive :
In most cases, the raw files to be processed are already present on the disk dedicated to photo folders. No need to import.
This widget may be considered indispensable by users who come from software offering an identical photo transfer function when an SD memory card is inserted.
– Select raw files in the add photos window
– Add photos
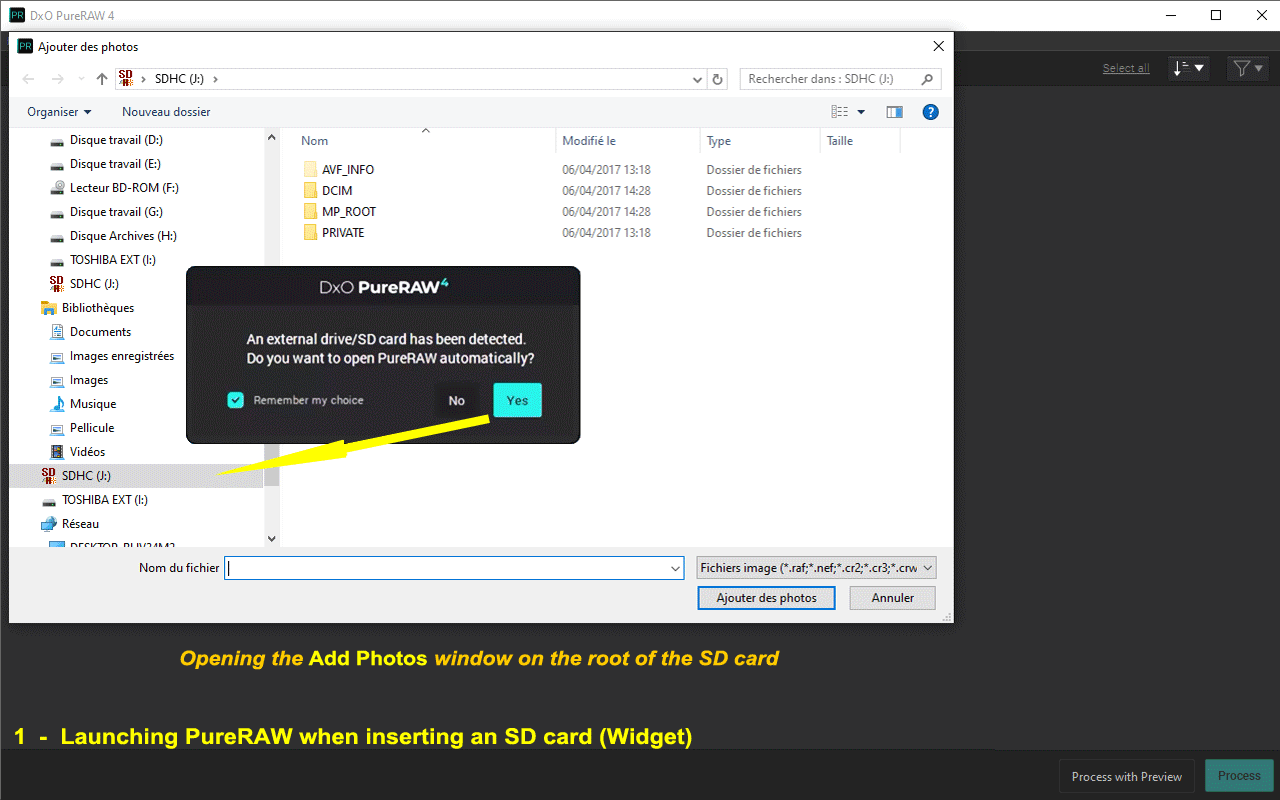
Caution : Never run PureRAW processing from files on the SD card, but always from a copy on a local disk!
If widget auto-open is disabled, PureRAW can be launched in three ways:
– PureRAW in standalone version
– From Lightroom Classic, via the plug-in Process with DxO PureRAW
– Directly from the File Explorer / Finder (without interface)
The last method is described in chapter alternative launch mode.
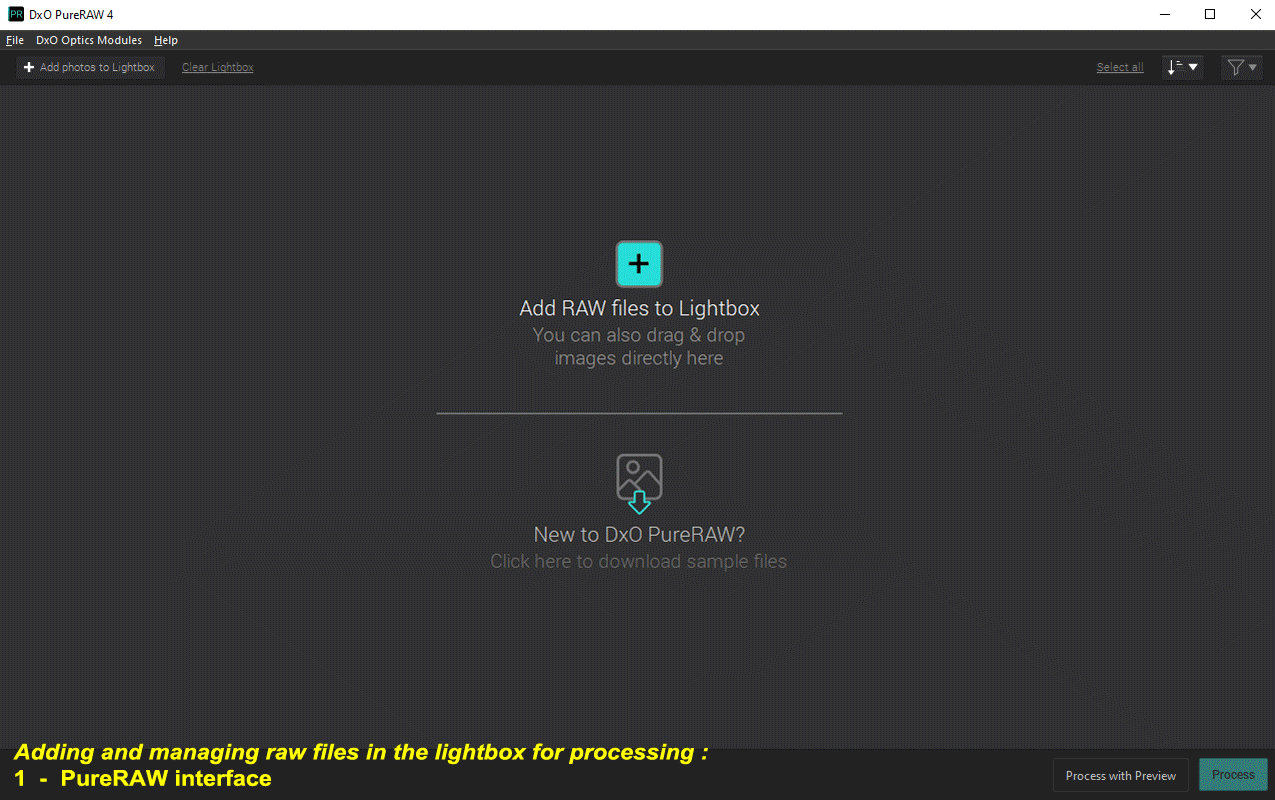
The PureRAW interface is basic.
– Add (Open) or Drag and Drop files into the PureRAW Lightbox
* The files present are displayed as thumbnails
* The optical module loading window opens when PureRAW finds one or more raw whose module is not yet present, or if there is a module ambiguity for which the lens used must be specified (the stored EXIF metadata correspond to several possible purposes)
See the tutorial “Mastery of PhotoLab – Hardware characterization“
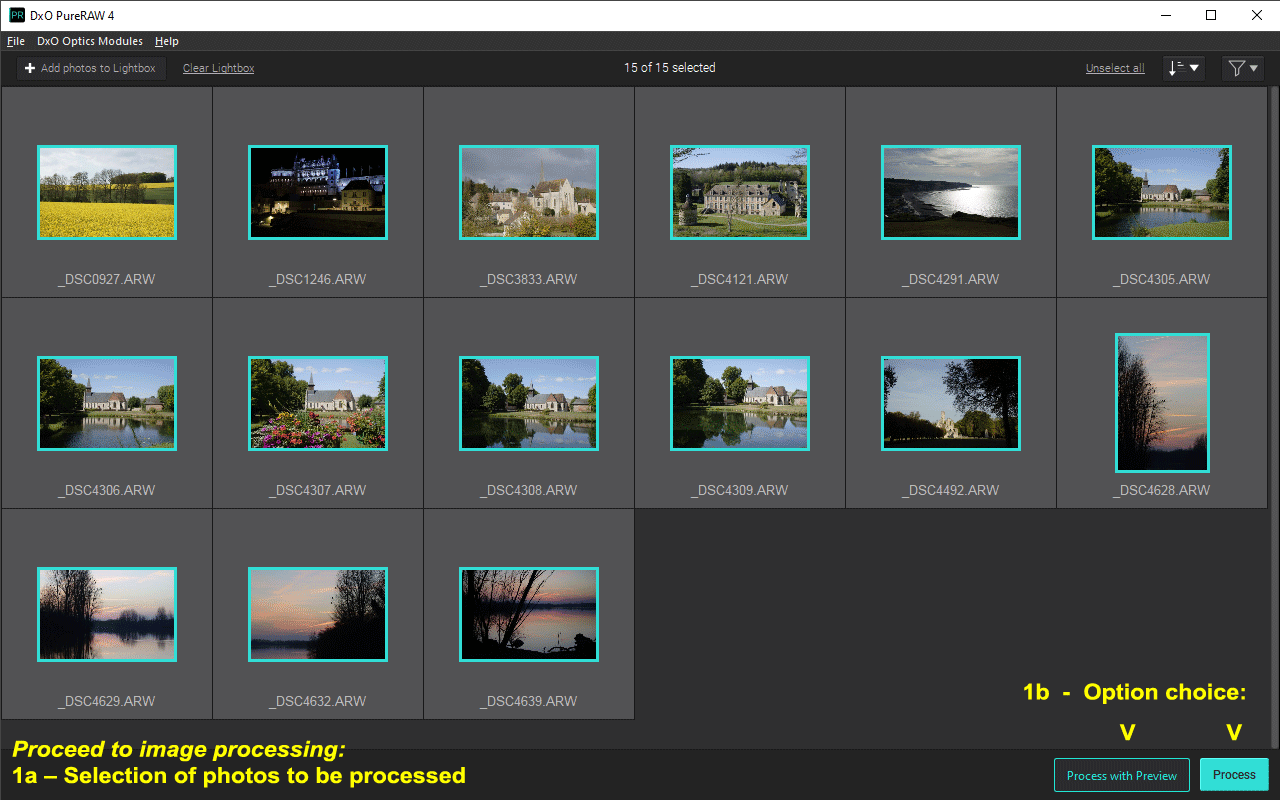
Files are selected by default when they are newly added.
– Select or Unselect the whole, with the button of the toolbar
– Individually by clicking on the thumbnail or by group with CTRL or SHIFT key
Files sorting is done via the button at the top right:
– by file name (initial display)
– by date
– by ISO value range
The sort order is reversed by selecting the same sort criteria again.
Selection and sorting are important functions that allow us to perform a differentiated optimization of groups of images. E. g:
– Sort on ISO values allows you to select the high ISO photos for which to choose DeepPRIME noise treatment
– With another selection, we will choose to use the HQ processing for low ISO files
Double-clicking on a thumbnail opens the viewer window.
– Double click to switch between full screen and preferred zoom value (200%, etc.)
– Button to display preferred value OR wheel to zoom in/out
– Click and hold to navigate through the image
The displayed image is the result of a demosaicing processing without any correction (all options unchecked and no Noise Reduction).
PureRAW never displays the embedded JPEG version in the raw file.
This method makes it easy to see each image. It is an important aid to selection, for example by allowing you to see that a photo is not 100% clear on the screen and that it should be deleted.
The Lightbox can be emptied or the thumbnails deleted one by one.
This is to remove them from the PureRAW environment, never to destroy the files.
Image processing
– Select one or more photos
– Process Immediately start treatment with the current settings
– Process with preview gives access to settings and output options for each image
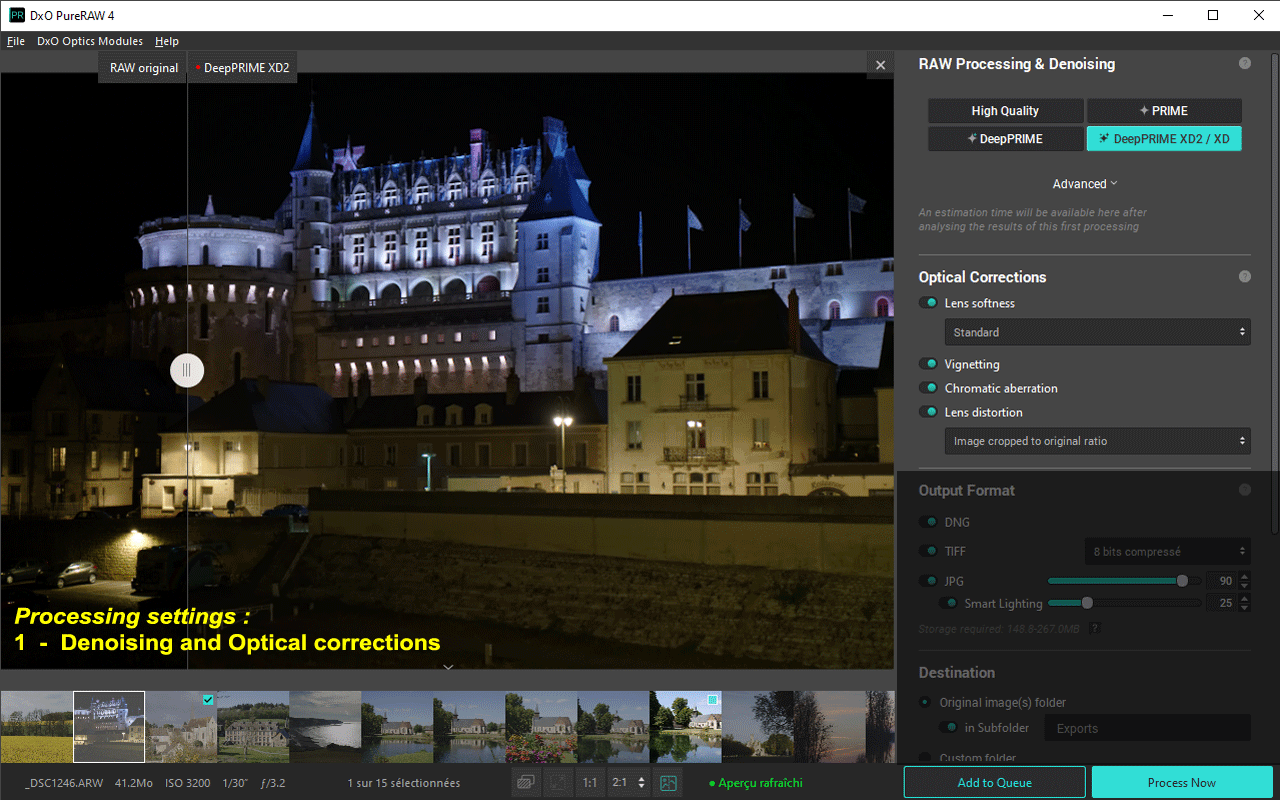
Real-time preview window
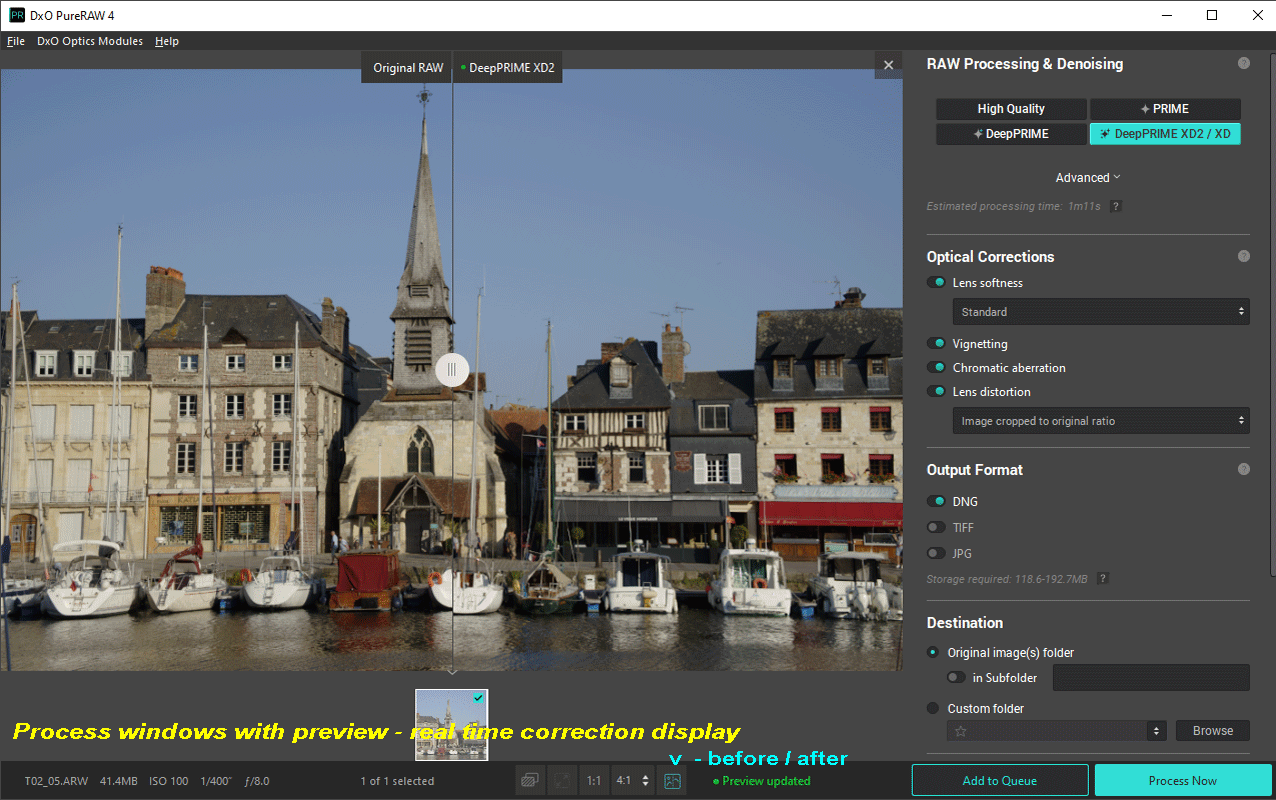
Each image in the Lightbox is displayed in the viewing window at all the current settings.
– Each time the image is modified, the rendering is recalculated in real time
– The impact of each of the denoising technologies and the effects of the various optical corrections are visible throughout the image
– The image is displayed in its entirety or split before/after
– The zoom factor is adjustable from full screen to 16:1 (including 1:1 = 100%)
The new functionalities, DeepPRIME XD2 and real-time display, require a graphics card with a suitable GPU.
Optimization settings
The optimization criteria can be predefined for a group of photos according to the sorting criteria presented previously.
– Click the Add to Queue button
– Specify the correction parameters
– Repeat the operation
– Launch via the Process now button
The optimization window has six groups of settings:
1- Raw processing and Noise reduction technologies
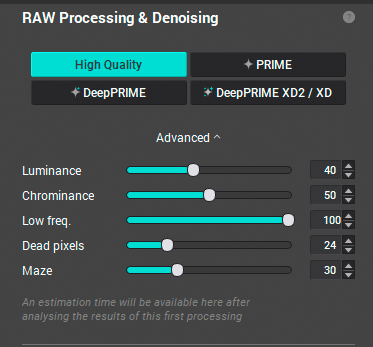
PureRAW offers three demosaicing modes:
– HQ
– PRIME
– deepPRIME and deepPRIME XD2
The HQ and PRIME modes are hidden by an option in the preferences.
DeepPRIME XD2 is the new version of the DeepPRIME XD demosaicer with AI / deep learning denoising.
– Improved noise reduction for more detailed images
– The algorithm is less sensitive to the risk of artefacts; bokeh is respected
DeepPRIME XD2 ne prend pas en charge les fichiers X-trans pour le moment, DeepPRIME XD est proposé en remplacement.
The settings sliders are identical to those in PhotoLab.
See the tutorial “Efficiency with PhotoLab – Noise Reduction“
With a high-performance machine or if processing time is not an obstacle, it is advisable to systematically use DeepPRIME, including for low ISO photos for which the algorithm brings a notable improvement in the dark or underexposed areas.
DeepPRIME XD2 is reserved for delicate photos or those intended to be presented in large format.
2- Optical corrections
The optical corrections are a specificity of DxO from which PureRAW benefits.
These corrections are applied automatically according to the lens module characterized by DxO. In principle, there is no need to deactivate them.
They are presented in four groups:
* Lens softness reinforces the accentuation by contrasting the contours (the pixels at the borders between light and dark areas) present in the image.
They are qualitatively superior to their Adobe equivalents (Sharpness or Blur Mask).
Sharpness can be turned off without affecting other lens correction settings. However, the disabled sharpness is inconsistent since it corresponds to the standard value.
The PureRAW 4 algorithm has been improved. It eliminates any residual effects at light/dark transitions.
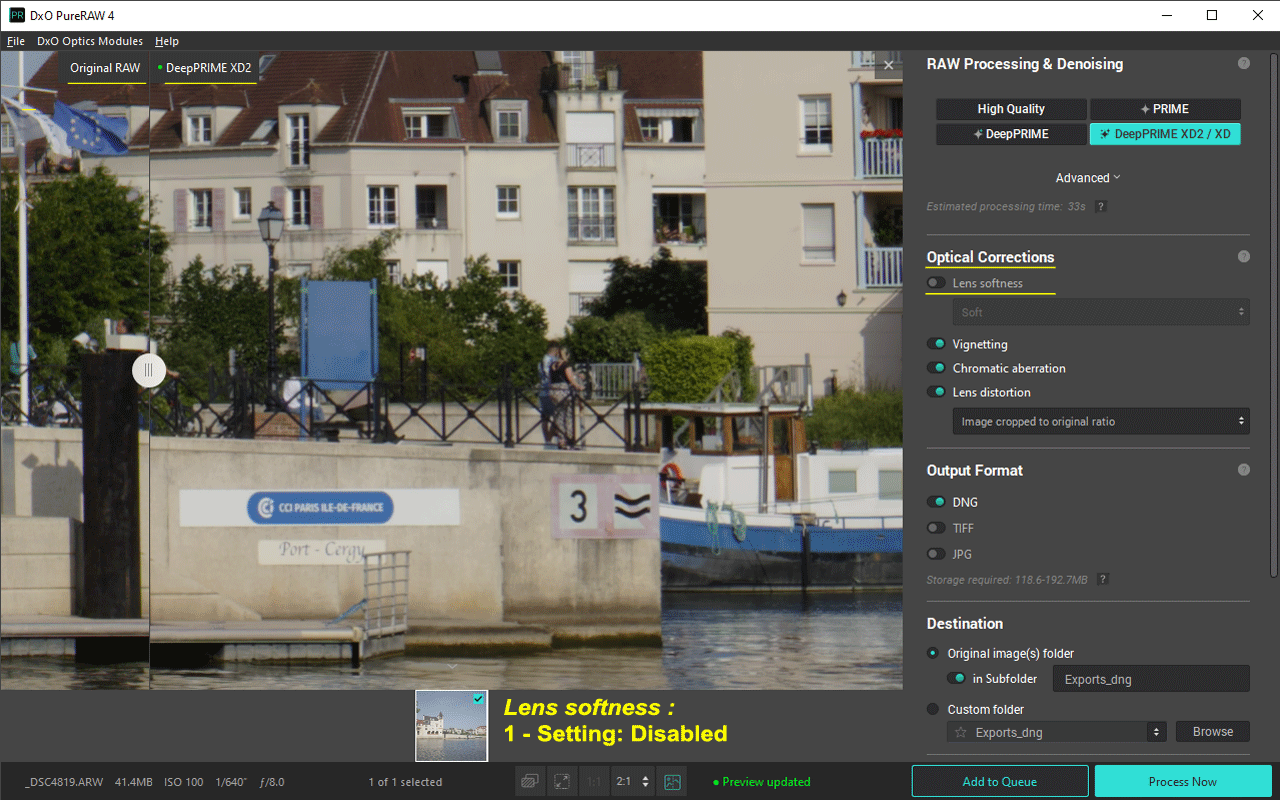
The choice of correction values depends on the purpose of the image.
A reduced format output for web display may require a strong or high correction, whereas a low or standard correction is preferable for an export intended for a large-format print run.
PhotoLab users access this setting through the Detail / Lens Softness correction/ Global. They also have a set of finer adjustments.
PureRAW Standard corresponds to PhotoLab Global +1.
Soft, Strong and Hard values correspond to -1, +2 and +3.
See the tutorial “Mastering PhotoLab – Sharpness Control“
* Vignetting
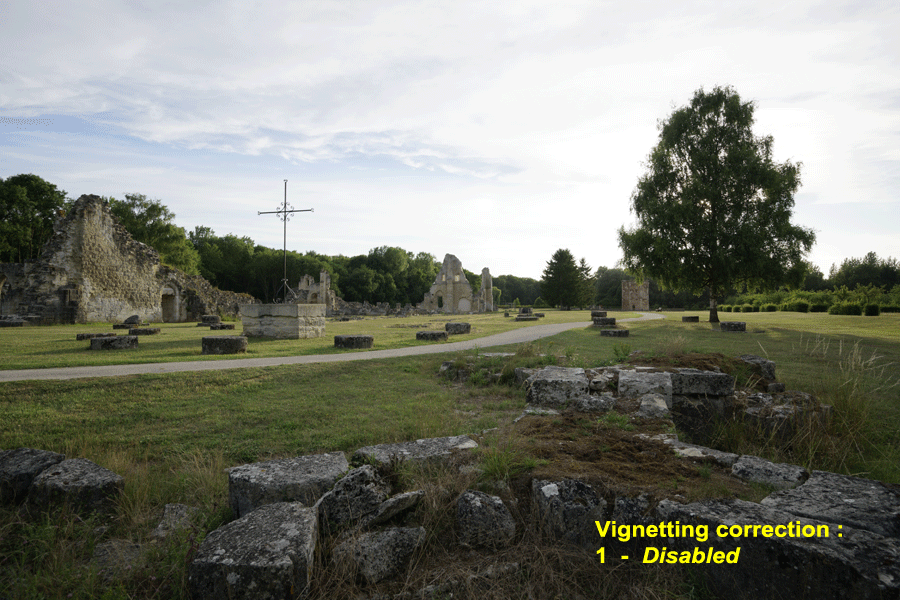
* Chromatic Aberration
These corrections are also linked to the DxO lens module. They must always remain active.
* Lens Distorsion
This is a major point of the corrections module by DxO. It must be systematically activated.
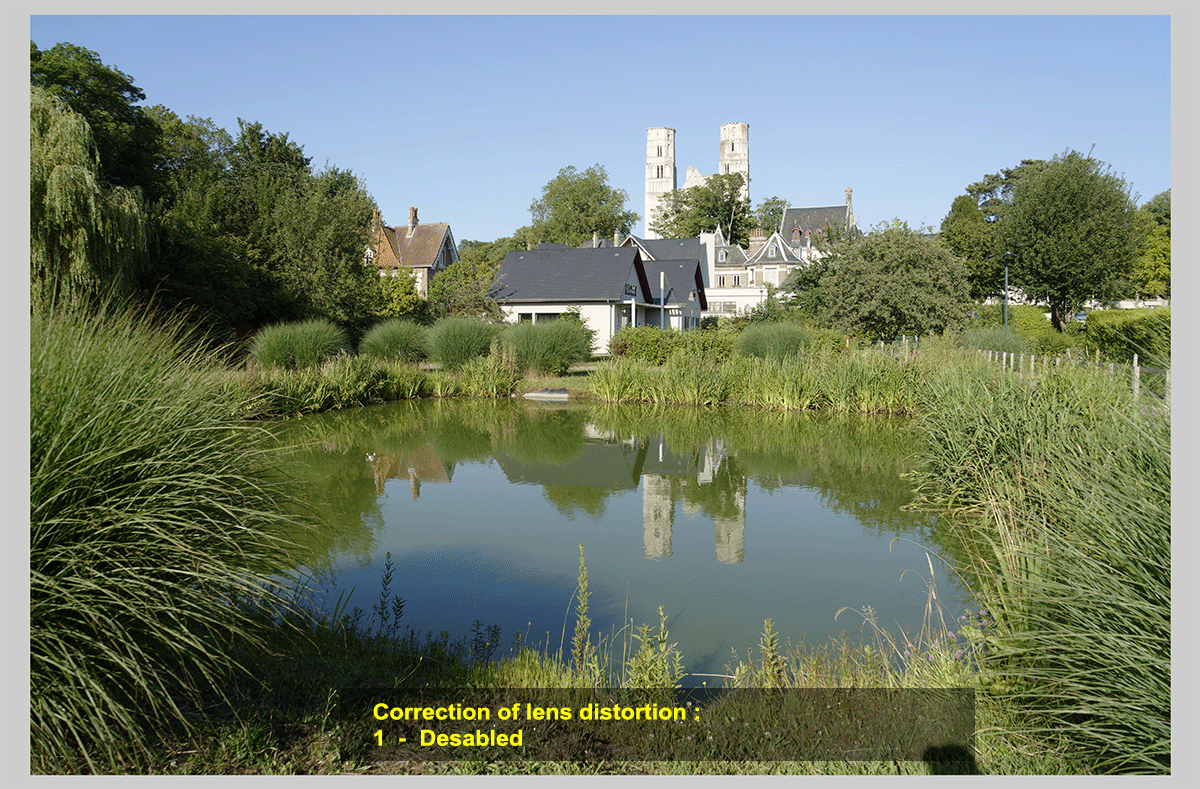
Distortion correction most often results in a very visible change to the edges of the image. The DxO technology is known to exploit to the maximum the pixels located on the edges of the image.
There are three options for cropping the output:
– Image cropped to original ratio; Some side parts may disappear
– Maximum rectangle; The maximum number of pixels is kept
– Complete image area; All pixels of the photo are available and the image is presented in a barrel or pad
See the tutorial “Efficiency with PhotoLab – Cropping“
The Complete image area option allows you to recover interesting areas on the edge of the image in post-processing with a tool like Clone Stamp.
3- Output Format
Three output formats are available. They can all be checked for simultaneous output.
– DNG (linear)
– TIFF, in 8-bit compressed or not, or 16 bits
– JPEG, with quality level adjustment
– SmartLighting. The brightness of JPEG images can be balanced.
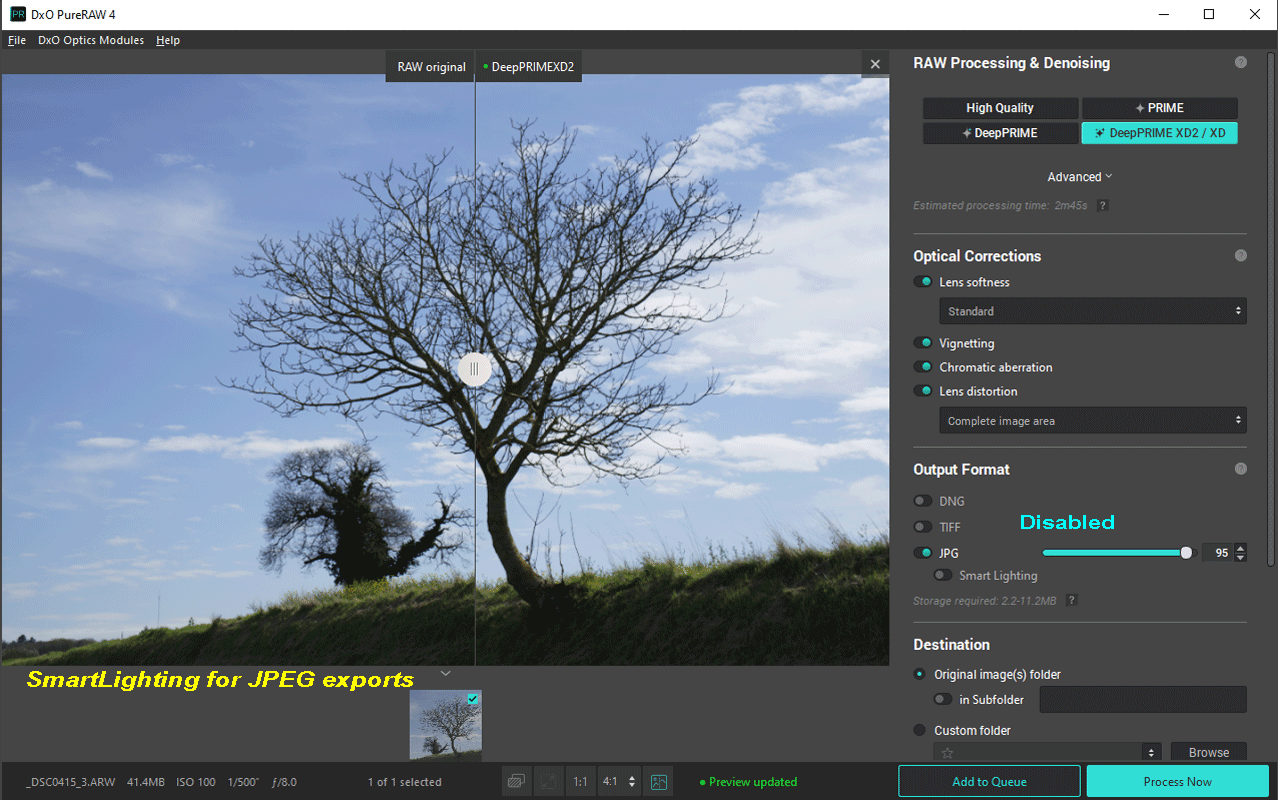
The SmartLighting values shown on the illustration (25-50-75) correspond to the weak/medium/strong settings in PhotoLab.
For multiple outputs (e.g. DNG and/or TIFF and JPEG), the JPEG version is displayed in the preview window.
To view the DNG or TIFF version, temporarily deactivate the JPEG output format.
16-bit TIFF encoding is the preferred choice for uncompromised working quality for later correction in the host software.
However, some software does not accept 16-bit TIFF files.
The choice of JPEG quality level depends on the destination of the file. It is generally advisable to use a high quality (90 – 95%) which can be reduced for images intended for example for a diffusion on the Web.
Note that PureRAW does not allow to resize the output image which remains in the original definition of the camera (possibly cropped using the lens distortion correction).
4- Destination folder
The output files are created
– In the original photos folder
– In a sub-folder, created if it doesn’t exist
– Or in another folder, which may be on another drive, local or network
5- File Renaming
File Renaming is a very important option during the calibration phase of pureRAW for your needs. It allows you to comment by specifying the characteristics of the image optimized by PureRAW.
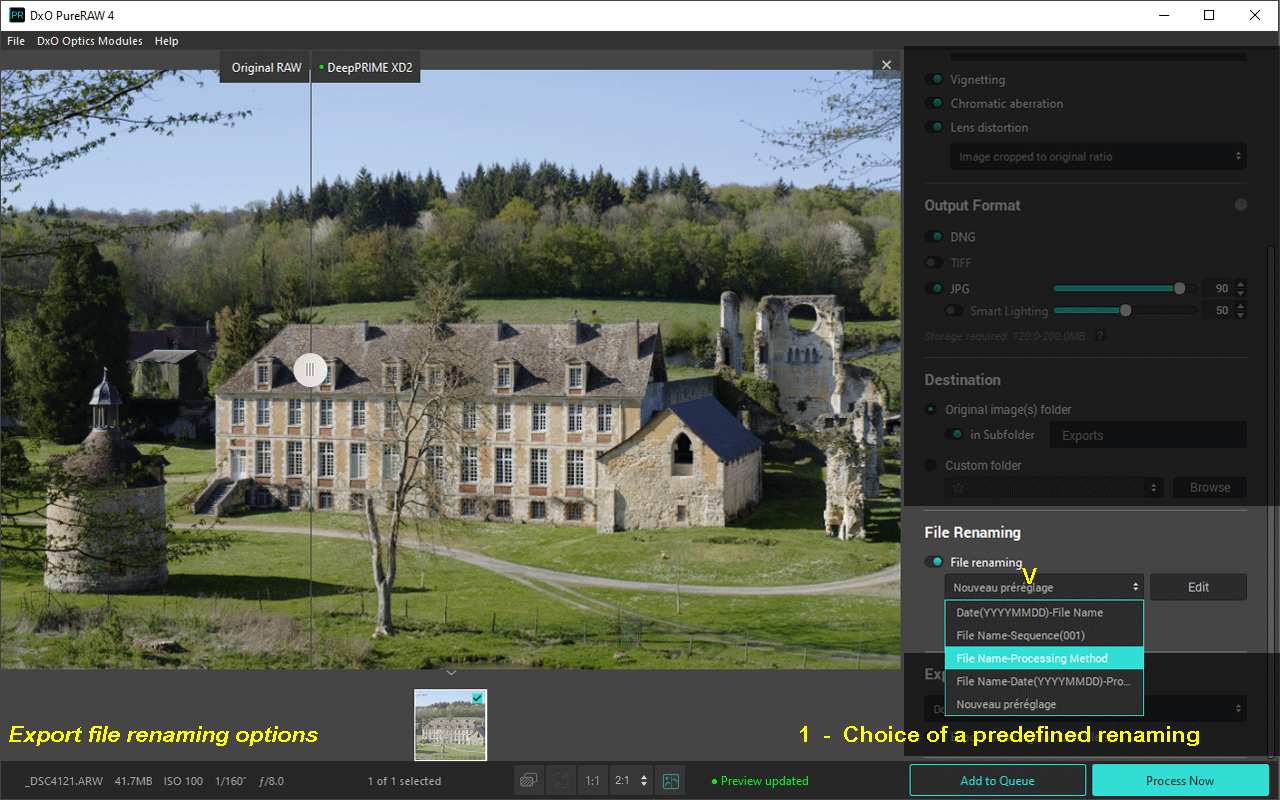
This option is interesting to develop the same image several times with different criteria.
A drop-down list offers 4 predefined renaming templates.
The Modify button enables advanced batch renaming, offering numerous formats with a combination of tokens (contextual data) and free text.
Choices can be saved/recalled in presets.
A preview of the file name shows the result of the renaming choices.
When a previous output has created a first file, an index -2, etc is added to the output file name.
It can be interesting to inform the sharpness correction brought to the image. We have seen that different optimization criteria can be predefined in the queue.
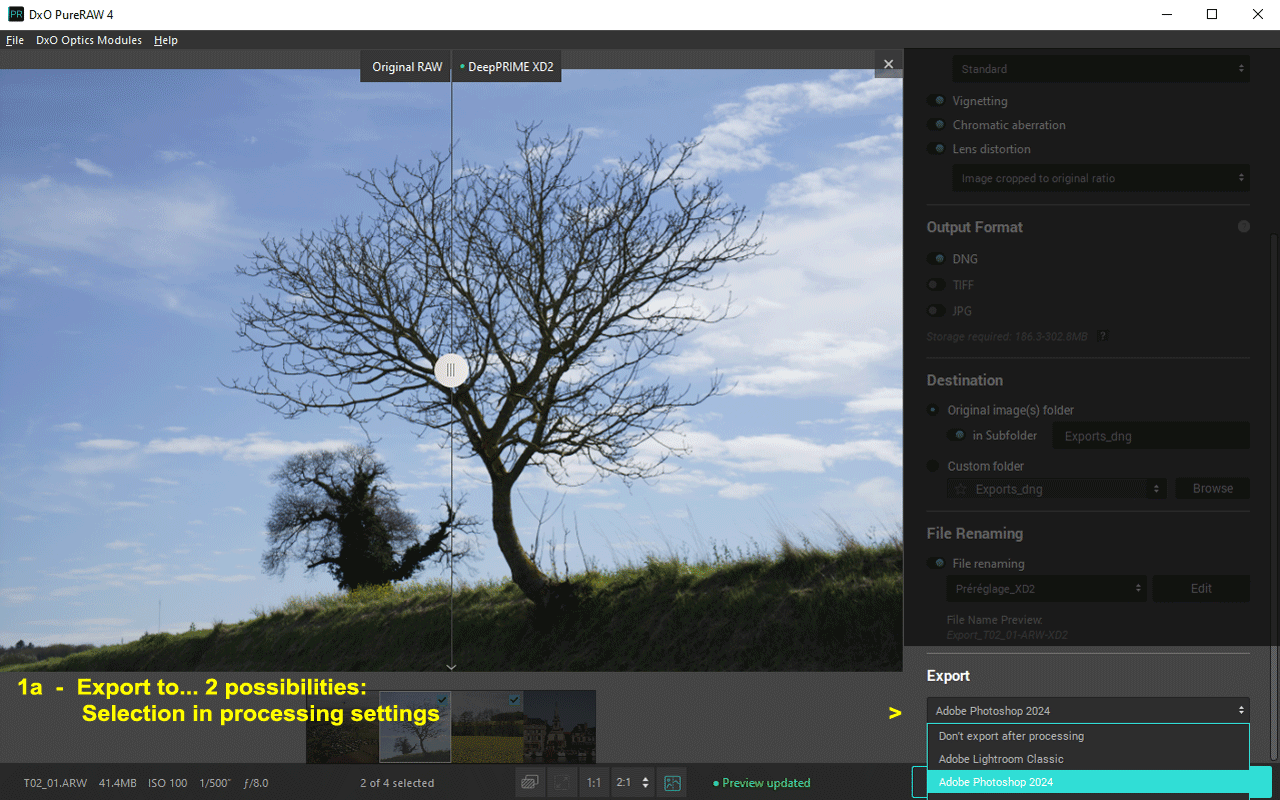
6- Export mode
This option allows you to send the optimized images to the software that will finalize the processing.
– Don’t export after processing: The optimized file.s is.are dropped in the destination folder.
This option is interesting for a sequential workflow; the photos are first optimized and then finalized in a second step
– Select Software to continue working in the automatically opened program at the end of processing (continuous workflow)
– Export with original RAW file(s), export raw files with optimised files
During the installation, PureRAW detected the existing compatible software and filled in the list of choices.
It is possible to add other software to this list.
The export can be requested in the Export setting OR at the end of the processing, the behavior will be identical in both cases.
Be sure to export to a software able to demosaic raw if the format is DNG.
Start the optimization
The files selected in the Lightbox are processed.
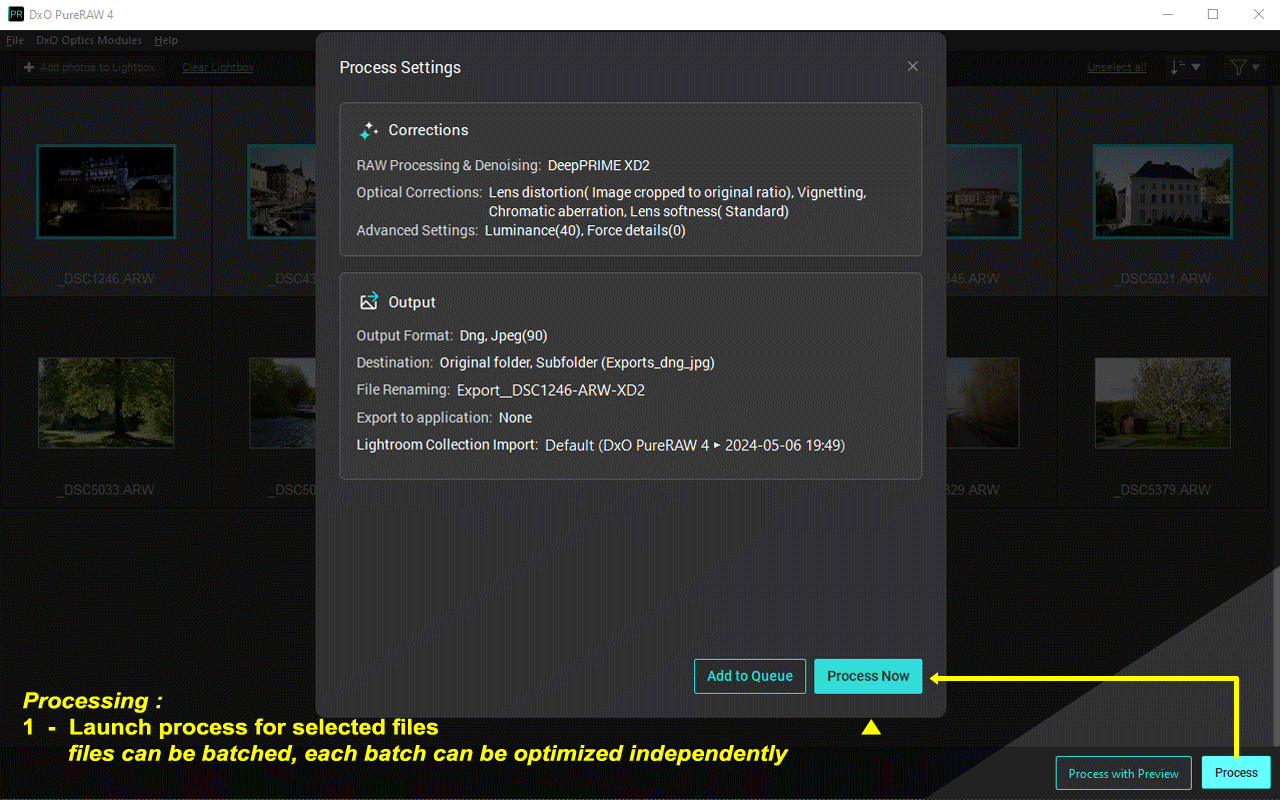
The queue is accessible via the buttons at the bottom of the PureRAW screen.
Files can be distributed in batches.
– Add to queue; allows you to distinguish between different batches
It is not necessary to wait for the end of the treatment of a batch to launch another one.
The sorting options at the top right of the screen allow you to prepare batches according to the nature of the images and/or different settings.
– Show queue; description of the treatment
Change the order (by dragging the thumbnail) to move a photo to the top of the list.
The processed images appear with a check mark on the thumbnail.
The visualization window (double click) is then enriched with two functionalities.
– Button for split display Original / Optimized
– Before / After comparison toggle
Lightbox displays the thumbnail of the optimized image (DNG, TIFF or JPEG), but new output requests are always made from the raw.
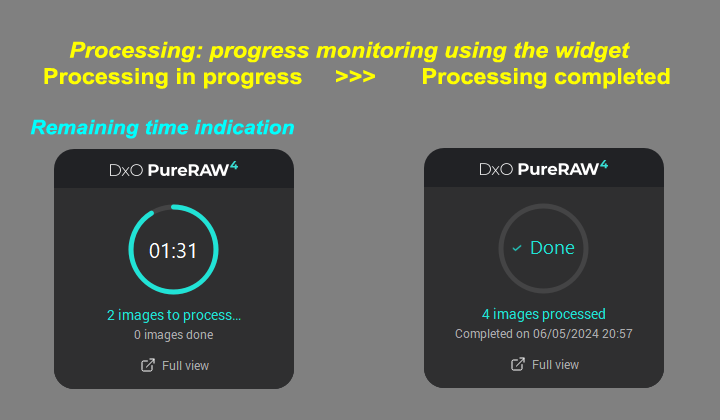
The PureRAW widget can be called up to monitor progress
– Windows: taskbar, bottom right
– Mac: menu bar
Export to a software
The chosen software will automatically open on the optimized files.
– A bitmap editor (Affinity photo, GIMP …) expects a TIFF image
– A raw development software expects a DNG file
Some software can only open one image at a time.
Exporting in DNG to Photoshop opens the Adobe Camera Raw window.
Specific export to Lightroom Classic.
PureRAW opens the Lightroom library on the optimized files folder.
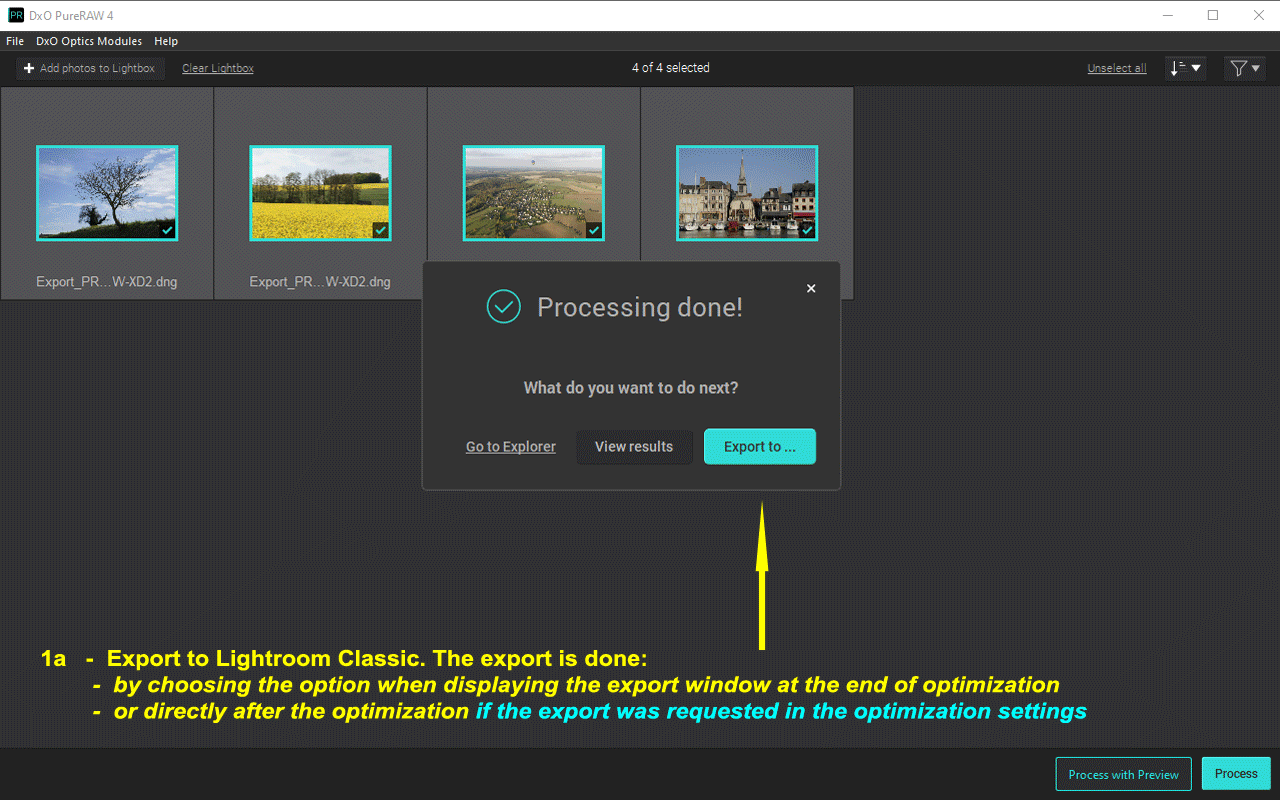
The behavior of this export is different from the plug-in launched from Lightroom Classic; it does not create a collection with the optimized files.
User can choose between the two methods.
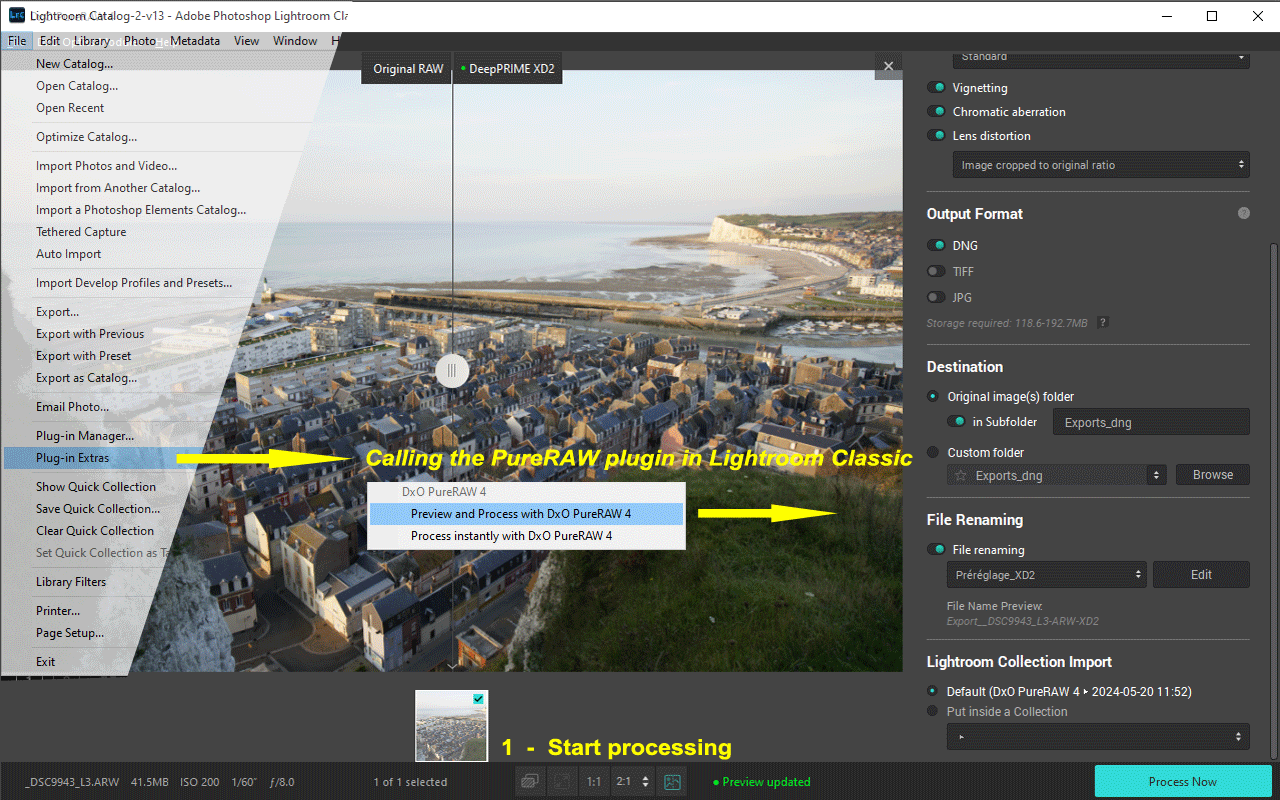
PureRAW as a plug-in for Lightroom Classic
For the expert user of Lightroom Classic, the interest is to stay in their environment. The privileged workflow is the optimization of DNG files directly exploitable by the development module.
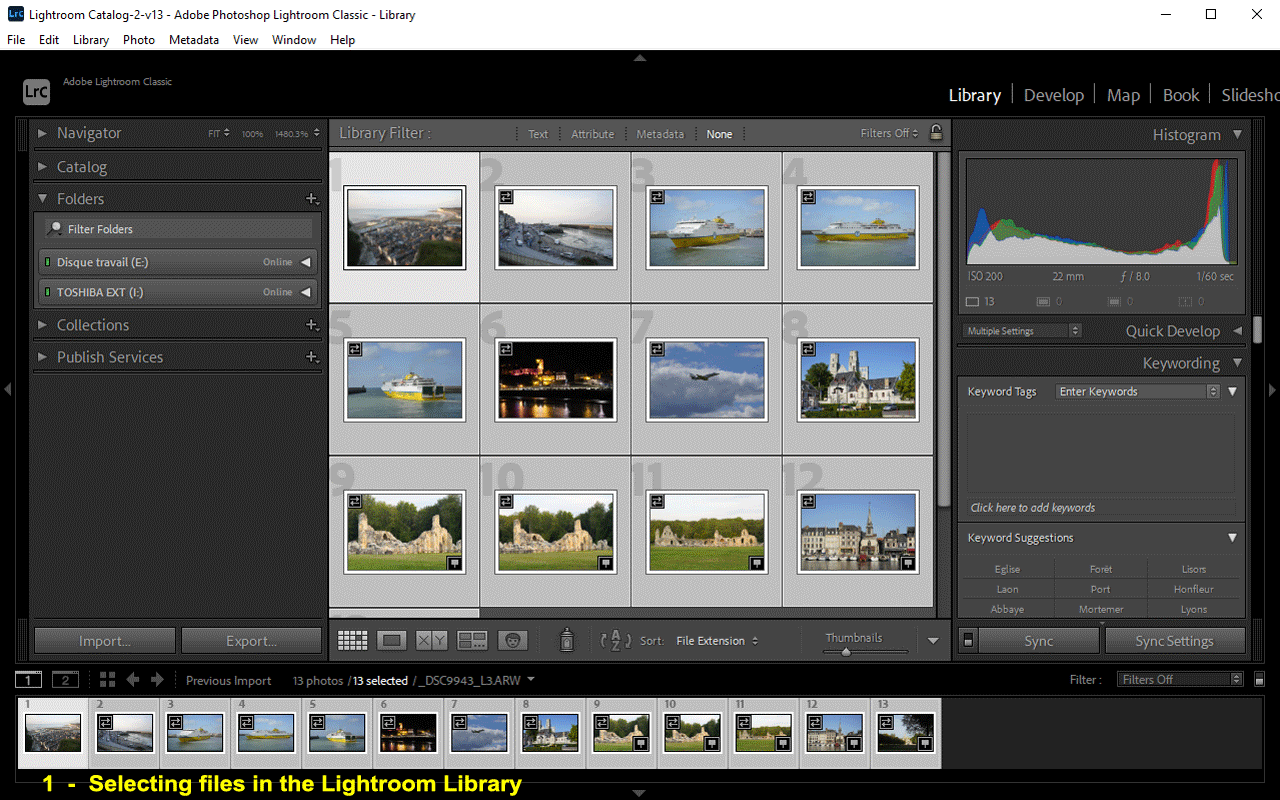
– Raw files are sorted and selected in the Lightroom library
– The PureRAW plug-in is called from the menu File / External Modules – Extra
The adjustments previously made in Lightroom (on the raw) are applied to the DNG file returned by PureRAW.
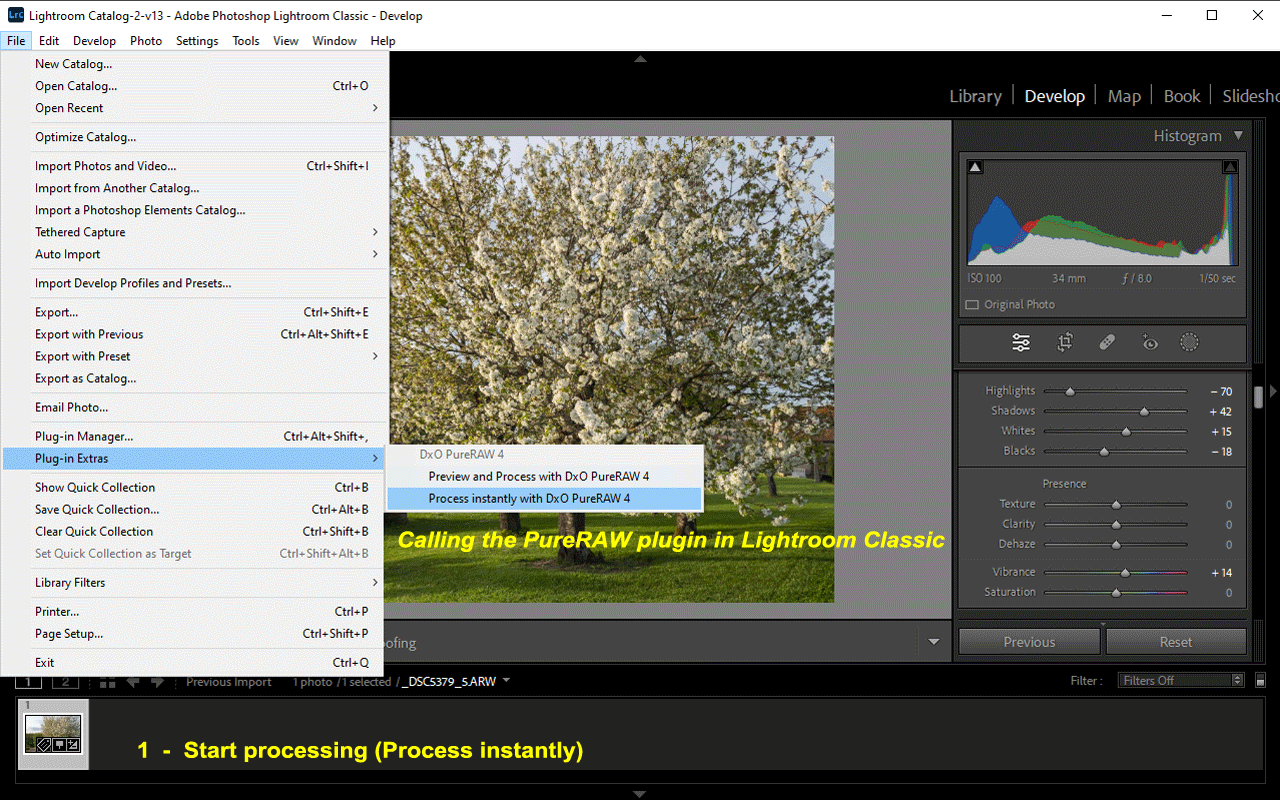
Processing and return in Lightroom
The system opens a processing window with a header specific to Lr.
The settings are the same as the standalone version.
There are two possible workflows in Lightroom:
– Processing with preview gives complete control over optimization settings, with real-time visualization of effects in PureRAW’s preview window
– Instant processing launches optimization with current settings, while allowing certain settings to be modified
When using this procedure (PureRAW as a plugin of Lightroom Classic), a collection is created on return to Lr.
This is not the case when exporting to Lr from the standalone version.
As the optical corrections and denoising are done by PureRAW, the corresponding settings are disabled (grayed out) in ACR / Lr Development module.
Alternative launch mode
From the File Explorer / Finder
– Right-click on one or more raw files
– If necessary, the optical module loading window will be displayed
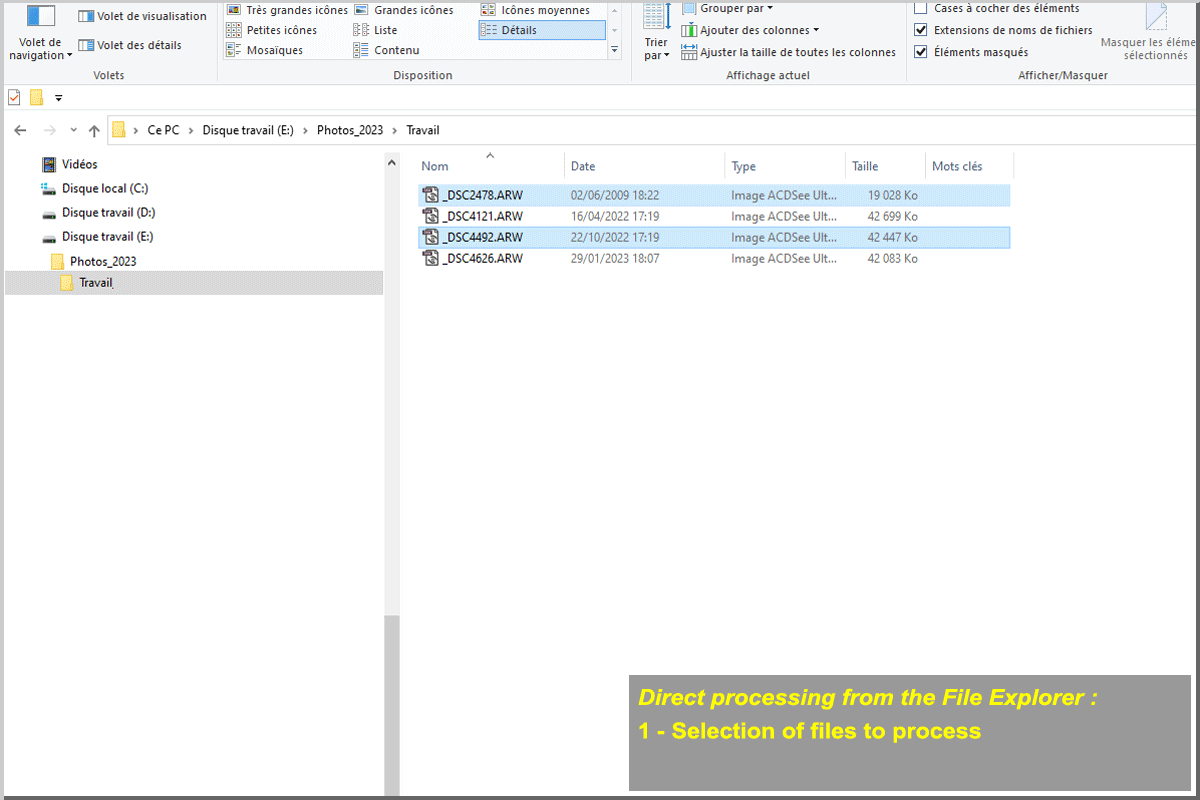
The first four options in the pop-up menu allow you to specify the level of noise processing and the type of output file.
The optimization and destination settings are predefined by DxO and cannot be changed. On the other hand, this method combines simplicity and speed.
The 5th option Process using with application settings is a special one; the treatment is performed according to the settings applied during the last use of the standalone application.
This option implies that at least one optimization with output has been performed beforehand in the software.
However, it allows you to use the full potential of PureRAW’s settings and options in a simplified process.
This method is particularly suitable for expert users.
Prerequisites for using PureRAW
The requirements are the same as for PhotoLab.
* Raw files to be processed are mandatory come from a camera characterized by DxO. DNG files, native or converted by Adobe DNG converter, are accepted under the same conditions
* To benefit from optical corrections and sharpness optimization, it is also necessary that the couple camera + lens is characterized by DxO.
Without a lens module, the processing remains possible but without any image improvement.
* Because of the computational power required by the advanced noise processing features (PRIME, DeepPRIME, and DeepPRIME XD), a suitable graphics card is desirable to use GPU acceleration
See the tutorial “Mastery of PhotoLab – Software and Hardware configuration“
TuToDxO.com – All rights reserved – tous droits réservés