Mode overview
PhotoLab offers five noise reduction algorithms.
The function is called “DxO Denoising Technologies” (sic).
* High Quality, conventional noise processing to be manually adjusted when post-processing raster images (usually JPEG)
* HQ (fast) is a very powerful processing to be applied by default on raw photos.
PhotoLab’s preview window (the main window that shows corrections) includes HQ processing all the time
* PRIME (Probabilistic Raw IMage Enhancement) is known to preserve details and colors. It restores depth to unblocked shadow areas. Its application is stunning on photos taken with older cameras.
* DeepPRIME is more subtle than PRIME. This improved algorithm better preserves color rendering, whether dull or saturated, and enhances micro details
* DeepPRIME’s new denoising functionality: DeepPRIME XD, version “eXtra Details” offers improved detail and denoising capabilities.
DxO included artificial intelligence neural networks (Deep Learning), hence the Deep assistant to the acronym PRIME, to reconstruct lost details.
DxO communicates: “We have subjected our system to reading millions of images produced during testing over the years in a holistic approach, analyzing the image as a whole.”
DeepPRIME replaces PRIME, it requires a good engine.
Alternately using the two versions does not make sense.
Access to PRIME is maintained for users who do not have sufficient hardware resources.
However, the systematic use of DeepPRIME XD is not recommended.
PRIME and its variants are available with PhotoLab Elite Edition.
What is digital noise?
See the tutorial Getting Started with PhotoLab – Noise Reduction
Mode selection
It is recommended to leave HQ (fast) noise reduction active at all times. The software divides the image into areas according to their density. It will process them as closely as possible depending on the characteristics of the camera, ISO sensitivity and luminance, or even apply no noise reduction at all.
In both versions DeepPRIME calls its own demosaicing algorithm which turns out to produce more detailed images.
It may be a good idea to systematically process with DeepPRIME all high ISO photos as well as those for which shadows have been planned.
– For scenes with high light dynamics, DeepPRIME cleans up shadows while preserving colors
– (very) dark scenes are by nature unfavorable to colors. DeepPRIME preserves them but does not work miracles if the colors are too narrow
On the other hand DeepPRIME can highlight skin defects (points, freckles, etc.). Use a negative microContrast Local Adjustment mask.
With PRIME some users observe less vivid colors. DeepPRIME remove the pixels it considers to be parasitic, it is approaching the shade estimated most likely. The error in the reasoning is to consider the result of the HQ processing of the noise as being the reference.
DeepPrime is sufficient in most cases.
Reserve DeepPrime XD when it is necessary to bring out the finest details and structures for large format prints.
DeepPrime XD is also very suitable for heavily cropped photos.
DeepPRIME XD sometimes needs to be refined to get the most out of it.
– The Noise model (Detail) slider applies additional softening or sharpening to the image. ATTENTION of artefacts. The value “0” should therefore be preferred by default
– The Luminance slider allows to define the level of grain smoothing
– The auto value of the dead pixels slider increases for very long exposure times (> 1s). Otherwise it is unique for all cameras, at all ISO speed
– The magic wand resets the recommended values
DeepPRIME XD enhances MicroContrast in fine details without any noticeable sharpness artifacts. But it can also invent a structure. As efficient as it is, DeepPRIME XD is not good for all images. Even though the DeepPRIME image is noisier, it often remains more natural.
DxO says:
All our noise reduction algorithms (HQ, PRIME, DeepPRIME and DeepPRIME XD) are calibrated for each body. This implies for us the knowledge of the amount of noise to expect at a given ISO speed. Thus, the amount of denoising applied is really adapted to each image.
This calibration is accurate enough to use DeepPRIME, but for the XD version this is not quite the case. That’s why we prefer to let the user intervene with the “Details” slider.
Ideally, the “default” denoising value should be automatically estimated on the fly based on the image to avoid refining each image independently.
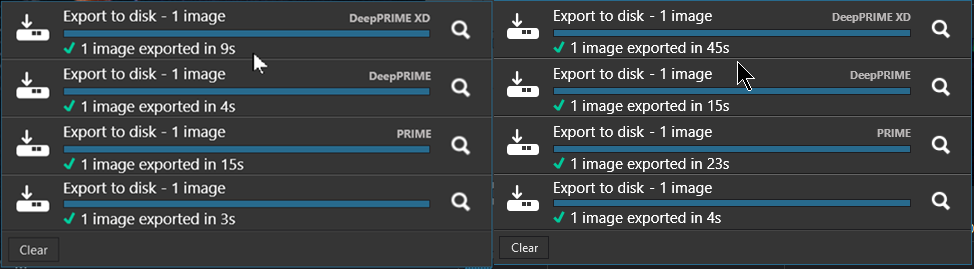
Performance
DeepPRIME requires a muscular configuration with a compatible graphics card (GPU). Transferring the DeepPRIME demosaicing load to the GPU frees up the processor (CPU) to continue working on a stable machine.
The export times risk being very long without a compatible GPU.
When PhotoLab is first launched, this choice is made by DxO.
The Edit / Preferences – Performances – Selection between CPU or Graphics Card menu is used to neutralize or force the activation (it’s worth trying) of incompatible graphics cards. Otherwise leave it on Auto.
DxO says:
If according to the Auto option your machine does not use the GPU.
By forcing it, in the best case the export fails and PhotoLab notifies you.
In the worst case, if the export consumes all GPU resources and freezes the display for more than 3 seconds, the system will restart the GPU and may crash.
To avoid this very unpleasant experience, we make a rather conservative choice by not considering potentially suitable material.
Here is a tip for users with a low power machine.
– Export overnight with the option “Export in DNG with optical corrections and DeepPrime”
– Then develop these DNG photos by benefiting from the noise processing carried out (permanent display)
See the tutorial “Mastery of PhotoLab – Exporting to DNG”
PRIME processings consume a lot of resources, it is not possible to display its effect permanently.
Its action is previewed in a thumbnail whose selection frame can be moved.
BEWARE. Always displaying this preview tile may slow down the system.
– Close the “DxO Denoising Technologies” tool
Résults
When exporting the image, noise reduction is performed at the very beginning of the development process, even before demosaicing. This is done under better conditions and the result is immediately more precise.
Unlike competing software whose noise reduction algorithms degrade the image, Optical Sharpness and MicroContrast corrections are performed on a better basis.
On particularly dirty images the output file size decreases as the noise reduction performance increases.
What could be interpreted as a loss of detail, is in fact the illustration of an artifact-free image.
As an indication, This is the size of the different files of the same JPEG image.
| NR off | HQ | PRIME | DeepPRIME | DeepPRIME XD |
| 6.4 Mo | 2.7 Mo | 2.2 Mo | 1.6 Mo | 1.3 Mo |
See the tutorial “Taking ownership your own image – Noise reduction”
It is possible to filter the thumbnails of images according to the quality of the noise reduction used.
See the tutorial “Photo management- Image Browser filtering“
Let us digress (optional reading) to return to sensor operation, how it collects light and why it results in noise.
We synthesize the various fundamental concepts of photography in a common presentation.Each photosite of the sensor (each defining a pixel) captures photons. The exposure is determined so that they collect just enough before saturation, the clipping. Thus some photosites are “filled” according to the maximum exposure capacity and others less. We classify the result of this capture in bright areas according to fractions (½, ¼, etc.) defining the tonal range of the photo.
The mathematical consequence implies that each area receives half as many photons as the previous one and, therefore, contains half as much information. The most subtle details of the bright areas are rendered while the definition of the dark areas is reduced to a few variations of hues.The maximum number of zones, from white to black, depends on the bit depth of the sensor (typically 12 bits, 14 for some cameras). The information captured on 12 bits is divided into 12 zones called Exposure Value (EV).
The first contains half of all the possible shades, or 212 / 2 (4096 / 2). The second contains half of the rest and so on.
EV zones 1 2 3 4 5 6 7 8 9 10 11 12 Number of shades 2048 1024 512 256 128 64 32 16 8 4 2 1 The dynamic range of the photographed scene is divided into 12 equal fractions but the tonal range recorded in the first zone is expressed in 2048 light shades and the last (2048 times less bright) is expressed to one shade step; “between almost black and twice as much almost black“. Areas of lower brightness are no longer recorded and all result in black pixels.
Note that by underexposing the shot, photographers deprive themselves of the camera’s best definition ranges. One optimization technique is to expose to the right.The only control the photographer can exercise is to increase the ISO speed. The previous table is only correct for the native sensitivity of the sensor (usually 100 ISO but tending to 200 ISO on modern cameras).
In practice; increasing the ISO speed means underexposing the photo.To compensate for this lack of information, the electronic circuits of the sensor amplify the electrical signal received from the photosites filled with fewer photons. This amplification, subject to the laws of the signal / noise ratio, creates more and more visible noise exponentially according to the rise of the denominator of the luminous index fractions (*). The goal is to keep as much detail as possible in the shadows, but with an ever-greater approximation of light nuances..
The tech-savvy reader has already understood; the so-called “digital” sensor of a camera is mainly an analog electronic circuit whose last stage is a digital encoder.The mathematical conversion of digital coding does not fit well the generated approximations, two neighboring pixels defined according to two different shades will be more discriminated in the photo than in reality. Other causes such as thermal noise from long exposures combined with the loss natural definition of a dimly lit scene results in image interference.
(*) Each camera model has its recipe for providing the best possible definition in low light situations
About the first release of the PRIME algorithm:
The recommended power (by the magic wand) of the Luminance blurs too much detail. My own preset setting, “0- Standard”, is set to 30 which still effectively attenuates the fine grain.
Note that the luminance value 0 still removes noise.
PRIME’s Maze setting change the Labyrinth pattern visibility by counteracting the phenomenon which may appear on a frame with a frequency different from that of the DC sensor pixels.Previous versions of DxO Optics Pro processed it automatically, but at the price of general reduced acutance details to fight against a marginal phenomenon.
< See here >
TuToDxO.com – All rights reserved – tous droits réservés.