Unsharp Mask is a classic tool of general use that acts on sharpening by reinforcing the contours present in the image. It can be used on all photos, and in particular for those resulting from camera + lens combinations not characterized by the DxO.
The Lens sharpness is a tool specific to DxO and one of its strong competences. It is only available for camera + lens characterized combinations. This tool should be privileged because it is supposed to bring the right improvement.
The corrections of these two tools should not be combined.
– If there is a lens module, PhotoLab activates (with the preset 1- DxO Standard) the Lens Sharpness and deactivates the Unsharp Mask
– If there is no module, only Unsharp Mask is available
* Please mind. The effect of these settings is visible in the preview only with a zoom value at least of 75% (preferably 100%).
* Use both tools together should be limited to very rare cases. Like adding, as a last step before printing, a slight Unsharp Mask accentuation adapted to the dimensions of the print.
* Direct JPEGs from cameras are usually enhanced. It is generally not necessary or desirable to add more, at the risk of caricatured artifacts.
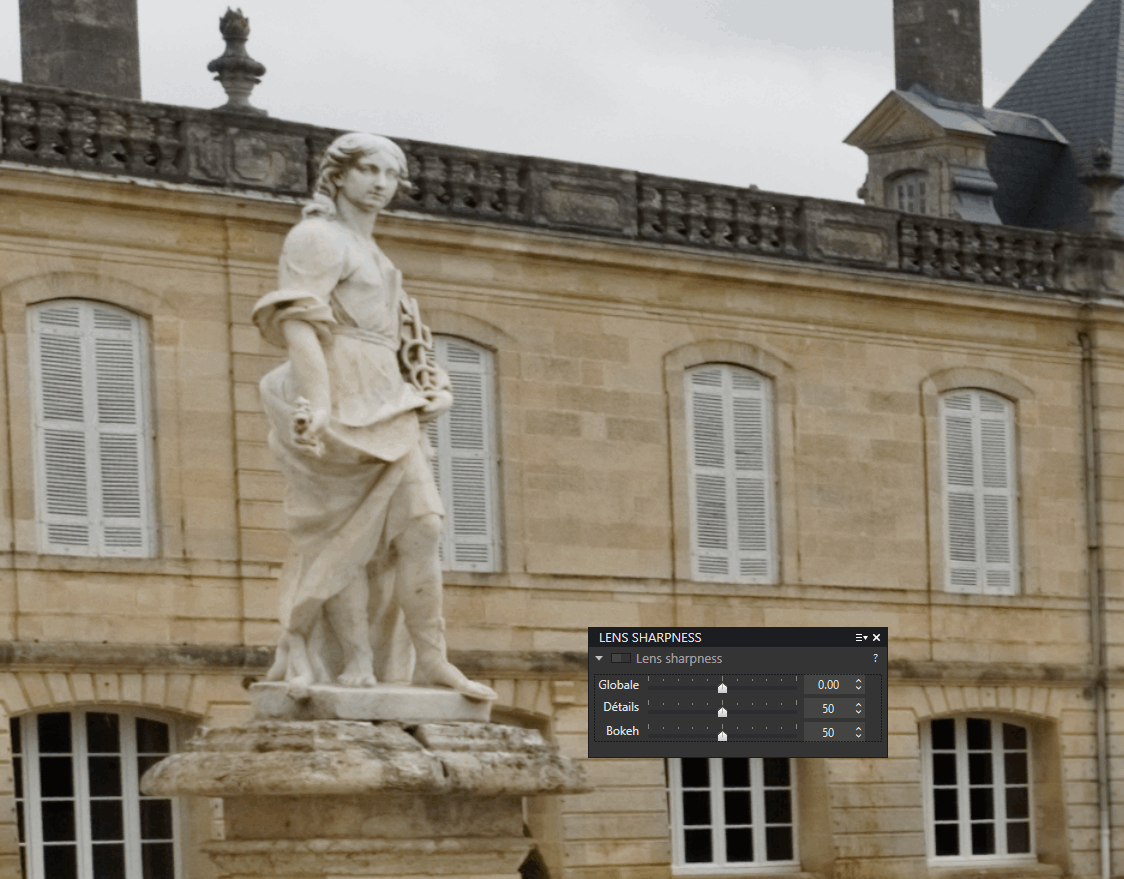
Lens Sharpness
According to DxO:
“Lens Sharpness corrects the problem of a point imaged into a more or less fuzzy spot. The details are enhanced by illumination, or not, of a pixel compared to its neighbors. Depending on the quality of the optics and ISO speed the algorithm applies a deflashing accordingly.”
– Global: The target value (0) of the sharpening defined by DxO for this lens.
Use a negative value usually in portrait, a positive value can be useful for a landscape for example. The value -3 cancels out the extra sharpening
– Details: This slider corresponds to the size of the influence radius.
It acts on the finest details of the image. It can be decreased for a portrait, and increased for a landscape
– Bokeh: (raw only) This slider allows you to limit the sharpening of the blurred background and avoid possible artifacts.
Beware of confusion: The Bokeh slider is not used to amplify the background blur but to preserve its softness by avoiding the creation of artifacts.
* The algorithm action, to default values, is restrained for medium quality optics, and the selected target sharpness is higher on consumer cameras. The numerical values suggested by PhotoLab are indicative.
* The riskof changing these values is to obtain an unsightly and unwanted sharpness effect in the areas outside the depth of field.
* Pushing the sliders too far can generate artifacts.
With optics of average quality, the improvement of the sharpness is amazing.
About the Digital Camera (DC) and optics characterization by DxO:
In order to offer an exclusive optical module for each combo (DC + lens) DxO achieves between 300 and 1000 photos to support a new DC (the useful ISO range and various special parameters making the difference). About one-third serve to make measurements. The rest is used to validate the settings and perform tests.
To characterize a standard zoom, around 300 images are needed for measurements. Then a hundred photos of natural scenes are used to validate the correction profile.
Since it is not possible to characterize an lens on all compatible cameras. DxO has defined laws of passage from one device to another.
More informations on the DxO blog
Unsharp Mask
According to DxO:
“The tool makes a blurred copy of the original picture then subtracts it from the original leaving the finest details which can then be enhanced.
It is unnecessary for JPEG files as in-camera processing has already sharpened them”.
Unsharp mask does not recover the sharpness of a blurred image when shooting.
These starting values are a good starting point:
– Intensity = 100 can set up to 200. Lower values can be used to soften, instead of sharpen an image.
– Radius = 0.5 (value in pixels). It acts on the finesse of the accent by adjusting the thickness on both sides of the contours considered
Over-tuning causes halos to form on the contours
– Threshold = 4. It should stay within a range from 4 to 10. It fixes the boundary of the effect of the correction. This makes it possible to avoid sharpening the smallest details that look just like noise
– Edge offset (specific setting for DxO) lets you homogenize the sharpness between the center and the edges of an image always a little less clear-cut
It is recommended to create a partial preset, e.g: “0 PARTIAL – Laowa 7.5” usable for photos taken under the same conditions.
Keep in mind that excessive sharpening will cause a strong visible halo along the sharp edges of your images.
Other settings contributing to the sharpness
The application of calibrated corrections (including these two features) is located early in the processes chain implemented during export so that measured calibration data can be applied in a meaningful way.
All corrections are linked. For example, the Lens sharpness correction influences the application, more or less strong, of the noise reduction.
In addition to these two sharpness settings, the MicroContrast and Fine Contrast settings should be used for “creative” image enhancement.
It is possible to make local adjustments to sharpness and blur in Local Settings.
TuToDxO.com – All rights reserved – tous droits réservés