The last step in the development process is to export the images.
PhotoLab offers three formats: JPEG, TIFF and linear DNG.
– The blue button with its export list button at the top right of the image browser OR
– Right Click “Export to disk” (Ctrl+K/ Cmd+K) in the current image editing window OR
– Select several images in the Image Explorer and export
It is possible to export several formats or options into a command (Elite edition).
– Choose one or more formats
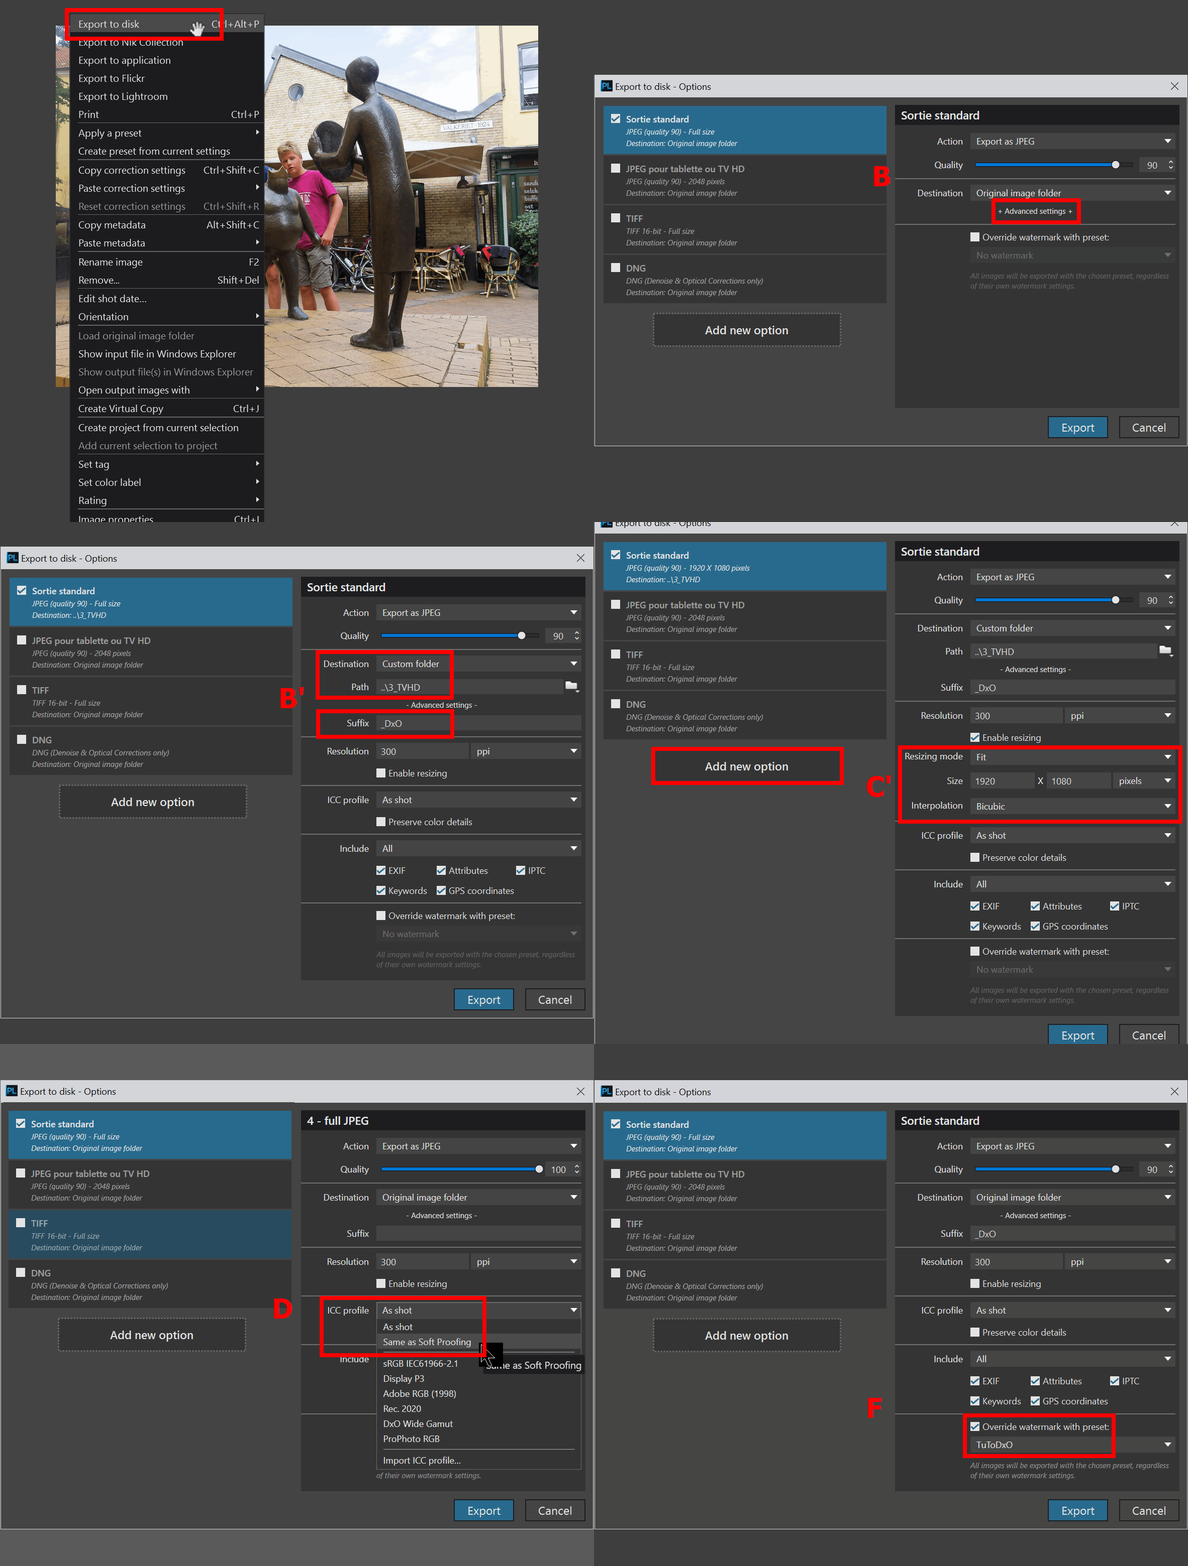
* A- Default export; full-size JPEG compressed (Quality) to 90% > Exporte
* B- Advanced settings, Choose output folder and change suffix
* C- Enable rezising; Resize mode and size > Create a new option (we prefer the term “format”)
* D- Modify the ICC profile of the output image
* E- Select available EXIF fields
* F- Apply an available watermark (not edited during corrections)
Output parameters
* PhotoLab allows to create custom export formats.
– “Add a new option” button, rename it and activate it (we often forget)
– Select output format > “Action: Export as”
These new output formats are added at the end of the list. It is not possible to redefine the order.
To sort the various JPEG formats at the top of the list:
– Delete default TIFF and DNG formats
– Create JPEG formats with explicit names
– Recreate TIFF and DNG formats so that they appear at the end of the lists
The JPEG standard specifies a compression ratio. PhotoLab refers to this as “Quality”.
– Quality (JPEG compression index) = 95% (see illustration above)
JPEG compression value (and method) differs from software to software. It has no absolute meaning.
For PhotoLab, 90% quality output produces files that are four times smaller than uncompressed files.
The 97% value for files half the size is a fine compromise.
When editing a JPEG image (e.g. from a smartphone), the version generated by PhotoLab can be much larger.
This is a JPEG characteristic.
The original file was heavily compressed when it was created. PhotoLab edited the image according to its pixel definition. The new version of the image was exported with a lower compression ratio, and therefore a larger file size.
The presence of local adjustment or repair masks (ReTouch) significantly increases the export time.
* An interesting option of PL is to give a destination folder collecting the exported images.
By default, images are exported in the same folder as native raw photos. Folder contents become confusing.
It is advisable to specify a custom destination folder.
For Windows only:
Images will be exported to a specific folder (absolute path):
– Advanced settings
– Destination – Custom folder – Path = D:\my_images\3_Photos\3_TVHD
A “3_TVHD” subfolder will be automatically created in the raw photo folder.
Note the inverted bar (\) at the beginning of the sequence.
– Destination – Custom folder > Ignore the File Explorer window
– Path= Enter manually: \3_TVHD
There’s a trick to create this folder to a position relative to the raw photos folder.
Note the essential presence of dots (.) at the beginning of the sequence.
– Destination – Custom folder – Path = .\3_TVHD or ..\3_TVHD

For MacOS only:
Images will be exported to a specific folder (absolute path):
– Destination – Folder = 3_TVHD (a Finder window appears)
– Destination – Subfolder = Leave empty
A 3_TVHD subfolder can be automatically created in the raw photos folder.
– Destination – Original image folder
– Destination – Subfolder = 3_TVHD
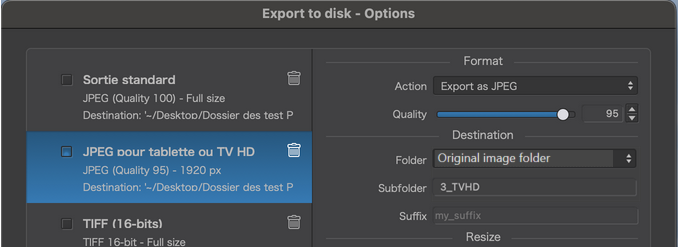
See Table 2, further down the page, for organization tips.
* By default, PhotoLab adds the suffix “_DxO“ to the file name.
This suffix can be removed or modified to comment on a correction applied to this version of the image.
– Advanced settings – Suffix = _DxO
The suffix is optional but applied to all images.
* It allows you to differentiate the original image from the output image.
* The suffix is essential for simultaneous exports in the same folder (with different options). There cannot be two identical file names: image.jpg.
Resize the image
Downsizing is more effective at reducing file size and qualitatively better than high compression for broadcast images.
PhotoLab offers six resizing options.
The simplest example is to take the preparation for projection on a 1920 x 1080 pixel HD TV screen of a report composed of Horizontal and Vertical images (landscape and portrait oriented) from a 4/3 format camera of 4600 x 3450 pixels.
Required target image are: width = 1920 x height = 1080.
* Fit is the classic option offered by all software.
PhotoLab resizes the image to be exported to the largest possible size when the ratios of the original photo and the requested image are different.
Its name does not specify it, but depending on the orientation of the image to be exported, Horizontal or Vertical, the output rectangle is rotated by 90° to exploit (to fit) the largest possible size of the container (the output image).
This is the recommended option for printing.
The order of the boxes in the export window, 1920 < x > 1080, is indifferent.
The largest possible dimension of our example, height 1080 px, is respected but the requested width, 1920 px, is not attainable.
– Horizontal image is output in 1440 x 1080 px
– Vertical image is output in 1080 x 1440 px
* Rotate to fit.
The adjusted image is constrained to the maximum Horizontal AND Vertical output dimensions.
So it doesn’t turn, it’s the destination medium that turns!
In our TV screen example, we expect an image enclosed in an invariant medium of 1920 px maximum width and 1080 px height. So our vertical image is always 1080 px high.
– Horizontal image is output in 1440 x 1080 px
– Vertical image is output in 810 x 1080 px
* Longest side or Shortest side.
– The Horizontal or Vertical image comes out respecting the instruction
The dimension of the other side has no constraint
* Megapixel.
This is the output size of the image in pixels, not the file size 😉
It is not possible to impose an output file size on PhotoLab.
* Proportional.
100% is equivalent to the “Full JPEG” profile option
Resizing in centimeters or inches is the only option that requires that you enter the resolution (in Dots Per Inch or Dots Per Cm).
See the tutorial “Appendices – Definition and resolution” which explains why the resolution of a digital image (in a file) is irrelevant.
For computer display (mail or social media), the necessary dimensions are much smaller and sometimes imposed.
Dimensions of social media images
For my use, I created several profiles JPEG depending on the destination of the images.
– Full JPEG = full format for comparison of different versions and virtual copies during the development phase. As well as files for printing
– HDTV = Rotate to fit 1920 x 1080 to speed up the display on the TV
– Diffusion = Longest side 1280 pixels for full-frame display on all screens, computers and tablets (dimension maybe to be updated today!?)
– Web = Long side 800 pixels compressed at 90% for social networks and mailings
– 16-bit TIFF for post-processing in image processing software (Affinity Photo, PhotoShop, GIMP, …) as well as fine art prints (see table 2)
See the overview of DNG format output options and how they differ from TIFF format in the tutorial Mastering PhotoLab – Two DNG export modes
The following table shows a suggested organization of profiles according to the folders used to classify finished photos.
Picture system folders \ [date_description] > one folder per photo reportage
then a series of subfolders:
\ 1_web_complete All photos in web format (1280 px)
\ 2_web_diffused Best photos in reduced web format (800 px)
\ 3_TVHD Best photos in HDTV format
\ 4_JPEG Photos for print (destroyed after printing)
\ 5_RAW_PL7 Raw + dop photos
\ 6_Affinity TIFF photos for editing > JPEG output will go into 3_TVHD
\ 9_rejected Interesting or duplicate raw photos > deleted in final ranking

* PhotoLab offers three interpolation methods for resizing.
DxO advises to export with the bicubic option.
For the record, interpolation in photography (or resampling) was originally a method of producing missing pixels when increasing the image definition. Today it is used to reduce this definition by producing a new pixel from the analysis of its neighbors on the original image.
– Bicubic interpolation is an image enhancement method based on the examination of the sixteen surrounding pixels. It produces smooth edges with less pixelation and fewer artifacts but sometimes making the image bland.
– Bicubic sharper interpolation is a variant based on bicubic interpolation with improved sharpness by enhancing contrast. This method preserves the details in a resampled image of small dimensions intended for display on screen.
– Bilinear interpolation is a method that harmonizes the pixels by averaging the values of colors of four neighboring pixels. It produces smoother images but handles transitions poorly (pixelation). It is perfect for large prints and digital images.
I did tests on detailed and smooth images (gradients) of 4000 pixels (Original format ratio 1:1).- For an output format reduced by half, I do not see any difference between bilinear and bicubic. Bicubic sharper produces an image that is too accentuated
– With an aspect ratio reduction of 1:4 and 1:8. the bicubic sharper interpolation is interesting
ICC Profil
Leave the “As shot” ICC profile; the profile selected in the camera at the time of shooting, usually sRGB, which is suitable … except for experts 😉
If a soft-proofing or ICC profile is selected, check the “Preserve color details” box to take into account the intensity value applied to this profile.
Choose a ICC color profile: sRVB, Adobe RVB etc…
– Windows: C:\Windows\System32\spool\drivers\color
– Mac OS: /Users/~/Library/ColorSync/Profiles/Recommended folder
Prophoto ICC profiles are available from these sites :
https://sites.google.com/site/chromasoft/icmprofiles
(this page also offers a few Prophoto variants)
http://www.color.org/chardata/rgb/rommrgb.xalter
(don’t mind the ROMM RGB name, it’s Prophoto)
Take a look on this DxO forum page
https://feedback.dxo.com/t/tiff-export-in-prophoto/5285
See the tutorial articles Mastery of PhotoLab – the Color process
Metadatas and watermark
* Select the metadatas fields that will be used to create the image.
It may be advisable to remove them for images intended for websites.
– EXIF includes information about the camera and shooting parameters
– Attributes, selection status, rating and stars
– IPTC content metadata; copyright, photographer’s name, locations and descriptions
– Keywords created in PhotoLab or imported from photo management software
– GPS coordinates inherited from the camera or created in PhotoLab
See the tutorial on Photos managing
* Replace the watermark with a preset – Box unchecked (default position)
– If the edited image has no watermark, this option has no effect
– If a watermark has been edited and remains visible on the screen, it will be applied to the output image
* Replace the watermark with a preset – No watermark
– If a watermark is displayed on the screen, it will be removed
This option prevents watermarking.
* Replace the watermark with a preset – Choose a preset
– An available watermark, not displayed on screen, will be added
This option is useful for multiple exports, as different versions have different watermarks.
See the tutorial Mastery of PhotoLab – Watermark
During installation, PhotoLab evaluates the computer performance(*):
* Determines the number of photos to be processed simultaneously when exporting
A inappropriate number of parallel processes, depending on available memory, degrades performance because the system is forced to swap
* Recommends to use the graphics card processor if it is significantly more powerful than the core (Windows)
* The output unit performances (read / write speed, buffer) are essentials
– The Edit / Application – Preferences – Performance menu provides access to these choices
(*) Delete the results file to restart the test.
Windows: C:\ Users \ <user>\ DxO \ DxO PhotoLab <version> \ ocl64.cache
Mac OS: / Users / ~ / Library / Caches / com.dxo.PhotoLab <version> /
See the tutorial “Mastery of PhotoLab – Software and Hardware configuration“
TuToDxO.com – All rights reserved – tous droits réservés.
