A preset is a collection of corrections applied in one step.
PhotoLab presents the corrections in palettes classified by area of intervention. The raw photo is developed by successively applying these corrections. The presets do not need this classification.
The presets are interesting for starting the development by systematically applying the most used corrections. Both PhotoLab specific and personal favorite adjustments.
A personal preset can contain the complete development recipe to be applied to a whole series of photos, or just the corrections systematically applied when the photo is opened, before any intervention (2- DxO Standard).
Between these two extremes, a dedicated preset (sunny landscape, dark interior, etc.) usually provides a base from which you can develop your images.Some users don’t want any automatic intervention on their photos. They’ll prefer preset 3- Optical corrections only.
As we’ll see later, preset 6- No correction is not a good idea.
Since release 7 PhotoLab applies a very typical preset by default (1- DxO Style – Natural), supposed to improve all images with the same recipe (sic).
We recommend that you modify this behaviour
– Menu: Edition (Windows) / Application (MacOS) – Preferences – General
– Auto apply preset for RAW images
– Choose the preset 2- DxO Standard
Starting preset
PhotoLab applies the “2- DxO Standard” preset when opening the photo. These are the basic improvements that the software provides. This preset is very efficient when the Digital Camera body+ Lens combo is supported.
See the tutorial “Mastery of PhotoLab – Hardware characterization“
The “2- DxO Standard” preset automatically applies a set of preliminary corrections. They are detailed in the corresponding chapters.
* Slight Smart Lighting to balance the light
* HQ Noise Reduction
* Adjustment of Lens Sharpness to maximize the blur reduction
* Lens Distortion canceling
* Suppression of Chromatic Aberrations
* Vignetting correction depending on the diaphragm used
* Protection of saturated colors avoiding flattened areas
– Click on the “Compare” button (Windows: Ctrl + D / Mac OS X: D) to see the improvement
User then intervenes on an automatically enhanced image and immediately focuses on its finalization.
These corrections are a starting proposal that must be customized to the user’s taste.
Automation is at the heart of DxO’s unique approach to photo development. PhotoLab does not just apply recipes but performs a custom calculation according to the technical data (gear) of the shooting and the lighting of the scene (corrections).
Most often, all you need to do is make small adjustments to finalize the image.
* This “2- DxO Standard” input preset is designed to suit a majority of photographers and showcase the skills of PhotoLab.
* The effects are more pronounced on photos from entry-level cameras.
Personal preset
Some users find this initial proposal too contrasty and too accentuated, even too saturated.
It is a starting point, photographers must take ownership of their image.
It is also possible to prepare the presentation of future adjustments for more efficiency.
Example of a personal preset, for use mainly with landscapes and street photos, in addition to the “1- DxO Standard” preset.
See the details of the corrections in the corresponding chapters.
* Smart Lighting with Spot mode (without detected faces it is equivalent to Uniform mode)
* ClearView not activated but preselected at value 15
* MicroContrast activated on the Automatic value
* Color enhancement, not activated but set at Vibrance 20 and Saturation -20
* HQ noise reduction with Luminance 30
* Cropping , disabled to appreciate the effect of Horizon or Auto Perspective
* DxO ViewPoint – Perspective – preselected value 90
* DxO ViewPoint – Volume Deformation – Preset to 80
* DxO FilmPack – Filter – Warm tone 10 preselected
Create a personal preset ex:”0- Standard”
– Right Click on the image “Create preset from current adjustments”
For an efficient workflow, Apply systematically to photos discovered by PhotoLab. It becomes the starting preset.
– Menu: Edit / Application – Preferences – General – Auto apply preset for RAW images
Then the “RESET” button reloads this starting preset and cancels all previously applied settings.
Alternative presets
The “3- DxO Optical corrections only” preset is intended for users who want to control the application of technical improvements and implement only those corrections they deem useful. This way the images benefit from DxO’s expert improvements that the user does not have to worry about.
DxO also offers the “6- No correction” preset.
Doing without calibrated corrections for no reason is a mistake. There are alternatives.
The three presets presented so far are the complete presets delivered by the software. They activate / inhibit the “technical” features of PhotoLab. Using them during the development process means cancelling all the adjustments made to the photo.
The other presets delivered are partial, they only intervene on certain functions.
Other complementary adjustments can be applied immediately:
* “4 – Neutral colors” to fade the effect considered a little too flashy by some
* “Portrait – Standard or Bright” and “Neutral Landscape” from series “1 – Portrait and Landscape”

BEWARE. These presets must be applied after “2- DxO Standard“.
Partial preset
The application of a preset makes sense when opening a series of photos. However, it can be used in the process of work. This preset must be of the “partial” type, i.e. it modifies only the corrections where it is to be applied.
There is no explicit distinction between the two types of presets. PhotoLab only creates complete presets. They must be taken over to be transformed into partial presets (Elite edition only).
– Edit a completed preset
– Uncheck the corrections not concerned
For example, apply a complete personal preset without color enhancement would overwrite the enhancement if it was previously done.
There are two steps to creating a partial preset.
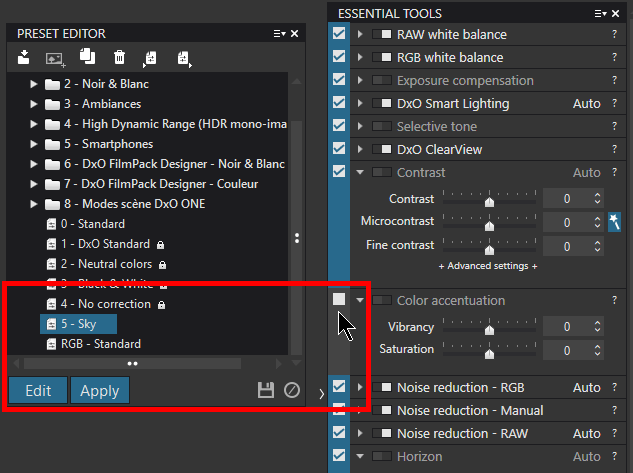
– Make a set of adjustments and create an preset named “5 – Sky”
– Right click: “Create a preset from the current settings”.
This preset is of the full type.
To avoid overwriting already applied adjustments (illustration) :
From the “Preset Editor” palette
– Select “5 -Sky” then the Edit button
– Uncheck the “Color Accentuation” correction
– Edit” button to Save (illustration)
This preset is now of the partial type.

Another method is to build your own preset.
From the “Preset Editor” palette
– Right click “New empty preset”.
– Rename then Edit
– Select the corrections
* Only the Elite edition has this feature
* Be sure to activate only the relevant corrections
* It is better to create basic presets, then create a final preset
Please note. By “correction/ adjustment” we mean all the parameters of the same tool (e.g. the four selective tone correction sliders).
The successive application of two partial presets on the same correction does not complete it but overwrites the previous values.
You can create as many presets as you need.
Personally I limit myself to very few presets. In fact, I present them all in these tutorials.
* It seems more efficient to me to create a few main presets and then adjust the settings
* You can also create a temporary preset for a series of images and then delete it, or move it to a personal series to be used later
See the tutorial “Mastery of PhotoLab – Batch Processing” provides solutions to adjust a preset over a series of images.
Preset management
The main presets are directly accessible:
* 1- DxO style – Natural
* 2- DxO standard
* 3- Optical corrections only
* 4- Neutral colors
* 5- Black & White
* 6- No correction
* Add here yours presets
Other presets are offered by series.
These are interesting starting points to quickly shade images, as well as the best way to convert images.
* 1- Portrait and Landscape
* 2- Black & White
* 3- Atmospheres
* 4- High Dynamic Range (HDR single frame)
* 5- Smartphones
* 6 and following when the FilmPack plug-in is installed
* Create here your own set of presets
The “6- DxO FilmPack Designer” preset set (license required) is highly recommended for black and white conversion.
A DxO forum member offers all FilmPack films as thumbnails for previewing.
To be download here, for FilmPack5 or FilmPack6
General note about presets.
The function “import personal presets” one by one has no interest. Just copy them from old version to the next.
Windows: C:\ Users \ <user> \ AppData \ Local\DxO \ DxO PhotoLab <version> \ Presets
Mac OS: / Users / ~ / Library / DxO PhotoLab <version> / Presets
When updating the software, the personal presets are copied to the new version.
See the tutorial “Mastery of PhotoLab – Software and Hardware configuration“
This manipulation may crash the software. Also to recycling presets from version to version holds the risk of ignoring important changes, since DxO regularly parameters of functions.
TuToDxO.com – All rights reserved – tous droits réservés.


