Sommaire
White Balance adjust is a preliminary common to all raw development software. That is why it is placed at the beginning of the “Basic Tools” palette whose tools are ordered to be reviewed from top to bottom.
The setting of the White Balance is fundamental, it has implications on the brightness, contrast and colors. You should not return to it during processing or question all the settings made.
See a few thoughts in the tutorial “Starting developing“
Generalities
The most efficient way to assign a color temperature to the scene’s illuminant is to use the Temperature slider to set the color rendering according to its memory.
The initial value, displayed by PL, is the estimation made by the camera (EXIF) when the picture was taken. It is indicative.
– Double click on the cursor to recall this value
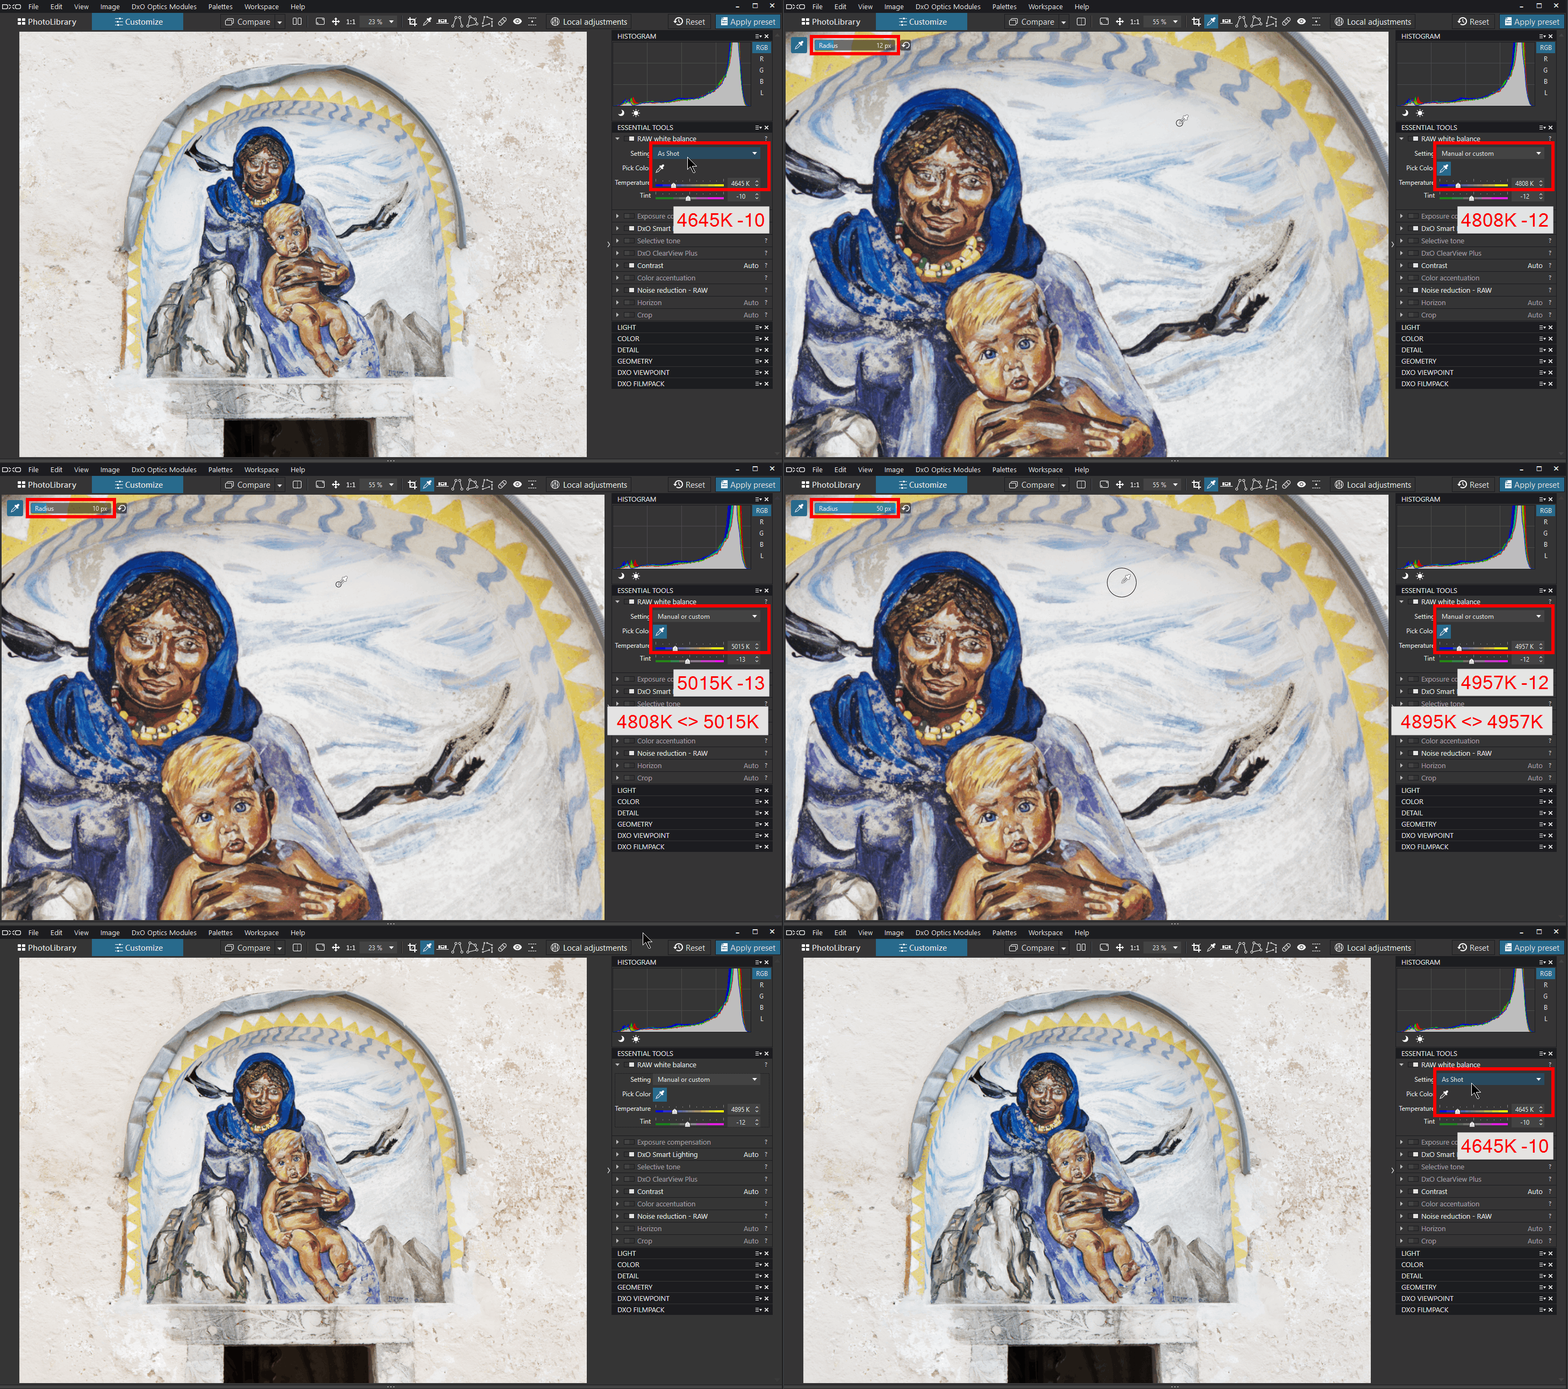
The selection Picker Color is an excellent tool for capturing a white or gray area. The important thing is to choose it in the shade to keep the sunny atmosphere.
The eyedropper sampling circle size can be changed to smooth out the measurement of selected pixels.
As far as possible, choose the largest radius to avoid an incorrect average value. This should be useful especially for noisy pictures.
Be careful not to place the dropper on pixels with a clipped color channel.

– Ctrl+ / Cmd+ wheel. Picker diameter from 1 to 50 pixels
– Capture several areas and note the values to average them afterwards
– Enter the value manually
– Press ENTER to stop the picker tool
* The pre-calibrated settings are of little use.
* To adjust an image with two illuminants (light sources) of different colors, use the Local Adjustments.
The Tint slider is used to counteract color drift on the other axis by creating a dominant color, green or magenta.
By convention we express the temperature of the illuminant on an axis from blue to yellow. By establishing the correct color, the whole color spectrum can be derived along the other axis, from green to magenta.
It seems more accurate to call “Dominant” the Tint slider allowing the adjustment of the drift, green or magenta, of the color.
When the photo is from an RGB file (JPEG or TIFF), the palette only shows a simplified “Color Temperature” slider.
Reminder for less experienced photographers: It is no longer possible to adjust the white balance of such an image, since it has already been set by the camera.
It is no longer a question to assign a color temperature but of correcting the dominant color (blue or yellow) from the image.
Personal use:
The problem with automatic white balance from cameras, is that it “averages” the entire scene towards daylight.
Thus, a sunset with warm colors by nature will be “cooled”.
The behavior is the same during a show where the camera will try to smooth the lighting.
Discovering your photo lit with an inaccurate light disturbs the memory of the colors of the photographed scene.
White balance selector on my camera is therefore set to “daylight” (5600°K) for outdoor shooting.
The technique consists in locking the shooting temperature of the camera in order to obtain the exact color of the light(*) present at the time of the shot.
The warm atmosphere in the late afternoon or the blue light in the evening or early morning are correctly rendered.
During the development with PhotoLab, just move the slider slightly to find the feeling of the moment remained in memory.
(*) in fact, it is corrected. See the “DxO answers” insert.
Particularities
The White Balance palette does not show the same colour temperature as the camera EXIF.
E.g., a photo taken with the temperature set to “daylight” = 5600K (Nikon D810) opens in PhotoLab at 5510K despite the mention “daylight”.
It seems strange that the temperature “Original / As Shot” is not read in the EXIF data.
User must set the desired temperature again in PhotoLab.
DxO replies:
In PhotoLab as in other photo software, the temperature displayed in the user interface doesn’t correspond to the camera setting.
– Even when imposed, a camera does not respect the precise temperature / hue. In the EXIF, only the standard temperature range (cloudy, tungsten, …) is indicated.
– Different camera models don’t provide the exact same temperature / tint for a shot of the same scene with the same light.The EXIF information is therefore not accurate.
If you have two cameras of different brands, you can set the same temperature value but they will not match.
You can only get the temperature you have chosen in your camera with the software of the manufacturer of your camera because it knows the table of correspondence between the scales of Temperature / tint.
In this field there is no standard. Each manufacturer does what he wants and does not share his information or at least not all that is necessary, it is impossible to reproduce the exact behavior of the camera.So, since 2016, DxO has standardized the temperatures / tints in PhotoLab for the displayed presets so that there are no discrepancies when processing images from different cameras.
WB Preset Température Teinte Tungsten 2850K 0 Fluorescent 4000K 0 Daylight 5200K 0 Cloudy 6000K 0 Flash 6100K 0 Shade 8000K 0 Underwater 15 000K 50 The temperature and hue displayed are only an indication to help with the adjustment.
How are the shooting temperature and hue adjusted ?
PhotoLab first uses the EXIF data, usually deduced by the “Automatic White Balance” to which it applies a conversion coefficient (depending on camera body) to obtain the light temperature of the scene.
For each of the camera profiles, DxO have a white balance scale for standard presets (cloudy, tungsten, …).E.g., a photo taken in the shade with the “daylight” setting but under a non-sunny light. The camera made some adjustments. PhotoLab does not display 5200K/0° but a different temperature / tint couple calculated from the WB scale of the body
Unlike other editors or camera manufacturers, DxO has assigned the value 5200K to daylight.
TuToDxO.com – All rights reserved – tous droits réservés.


