Selective Tone
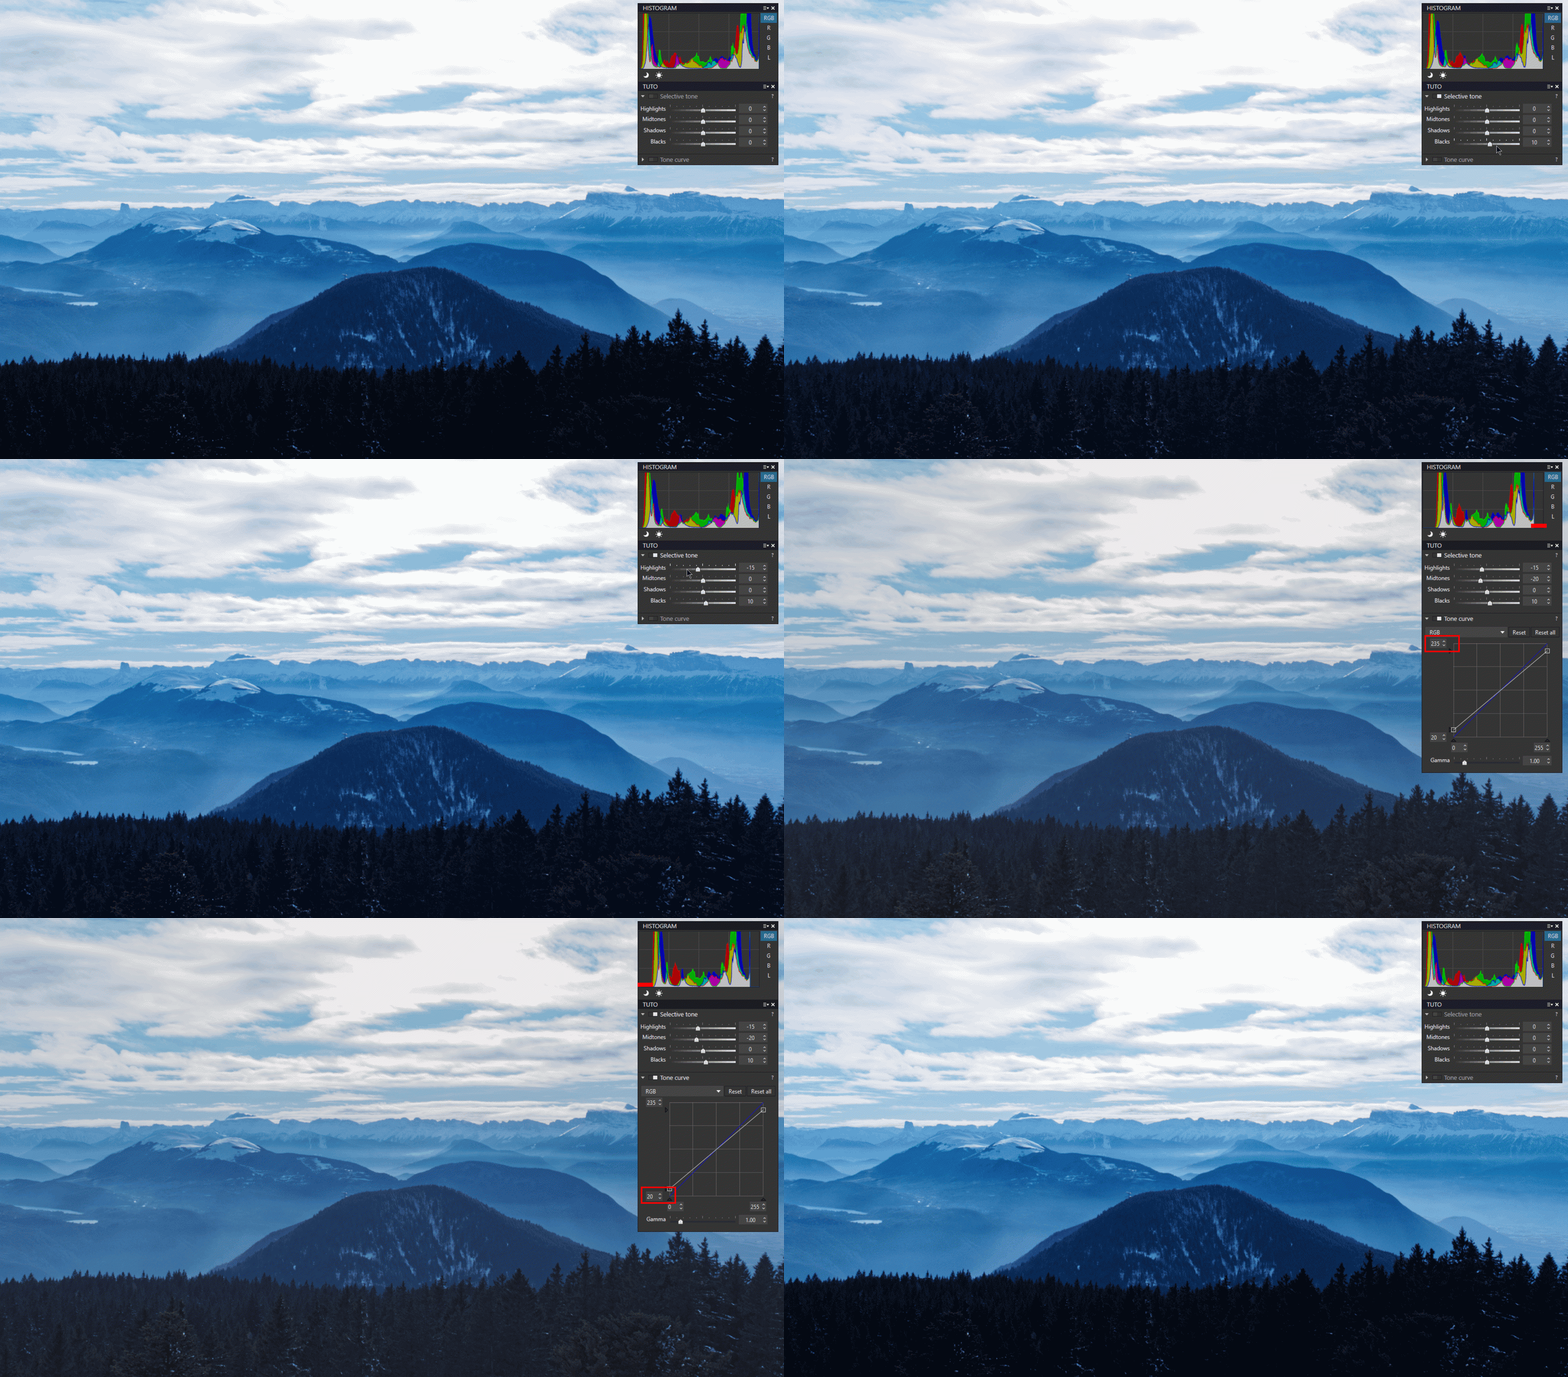
Selective Tone, used alone or as a complement to the Smart Lighting, allows to give character to the image by controlling the overall brightness according to three tone ranges.
* The three tone sliders are a simplified representation of the traditional tone curve
* The “Blacks” slider lets you set the blacks threshold.
* The “Whites” slider (present on other software) doesn’t exist in PhotoLab. Exposure compensation must be used.
An effective rule when using Selective Tone is not to move the sliders in the same direction. If this is the need, Exposure Compensation is the right solution.
See the description of the function in the tutorial “Taking ownership your own image – Selective Tone“
Unlike competing software that tightly corrects tonality within the exposure range of each slider, PhotoLab’s tools act as smooth curves that interact with each other.
* Thus increasing the highlights slightly increases the midtones.
* Decreasing midtones softens some of the highlights and deepens the top of the shadows.
* Defining the blacks affects the shadows.
This crossover of effects gives smoothness to transitions and maintains the initial mood of the image.

The lack of a sensitivity setting for this behavior generates criticism. Some users, used to other software, find the overlap between tones too great, making the image look bland.
Selective Tone and Contrast

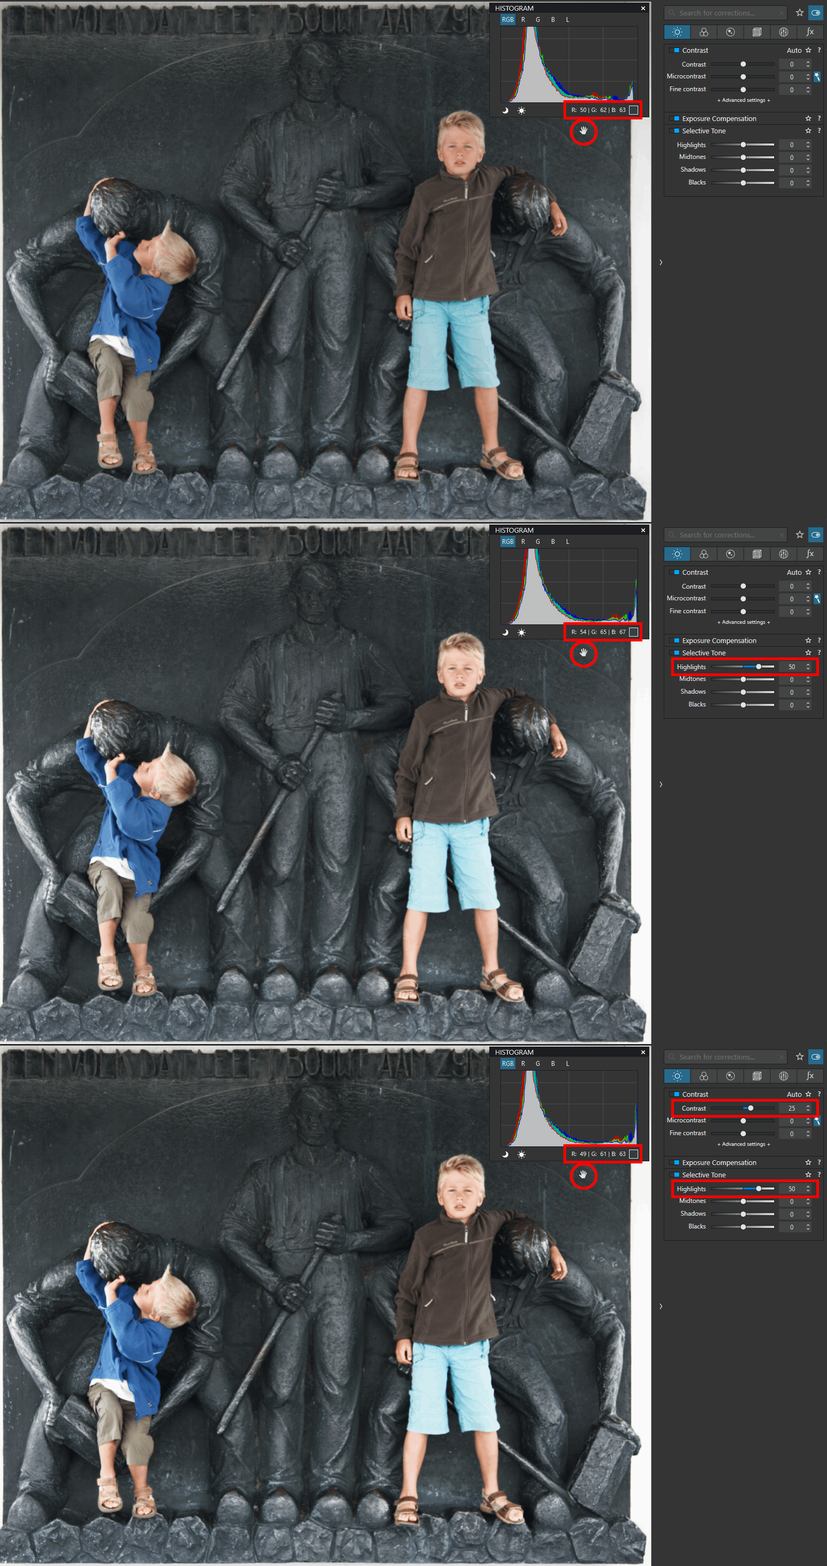
A first solution to counter this overlap is to use the Selective Tone and Global Contrast together.
The RGB values without correction of the gray background are 50 – 62 – 63 (illustration)
– Light tones are increased to 50. The gray background is lightened to 54 – 65 – 67
– Increase the overall contrast to 25. The gray background is restored to 49 – 61 – 63
This is not a law. Each image behaves differently.
Other combinations of adjustments can be tried to maintain good contrast in the image.
* The Black slider can be used to densify shadows (negative direction) or recover detail (positive direction) without compressing or raising midtones and the bulk of the shadows
Another solution when there is an overlap between shadow and black:
– Set the blacks to half the value of the shadows in the opposite direction
* Smart Lighting often establishes a good base to start with highlights and midtones. Then darken the shadows or blacks, if necessary
* ClearView can also help with a roundabout way of using it, but at the cost of unbalancing the image. Beware of reducing midtones and excessive contrast
Here are some other procedures for adjusting overexposed areas and restoring contrast.
The Fine Contrast (FC) sliders from the FilmPack Elite plug-in are more effective at removing clipping than their Selective Tone (ST) namesakes.
For example:
– Lowering the highlight slider from ST to -20 removes clipping but at the cost of gray convergence
– Lowering the highlight slider from CT to -5 is more appropriate
Used together these adjustments modify the tone and restore the contrast. The principle is to distribute the values between the two corrections.
For example:
– The desired tone is obtained; light slider from ST to -30, medium to +20 and shadows to -10, but the image is soft
By applying a half correction to Selective Tone and Fine Contrast, the same effect is achieved by restoring the correct contrast.
– ST sliders at -15, +10 and -5 AND
– FC sliders at -15, +10 and -5
Once again, this is not a law.
Do not hesitate to create a personal preset to quickly implement all these corrections (there are 6 sliders to manipulate).
– Call up this partial preset during development
– Double click the sliders to undo unnecessary corrections
– Play with Undo / Redo (Ctrl+ Z / Ctrl+ Y) to check the effects
Beware not to confuse light overexposure with channel saturation in the histogram indications.
– The RGB value 255, 255, 255 means that this pixel is clipped
– The RGB value 255, 192, 128 means that the Red channel of this pixel is saturated
The indicators of the histogram, despite the color code, create confusion.
See the chapter “The Histogram”.
See the tutorial “Mastery of PhotoLab – Histogram and tone curve“
* The “saturated color protection” of the Color Rendering allows to keep details in the detected areas by desaturating some pixels of the group
* The Tone Curve is an alternative way for intervening quickly on the blacks and the whites (illustration). In the “Light” palette, it is available in luminance and for every RGB channel
– Right click on a point to delete it
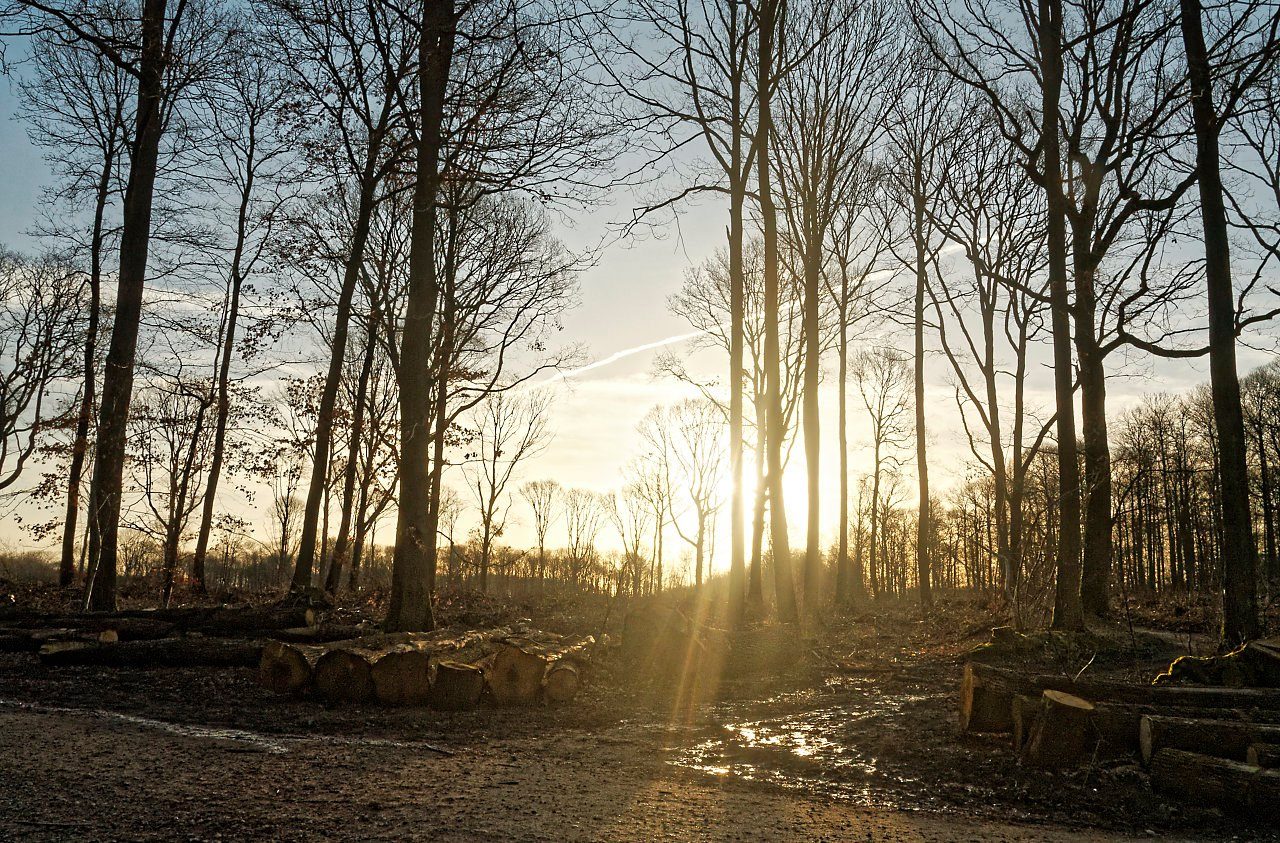
PhotoLab handles backlighting and glare very well with the “4 – HDR single frame” giving a good starting point.

Comments on the illustration:
With traditional PhotoLab corrections, a user could not render the glare of the scene. To render the impression of glare in daylight, PhotoLab’s single-frame HDR preset does the trick
– WB 6000K and Microcontrast +70
Note the exceptionally high value
Review of the operation = 4 corrections
The Tone Curve
By changing the black point or the white point on the tone curve, the tonal range is only tightened.
Details lost on the raw definition are not recovered with this method. The clipping is carried to lower values, for example 4 and 250. The histogram warnings are inactive but this part of the image, expressed as light gray or dark gray pixels, remains empty of tones.
The tone curve is a poor tool on PhotoLab because the software offers other tools. In fact, it was only designed to increase the action of other corrections.
* Exposure compensation is the best tool for reducing highlights that are not overexposed. You can then curve the tone curve to restore the general impression of luminosity.
* Another avenue is to use Smart Lighting which compresses extreme values. This tool is very good at retrieving details in extreme areas that are apparently clipped.
* Finally, the three selective tone controls achieve the same correction as points placed at the ends and in the middle of the tone curve.
* The Global Contrast slider is equivalent to an ‘S’ shape
See the tutorial “Efficiency with PhotoLab – Exposure compensation” and “Selective Tone“
Dxo is aware that many users are orphans of a tool that they consider essential.
To the question “I want to be able to change exposure and contrast at the same time with one control. DxO might offer a check mark to connect the advanced contrast sliders with the selective tone sliders so that they move as one.” It is answered:
The contrast adjustment could roughly be translated into a curve tool, like the clearview or smart lighting algorithms. These algorithms have a local behavior (in that two pixels with the same gray level can be impacted very differently depending on the brightness of the pixels surrounding them), while the tone curve tool has a global behavior (l (impact on a given pixel does not depend on its environment).
TuToDxO.com – All rights reserved – tous droits réservés.


