Sommaire
In this chapter, we’ll explore a few use cases. They should help to understand how metadata can be added, changed and removed with DxO PhotoLab.
Metadata serves to log camera settings, shooting conditions, exposure settings as well as information about the image, the photographer and the subject. For commercial use, it’s a good idea to add information about property rights and more.
Intellectual Property: Copyright
“Copyright, a form of intellectual property law, protects original works of authorship including literary, dramatic, musical, and artistic works, such as poetry, novels, movies, songs, computer software, and architecture. Copyright does not protect facts, ideas, systems, or methods of operation, although it may protect the way these things are expressed.”
(source: <copyright.gov>)
A landscape photo might not qualify as an artistic work. A print of the same, edited photo can be an artistic expression though. The rights of the author are not enforced in the same way everywhere.
While copyright regulations and laws protect works even if they bear no copyright notice, it is good practice to add that notice, usage terms and contact information. We can do this with PhotoLab.
How to Edit the Copyright Notice and Usage Terms
Do the following to add, change and remove copyright information
- Make sure PhotoLab is in PhotoLibrary view.
- Find the “Metadata” palette at the right edge of the PhotoLab window.
- Expand the IPTC tool if it’s not already expanded.
- Find “IPTC – Status” at the bottom of the IPTC tool and then, you should see the following:
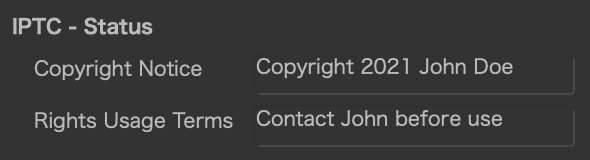
Although the fields look relatively narrow, they allow longer text.
If you like others to ask for your permission, add your name, address and more as follows
- Make sure PhotoLab is in PhotoLibrary view.
- Find the “Metadata” palette at the right edge of the PhotoLab window.
- Expand the IPTC tool if it’s not already expanded.
- Find “IPTC – Contact” and add your information
In earlier versions of PhotoLab, copyright and author’s name can be edited in the EXIF Editor located in the Metadata palette in the left dock of PhotoLab’s Customize view.
How to Edit GPS Coordinates
To edit GPS data, do the following
- Make sure PhotoLab is in PhotoLibrary view.
- Find the “Exif” palette at the right edge of the PhotoLab window.
- Expand the Exif tool if it’s not already expanded. Use the + sign at righthand bottom corner.
Coordinates are accepted in one of the following formats. If you enter something unexpected, PhotoLab will open a window that lists the formats:
- 12.345678º
- 12º 34.567’ N
- 12° 34’ 56.789” N
Entering something like 12.345 will automatically convert to format 1, the “°” sign is not needed.
Positive values will be appended by a “N” or “W” cardinal direction indicator.
Negative values will come up with “S” and “E” instead.
Copy-pasting coordinates that come on a single line might not work.
How to Edit Keywords
Keywords are mainly used to describe image content and can be used as single words or as member of a keyword hierarchy. Because keywords play an important role in finding images by their content, there is a separate palette for keyword editing.
How to Edit Single Keywords
To edit (single) keywords, do the following:
- Make sure PhotoLab is in PhotoLibrary view.
- Find the “Keywords” palette at the right edge of the PhotoLab window.
- Expand the Keywords tool if it’s not already expanded. You should now see the following:
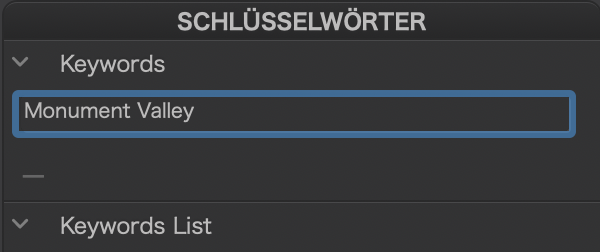
Enter the desired keyword and press enter. The keywords tool will then change to display the stored keyword like this:
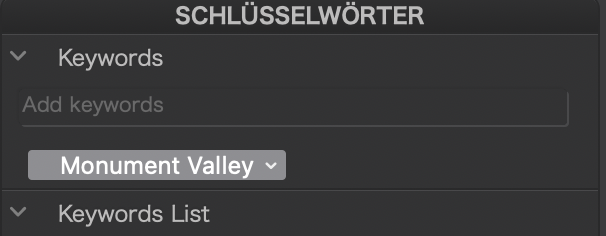
To remove a keyword, click on thetick next to the keyword and select “Remove keyword from image”
Known issues:
- the palette title does not appear in the appropriate language.
- using “Rename…” will change the keyword in all images that contain it.
You might not want to do this, e.g. if you want to add something Monument Valley North/South/East/West/Central…
How to Edit Hierarchical Keywords
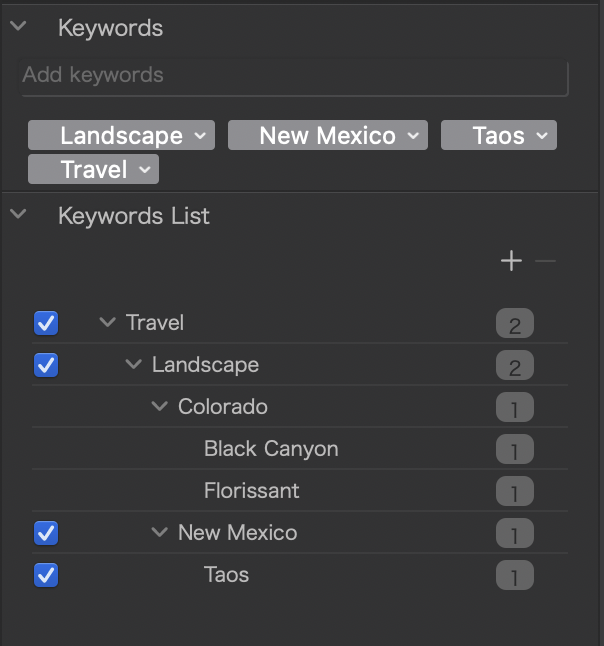
A list of hierarchical keywords can look like this:

To add a keyword from the Keywords List, do the following:
- Select an image.
- Check the box left off the keyword.
This will not only add the checked keyword, but also all parent keywords, right up to the root keyword of the hierarchy.
To remove a keyword or keyword ancestors, uncheck the respective boxes. PhotoLab will remember the complete hierarchy, even if you have deselected ancestor keywords.
How to Get Hierarchical Keywords From a Flat List of Keywords
When I started keywording images a few years ago, I simply added keywords to individual images or group of images. Doing this, I got a flat list of several hundred keywords that contained misspelled keywords too. Apart from checking the list and correcting misspelled keywords, I thought about reorganising the list in order to get a structured, hierarchical list instead.
This is how to get a hierarchical list from a flat list
- Back up the database (for fallback) using the respective file menu item
- Expand the Keyword List tool (see screenshot above)
- Drag a keyword and drop it on a suitable parent keyword
It’s good practice to reorganise the keyword list in several sessions in order to prevent errors. Go through the three steps above in every session. When all is well, you can delete older database backups.
At the time of writing, PhotoLab offered no means to import or export keyword lists, which means that changes need to be done “live”, which is why backing up the database is important in my opinion.
How to Change Date and Time of Capture
This function has been introduced fairly silently. In order to change the date and time of capture, do the following:
- Open PhotoLab and switch to Customize view
- Select an image and right-click on it to reveal the following window
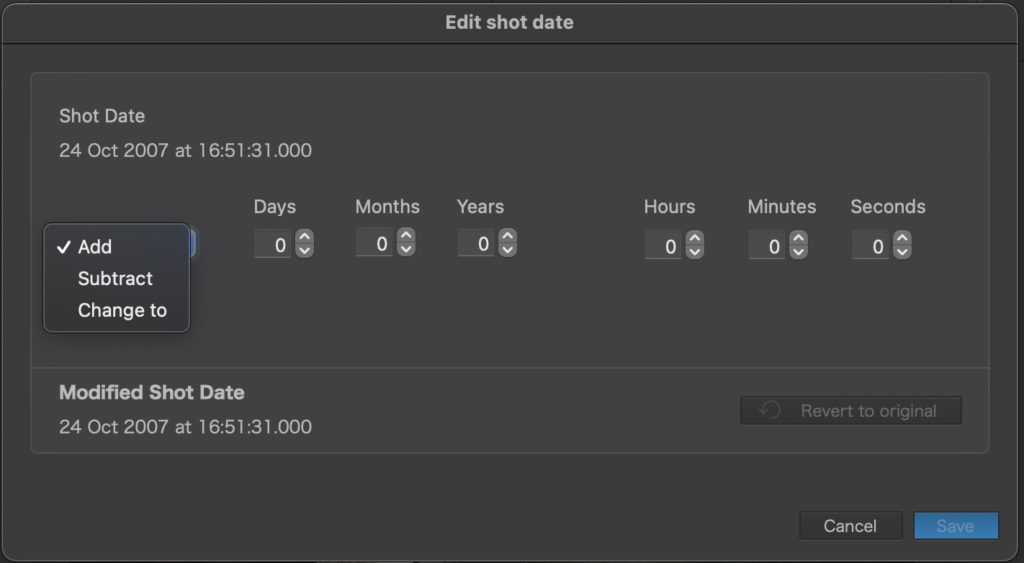
The shot date can be changed in the ways shown above (add/subtract/change to).
- Changes will be written to JPEG and TIFF files immediately, but not to RAW files.
- A changed capture timestamp will be written to all output files (JPEG, TIFF, DNG).
Takeaway
The use cases show how metadata can be edited. Use the fields according to their labels.
TuToDxO.com – All rights reserved – tous droits réservés.