Sommaire
Projects are used to collect images from different sources, e.g. from search result or manual selections, into one (virtual) set of images. Selected image files stay where they are and nothing gets copied when a project is assembled.
A project is useful for developing series of images in one step.
- Photos seen in a project remain in their original locations, the project only links to those photos.
- Deleting a photo in a project does not delete the file from the disk.
Projects can set up manually in PhotoLab or appear automatically, e.g. when Lightroom Classic’s module options are used to hand over images or collections to PhotoLab. Projects can be used “individually” or as hierarchical projects, which were introduced in DPL6.
Manually Create a Project or Project Group
In PhotoLibrary mode, click on the plus sign in the PROJECTS headline and select to create a project or project group. Alternatively we can select a bunch of images and create a new project from that selection or add the selection to an already existing project.
We can use drag & drop to add images to a project, but not to a project group.
Using Virtual Copies in a Project
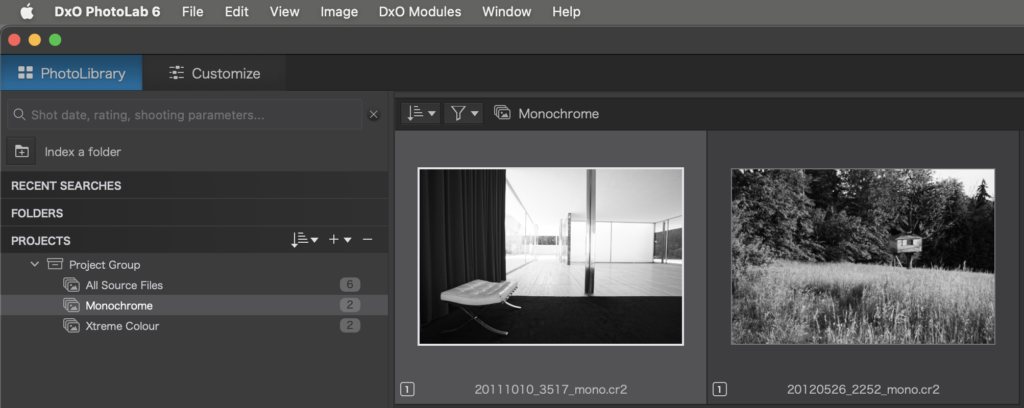
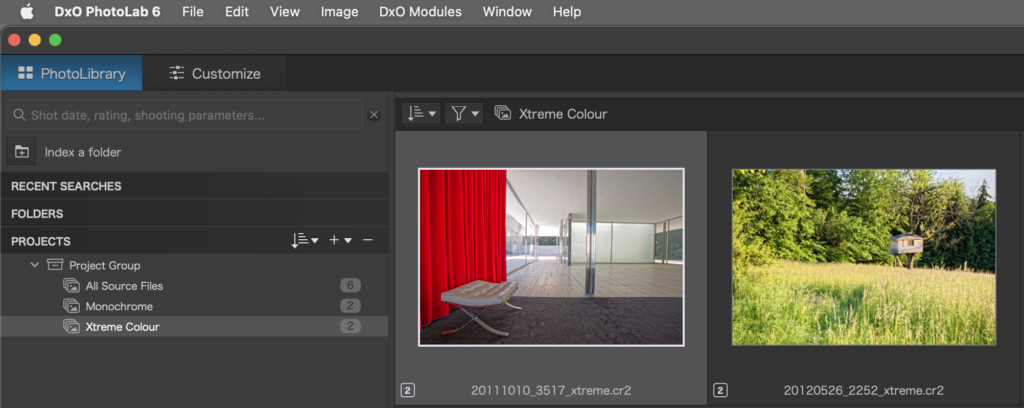
One idea of using projects is e.g. to create a project for colour output, one for black and white etc.
Sadly, this does not work, unless we use the following workaround:
- Create a new project group (or use one that already exists
- Assemble a project that contains all the images that you want to work on.
Let’s call that project “All Source Files” - Select all images in the project, create virtual copies and
add the virtual copies to a new project that might be called “B&W” - Repeat step 3 and add the new virtual copies to a new project called “Colour”
- Move the three projects into the project group created or selected in step 1

The project “All Source Files” contain all images including their virtual copies.
Don’t touch any images in that project. Use it for reviewing the results only.
You can now work all images in e.g. “B&W” and give them the look you like,
then repeat with all images in “Colour”.


The procedure might look complicated, but after using it a few times, you should be able to use it naturally, without any special effort…except some planning ahead, e.g. if you want to create several variants of each image.
Note that at the time of writing, virtual copies can be renamed in DPL on Mac, but not on Windows! Renaming can help to identify the variants you created, once that the files have been exported.
Building a Project Hierarchy
Building a project hierarchy is not complicated, but it helps to consider a few things:
- Several projects can added to a project group
- A project group can also be part of another project group
- We can drag a project or project group onto a project group
- BUT: dragging a project onto a project does not work
In order to build a complex project structure, it is best to proceed top-down:
- First, define project groups
- Then, drag project groups onto project groups
- Then, drag existing projects onto appropriate project groups.
We can always rearrange our hierarchical project structure by dragging a project or project group onto a different project group.
Hierarchical projects can be sorted alphabetically, or by modification- or creation date. As of the time of writing, there is no manual sort order. Choose project (group) names carefully to prevent confusion.
A project or project group can be renamed or deleted. We recommend to use the context menu.
Display What’s in a Hierarchical Project
PhotoLab usually displays the contents of the selected folder only. In hierarchical projects, DPL’s preferences/settings define, what will be displayed:
- the content of the selected project
- the content of the selected project group and everything within that group
The respective checkbox can be found near the lower edge of the “Advanced” tab of DPL’s preferences/settings.
Remember
While we can add photos to a project, we can not add photos to a project group.
Project groups can only contain other projects or project groups!
TuToDxO.com – All rights reserved – tous droits réservés


