Sommaire
Manual horizon correction is used when the result of the auto step is unsatisfactory and as a preliminary to a manual correction perspective.
The difficulty is to find the right element truly horizontal on which to rely
In our contemporary environment, vertical lines are most common.
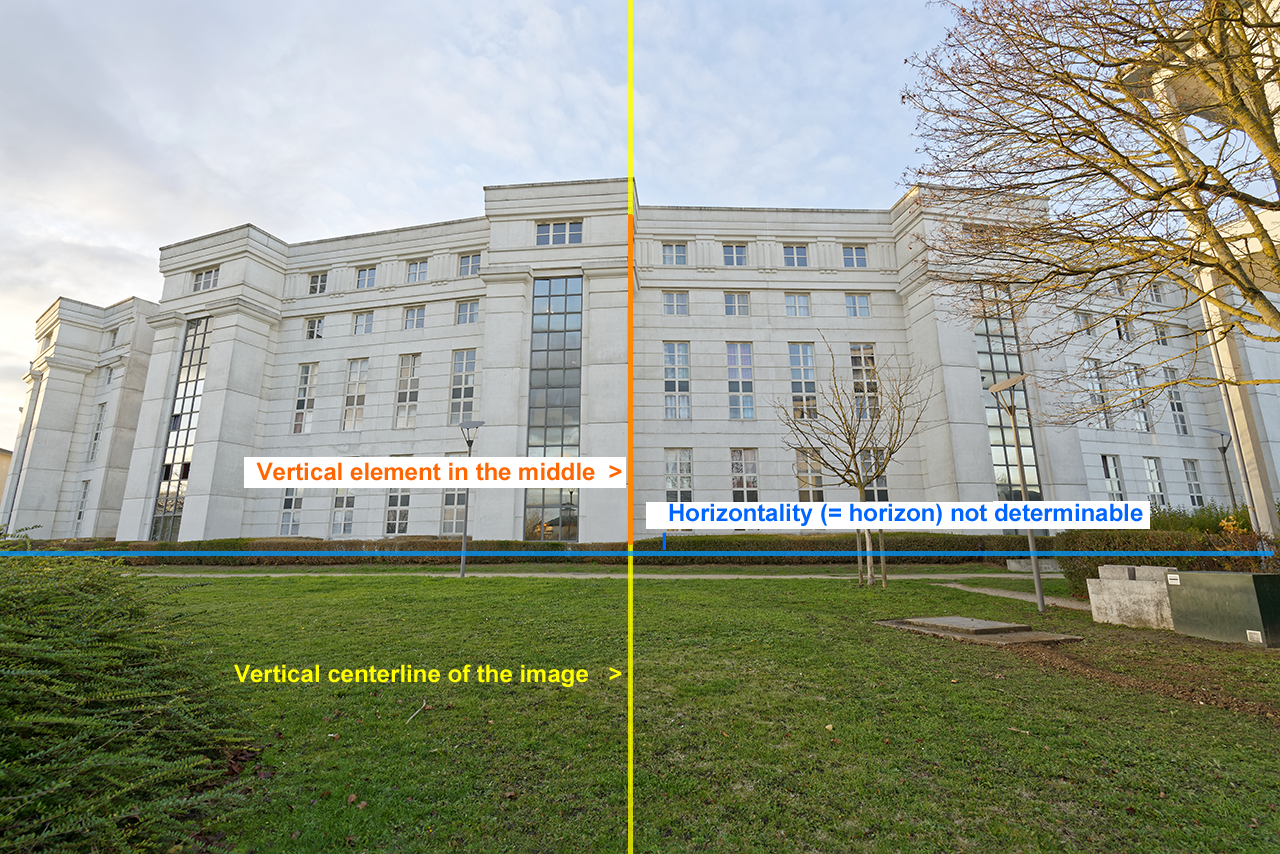
Finding a vertical passing through the middle of the photo is relatively easy, especially in urban photography or monuments.
A typical example where the vertical is directly accessible on the subject, the horizontal can not be determined directly.
Successfully correcting the horizon
It is important to determine which reference elements can be used in the image.
Using a horizontal element is not always possible, since the perspective effect quickly loses the horizontality of the lines. It is often better to rely on the vertical elements of the image.
Using a vertical element
Rigorous photographers look for the median vertical element as close as possible to the vertical axis of the image. If there is not exactly one in the middle, it is often possible to interpolate a virtual line between two elements both sides.
The reference element must of course be perfectly vertical in reality. If it is also the case in the image, it means that the horizon does not need to be corrected.
The most classic cases where vertical elements are not lacking.The shorter the vertical reference, the more accurate the placement of the marks needs to be.
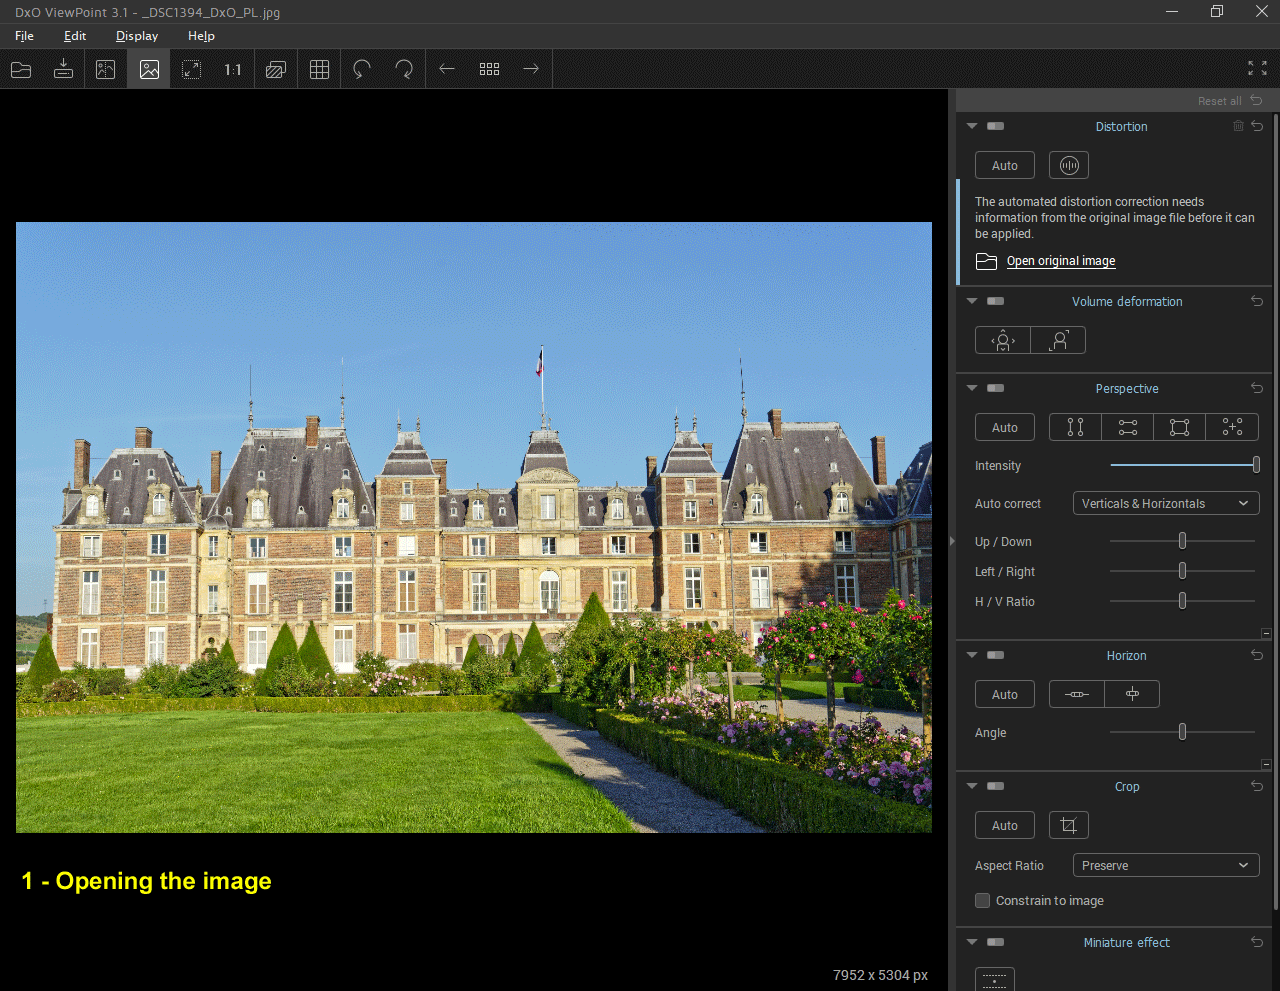
ViewPoint: in palette “Horizon”
– “Vertical level” button – The tool is positioned in the middle of the image
– Adjust each end. Press SHIFT simultaneously to slow down
PhotoLab: in palette “Geometry / Horizon” OR the upper toolbar
– “Horizon” button – The tool, a horizontal line, is centered on the image.
– Ignore the displayed level line and click on the first reference point
– Hold down the mouse button and set the other end of the new level line that appears. ViewPoint understands that this is a vertical level and considers it as such!
This procedure works for both versions
There is no magnifying in PhotoLab. This absence is compensated by zooming (Ctrl + scroll wheel) on the selected area. it’s just as fast and accurate.
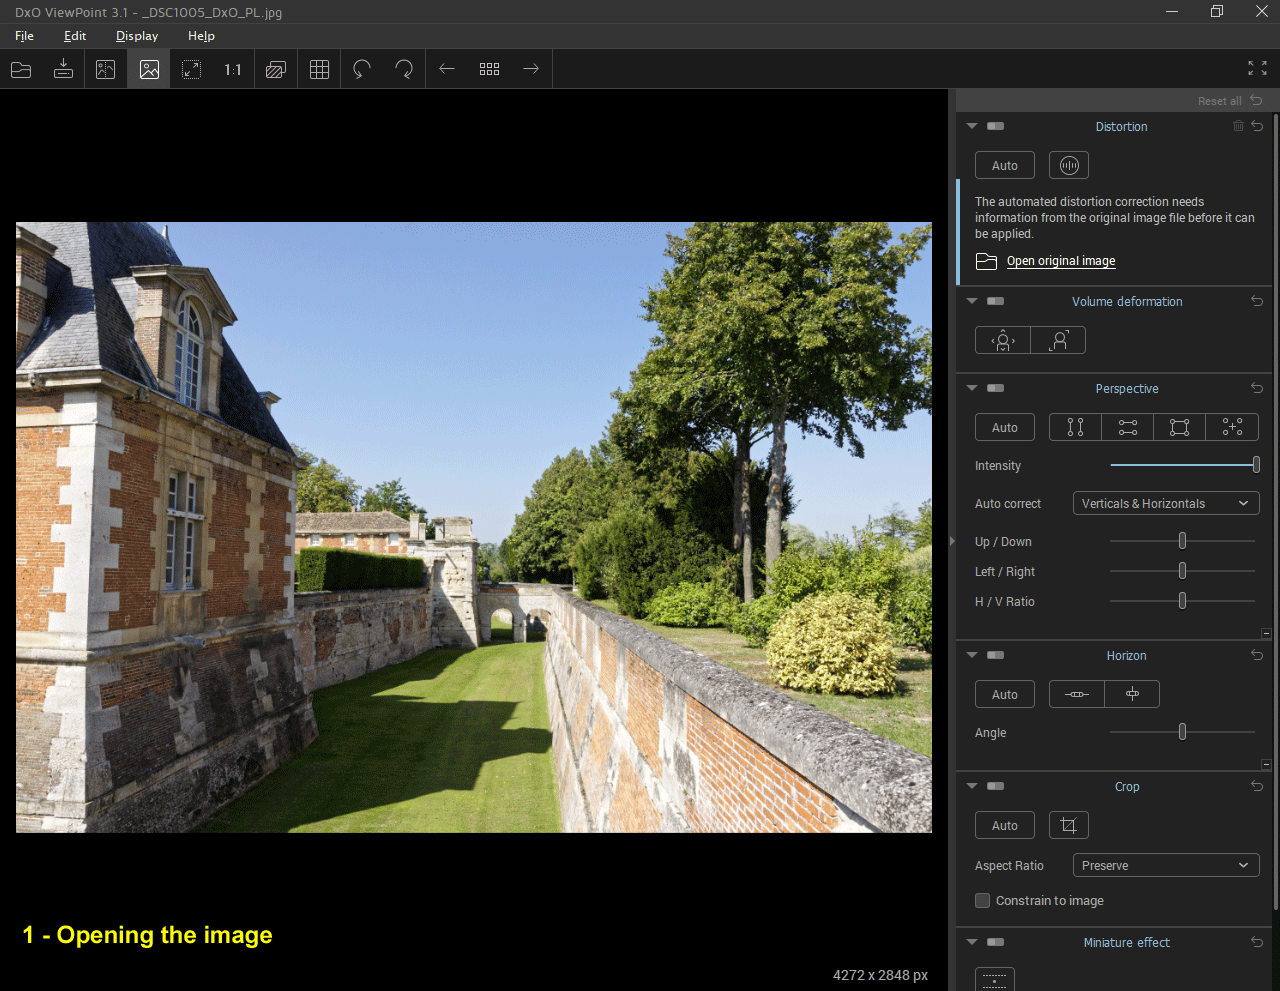
On this illustration nothing seems plumb, it is necessary to rectify the horizon before passing to the correction of perspective. The problem is to find a “true” vertical, which is not the case with the walls of the ditch at the bottom.
The vertical tool is displayed on the axis, and it aligns almost exactly with the front of the massive, truly vertical entrance gate. A fine adjustment gives a correction angle of 0°! The image, perfectly horizontal, is ready for perspective correction.
The reflection on a horizontal plane
An object and its reflection in a waterbody are strictly located on the same vertical. The horizon setting needs to be perfect.
The principle is identical to the previous examples. Point an element towards the middle of the image, not necessarily a line, and connect it to its reflection.
In almost all cases, this operation must be followed by astraightening of perspective so that all objects and their reflections are vertical.

Using a horizontal element
In palette “Horizon”
– “Horizontal level” button – same procedure as previously
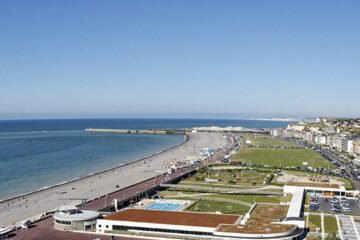
A body of water whose opposite bank is located far away.This photo is the typical subject for adjusting the manual horizon recovery. The bank is located at a distance compatible with the sea horizon.
The automatic correction does not work because of the absence of vertical lines and the “horizon” line of the bank is disturbed by the waves and boats. The eye succeeds without problem to draw an exact line. The reference line (opposite bank) does not occupy the entire image, but its length is sufficient for perfect correction.
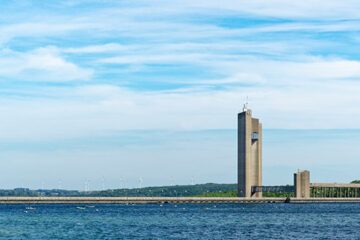
It is sometimes desirable to correct a troublesome “pseudo horizon”, a distant line leaning in reality, but which gains to be rectified.

Determine the horizon line
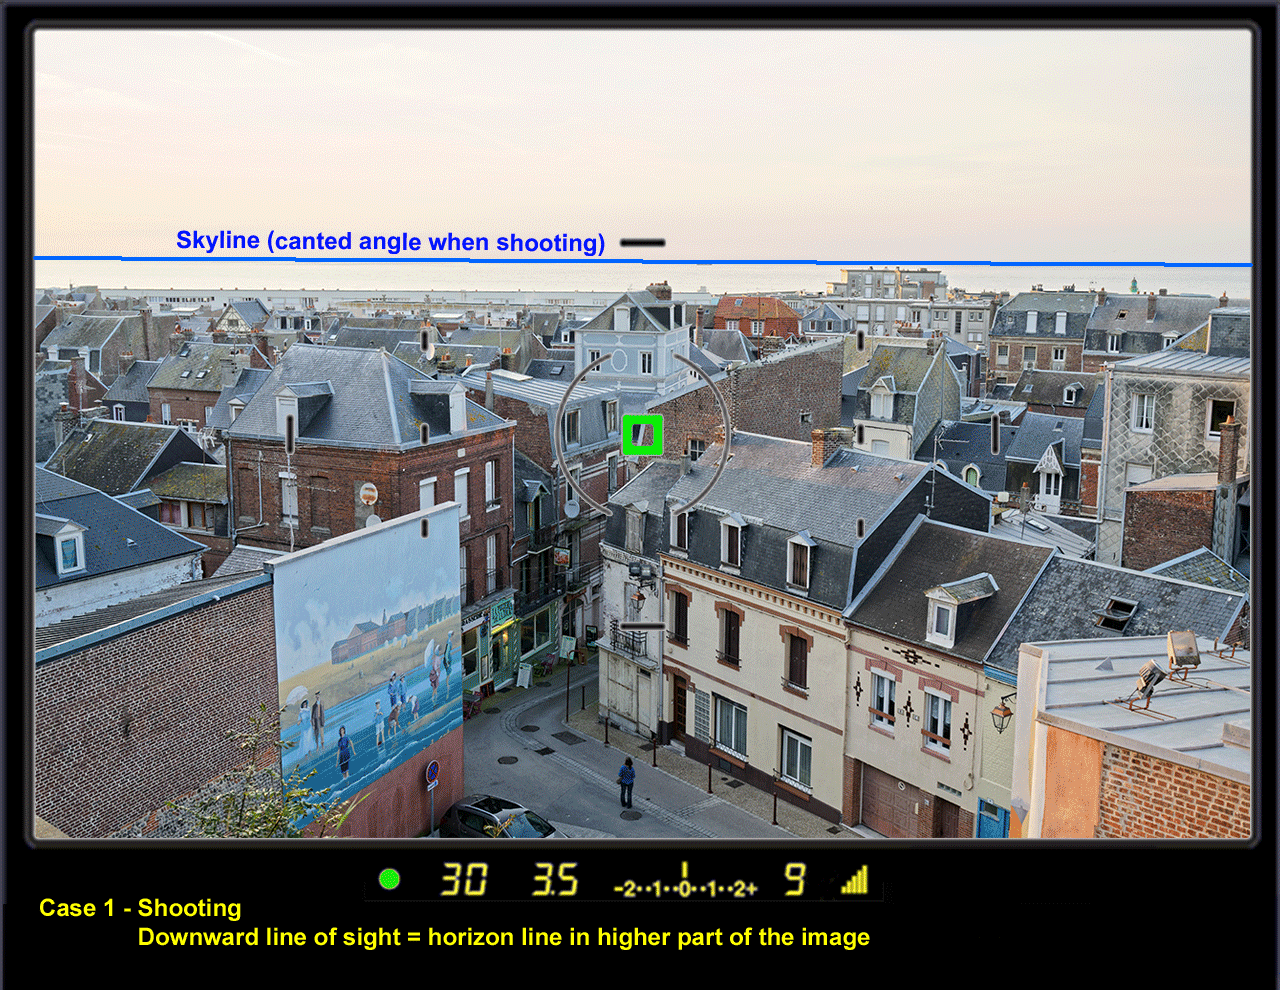
In reality, the skyline is exactly at eye level, straight in front of you. In photography, where the sensor is often inclined, the horizon is rarely on the line of sight (median height of the image).
Defining the horizontal of the photo consists in aligning with a support line which, in reality, is exactly on the skyline. This support line can occupy any position on the height of the photo but that has consequences on the vertical lines.
This position depends on the down / up orientation of the line of sight:
* Case 1- If it is pointing down (downward shot), the line of sight rises to the top of the picture and the vertical lines point naturally downwards
* Case 2- If the line of sight is horizontal (strictly vertical case), the horizon line passes exactly in the middle of the photo
* Case 3- If it points upward, the horizon goes down. The low angle shot is the most frequent case for buildings / monuments. Note the verticals that point upward.
The difficulty is to find the correct really horizontal element which is often more complicated to discover than a vertical one.
Identify the skyline
Two essential rules for identifying the skyline:
– Rule 1: It is located at the photographer’s eye level (in the same horizontal plane)
– Rule 2: It is defined by the convergence to infinity of coplanar lines* of landscape elements
* lines located on the same horizontal or vertical plane
The rules of the skyline; the convergence of lines is verified. Here the horizon line is already known but the line convergence would allow finding the horizon line if this one was not visible.

Most of the time, the horizon line is not directly visible. We must first identify its position in the image
* The simplest case is a building seen strictly from the front. In this situation, all facade horizontal lines are parallel to one another and to the horizon line.
Any of these lines can be used to correct the horizon.
This building fits this criterion well.
This is a slightly low angle shot performed shot, the skyline is approximately located in the middle of the platform height but can not be defined exactly. A significant horizontal facade alignment is used to correct the horizon.
When the skyline is not visible, locate it.
First clue according to rule 1:
A person is close to the front on the right. The skyline is probably at eye level since the photo was taken with the camera at eye level.
The horizon line would thus be at the height of the first window bar.
Observation:
On the other hand, the two people in the center of the image are clearly below. Either the soil goes down here or the reference is not good.
Second clue according to rule 2:
The virtual lines of the recent paving (probably a regular plan) converge a little below the first bar.
Verification:
All first window bars are not on the same line: the skyline is not located exactly on these bars, but a little below.
the bottom of the windows as a reference, we realize that they are all located on the same straight line: It is the skyline !
* Locate the skyline using the parallel planes of the steps of a staircase.
This neo-Renaissance building is, at first glance, not very conducive to this exercise. But it has a very useful element in many similar cases; a staircase.
When the steps are horizontal, one of these steps will be close to (or on) the skyline, it is the first one whose upper face is no longer visible.
The solution is to take this step as the reference, then, from this point, to find the elements located on the same plane. All those above and below this step are not aligned.

Locate the skyline on topics of varying shape.
A 15th century castle. With its round towers and a strong low angle shot, finding the skyline seems complicated. In fact, on the first tower, just look for the line where the stone beds pass from a concave line to a convex line: it is the horizon line!
All the horizontal elements, whatever their orientation, located on the skyline are on the same plane and therefore appear merged on the same line. On the contrary, they will appear to follow divergent lines or elliptical arcs if they are on different planes than the horizon line.
This applies to all forms (parallelepiped, cylinder, sphere, cone …).
However, it must be ensured that the contiguous elements are on the same horizontal level, which is not always the case on historic buildings.
The two towers of the entrance do not have their stone beds at the same level, which is why the skyline is in the middle of a bed on one side and on a joint of the other.
TuToDxO.com – All rights reserved – tous droits réservés.