Sommaire
Unlike other software, Cropping and Horizon are two separate functions of PhotoLab. The independent application of each of its corrections allows to improve the accurarcy.
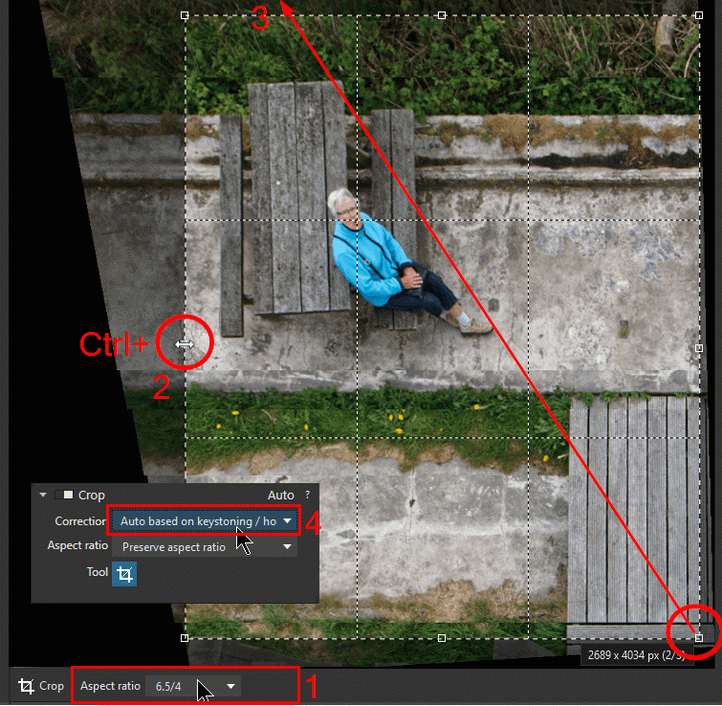
– Draw a frame along the diagonal by holding the Left click
– Press ENTER to exit the tool
* However, a quick image straightening is possible (see bottom page)

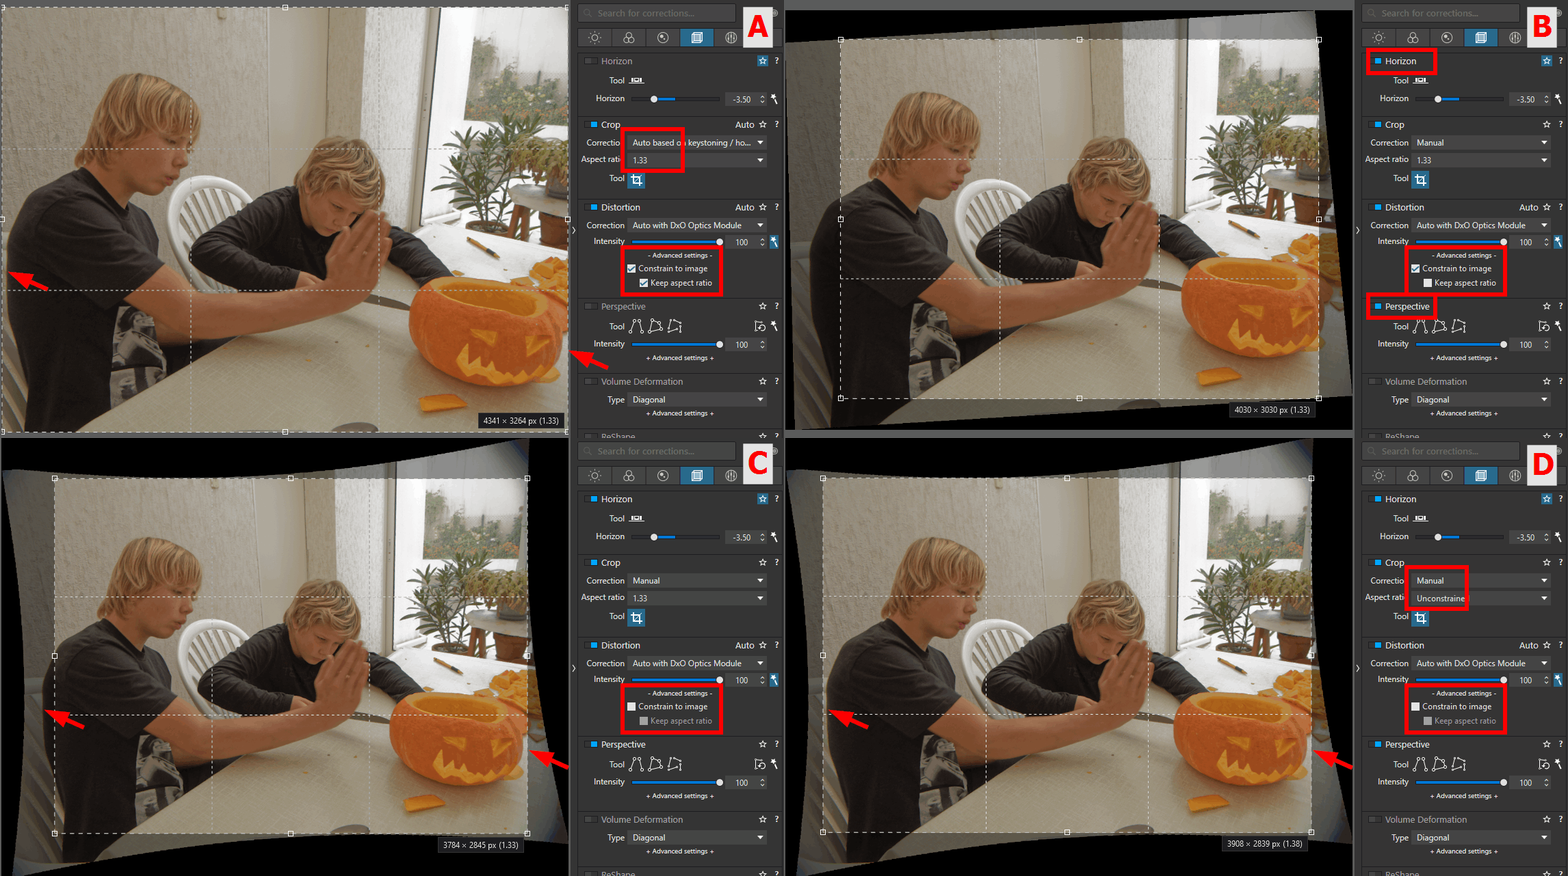
Description of the 4 states according to the illustration
Image ratio
1- By default this function keeps the proportions, the initial ratio, of the photo
– Choose from the list a different ratio OR
– Enter any value, numeric or ratio eg: “1.333” or “6.5 / 4” (respect spaces) OR
– option “Unconstrained”
Note the 7/5 ratio corresponds to the ISO A format (A4,…).
Personal ratio values are retained from one session to the next.
The choice of DxO to respect the ratio of the camera does not suit some photographers. It can easily be changed in the personal startup preset.
PhotoLab reports live the pixel dimensions of the cropped image. It is not possible to impose dimensions.
The metadata window displays the cropped size of the photo. PhotoLab only resizes the image when exporting. It is at this moment that the output dimensions must be indicated.
Voir le tutorial “Efficiency with PhotoLab – Export photos“
The properties window (Ctrl+ I / pop-up information window) provides information about the original shooting only and the value indicated is therefore insensitive to reframing.
Unconstrained mode
2- A combination of keys allows you to quickly switch to an unconstrained frame, there is no need to select the “unconstrained” option
– While holding down the CONTROL / SHIFT key
– Pull on one of the corners of the dotted frame OR
– Pull on a handle of the edges to limit the direction
– Release the press on the key
Unconstrained mode becomes permanent for this image.
When carrying out new operations on the frame of this image, it is no longer necessary to press the key.
– Hold down the SHIFT key (Windows and Mac) to modify the frame by constraining it in these new proportions
By default PhotoLab overlays a 3:2 grid for cropping according to the rule of thirds.
While these rules are controversial, other cropping guides would be interesting like the golden ratio, golden spiral, diagonals, etc.
On wide-angle photos, PhotoLab recovers much more lateral information than other software and camera JPEGs (especially for photos taken with cameras applying digital corrections).
The starting frame of the cropping function sometimes cuts off those gained pixels which can be valuable.
* Disable the “Constrain to image” and “Keep aspect ratio” options, Distortion function of the “Geometry” palette, to recover the maximum area of the image corrected for distortion
– Image distorted when taken, not cropped + Distortion corrected – Sequence A of the illustration. There is space behind the boy and to the right of the pumpkin.
– Horizon straightened + Perspective Auto – B, the image is cropped
– By unchecking “Constrain to image”, useful space is reclaimed – C
– On leaving the 4:3 ratio, “Crop without constraint”, coverage is total – D

My starting preset “0- DxO Standard” automatically straightens the horizon. I turned off auto-cropping to monitor the lost area.
Landscape and Portrait orientations
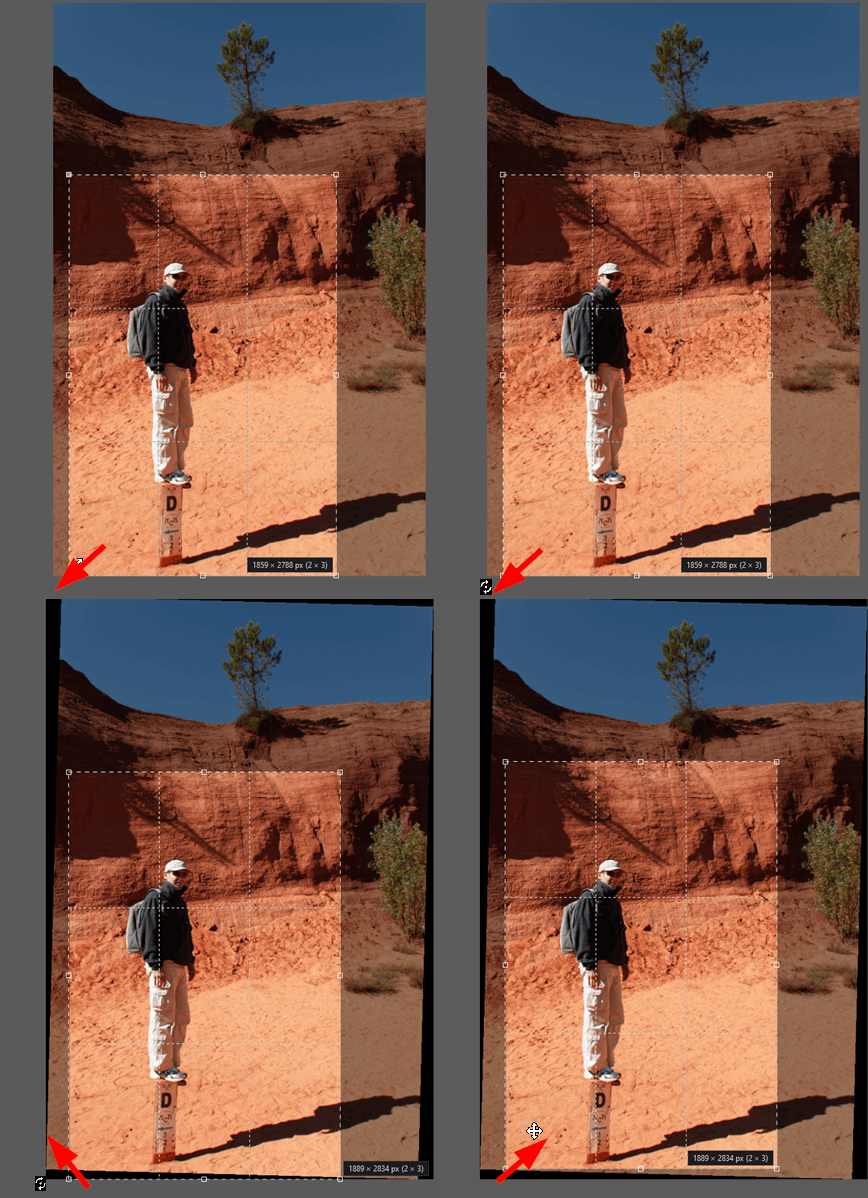
3- To swap the Landscape and Portrait orientations
– Selecting a vertex then
– Cross the frame diagonally by holding the Left Click until you go past the opposite vertex
Note the Left or Right orientation buttons on the image.
The image can be rotated on the fly while cropping
– Place the mouse cursor outside the frame, the rotation mode is activated
– Hold the click to rotate the image
The angular value is shown in the Horizon palette.
Restoring the auto constraint
4- After the Horizon or Perspective corrections, restore the option “Auto based on perspective / horizon” to force the frame to occupy the maximum rectangular area
It is a pity that the cropping in PhotoLab does not benefit from the constrained circulation in the image of the stand-alone version of ViewPoint.
* Le redressement rapide de l’image est possible (rotation en direct)
– Placer le curseur à l’extérieur de l’un des quatre coins
– Faire tourner l’image dans le cadre
* Lorsque l’image est agrandie et partiellement cachée, le zoom est annulé lors de l’appel de la fonction de recadrage

TuToDxO.com – All rights reserved – tous droits réservés. 400


