Sommaire
The Control Line tool is a graduated filter that uses the Control Points technology (Upoints).
The reference area is located using a dropper.
This selective collector analyzes a group of pixels in its collection range (range not configurable) to create a mask from pixels with the same characteristics.
Two selectivity parameters define its sensitivity according to the color (Chroma) or to the luminosity (Luma), for total control of the effect.
This Local Adjustment combines performance and ease of use. It is a good substitute to replace several Control Points.
General information on Local Settings is given in the article Practising the Local Adjustments.
Create a Local Adjustment Control Line
This mask takes place in two-step.
– Select the Control Line (a)
– Left click to start the border at 100% opacity (continuous line (b)
– Hold down the mouse button and drag to define the second line (c)
– The movement defines the transition area according to a gradient towards 0% opacity (dotted line) and orientates the whole in the same action (d)
– Click and drag the dropper initially placed next to the tool indicator to define the reference area (f)
The index at the end of the line (a,b,…) corresponds to the shot of the illustration.
The angular position is changed by moving the indicator (the handle) on the dotted line.
– Gain accuracy in rotation by momentarily increasing the distance between the two lines (c)
– When the angular position of the straight lines is close to horizontal or vertical, the system experiences a floating moment indicating the exact positioning
– For a precise angular position, close to the horizon, press ctrl key to rotate the mask without aligning it with the horizontal or vertical (d)
– The two lines can be moved separately by clicking on any point on the line (other than on the indicator) (e)
– Moving the indicator moves both lines
– Pressing the Ctrl key beforehand also moves the eyedropper
Chroma and Luma
Selectivity settings; Chroma and Luma adjust the influence of the mask by dissociating elements of neighboring colors.
– Toggle mask display to permanent monochrome (M /Shift+ M) + Black & White
– Adjust Chroma according to the hue of the selected color
– Adjust Luma according to the brightness of the area
– Move the dropper to define the mask precisely
Note the extreme values:
* With 0% chrominance, almost all of the pixels in the hue, dull or saturated, are included.
* 0% luminance corresponds to no progressive contour for the mask.
* 100% is, on the opposite , highly discriminating.
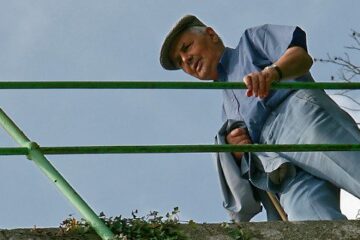
The first use case consists in modifying the sky without changing the foreground.
– No correction – The sky is too bright (a)
– Make corrections: Exposure: -1 (b) – The character dressed in blue is darkened
– Toggle mask display to permanent monochrome (c)
– Chroma and Luma selectivity at 75% (d) – The character is ignored by the correction
– Annuler l’affichage du masque (M /Shift+ M)
Combine masks of Local Control
Others Control Line and Control Point masks can be used together on the main Control Line mask.
Adding secondary masks allows you to refine the influence of the initial local adjustment.
– With Local Control active, choose the Control Line type or select Control Point
– The additional masks complete the area
– By pressing the Alt key, they become protective masks that inhibit the correction on the area they cover
The Control Point mask can be used as an eraser by pressing the Alt key.
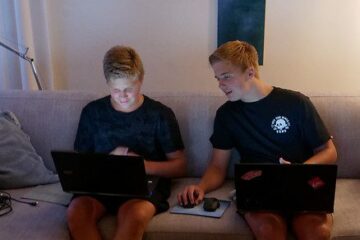
In this image, we want to change the color of the flowers without altering the surrounding color of the bricks and the illuminated signs.
– Draw a slanted line to limit the space on the wall and spare the sign (a)
– Toggle Black & White permanent display (b)
– Place the dropper (c) on a flower
– Find the appropriate Chroma and Luma values (d)
– Change the color to green (e)
Note the color change of the bricks and the sign (f)
– Add a protective Line (Alt+Click) and place the eyedropper on the bricks (g)
– Add a protection Control Point (h) (Alt+Click) on the sign (h’)
– Add a complementary Control Point (Click) on the forgotten flower (i)
– Turn off the tool to see the effect
The same correction with Control Points is much less easy.
Each additional mask has its reference area defined by:
– Its dropper for the Control Line
– Its central disk for the Control Point
BUT the selectivity value (Chroma and Luma) is unique for all Local Adjustment.
* The dropper is only displayed for the active Control Line to avoid confusion when there are several masks
* Additional masks are not identified in the palette. They can only be activated by selecting their indicator.
* Controlling the action of the cumulation of masks with the monochrome mode (M / Shift+ M)
When the Control Line mask is inverted (shift+ I), a new mask cannot be added.
– Invert the local Adjustment to add a new Line, a Control Point or a protection Point
Advanced usage
The lines of the Control Line mask can be placed outside the image.
This use of the Control Line is similar to a Global Adjustment that would benefit from Selectivity (Chroma and Luma).
This feature is perfect for flat tints of color.
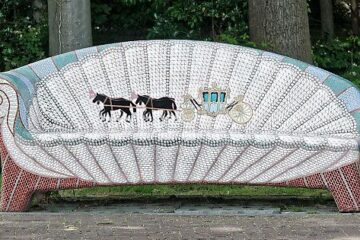
An example of an application to quickly correct an image with two different tones (White balance).
– No correction – Color temperature difference is too sharp
– Control Line with the pipette placed on a plate
Note the two lines outside the frame.
– Chroma and Luma at 75% to hold the correction in the light areas
– White balance modified
The scene retains its atmosphere but the light areas are less yellowed
– Protection Control Line (Alt+ Click) – A denatured area of the wall is restored
The strength of the tool is that it can be placed without special care.
TuToDxO.com – All rights reserved – tous droits réservés