Sommaire
ReShape introduces the possibility to locally modify the geometry of the image.
The correction places a grid on the image, the image is stretched locally by moving the points at the intersection of the lines.
Selecting and moving points on the grid:
– Select a point and move it by holding the mouse click
– A group of points is selected with the Ctrl key or by scanning an area. They are then marked with a white ring
– Drag the points. When you move a point, all points in its group are moved. The moved points remain marked with a white dot
– Double-click a point to reset its position
– Create a new group and double-click on one of the points to reset all the points in the group
* A point (or group of points) can be moved outside the frame
* The action on the up/down and left/right arrows on the keyboard allows precise positioning with the added advantage of being able to constrain the movement in one horizontal or vertical direction
* The movement step is increased by pressing the Shift key simultaneously
Using the tool
The layout differs depending on whether you are using ViewPoint as part of PhotoLab or as a stand-alone version (and as a plug-in for Lightroom or Photoshop) but the functionalities are the same.
– ViewPoint: “ReShape” palette – grid selection. The step and the choice of the grid color are displayed at the bottom of the preview window
– PhotoLab : “ViewPoint” palette ReShape – selection of the grid. The tool settings are displayed at the top of the preview window
The grid can be displayed in one of the predefined densities (from 4×4 to 32×32) or customized.
The accuracy of the correction depends on this initial setting:
* A high density allows for a more accurate correction
* On the other hand, the calculations take longer for the preview and then for the final export
* The color of the grid can be changed to match according to the background colors of the image
* Momentarily hide the grid to appreciate the changes by positioning the mouse cursor outside the preview window
Characteristic of the deformations:
Moving a group (defined as a quadrilateral by the grid) causes the image to deform, sliding along the (fictitious) diagonals formed by the opposite points of adjacent quadrilaterals.
This principle causes a break in the image. DxO’s choice of a local geometric modification following vectors does not offer the same possibilities as the correction following a continuous curve (spline) proposed by other software.
The image shows how the deformations are managed. They can be reduced by increasing the density of the grid.
Displaying the grid on the image:
The grid display is different depending on whether you are using ViewPoint standalone (and as a plug-in to PS / LR), or integrated into PhotoLab.
ViewPoint standalone – the shape of the grid always follows the edges of the image:
* Rectangular if the perspective of the image is not changed.
* Deformed according to the corrections made. The grid adapts to the shape of the image
Enabling perspective correction, either before or after ReShape, does not affect the fill.
AutoCrop is automatically disabled and re-enabled when ReShape is closed.

PhotoLab – the grid display is always rectangular.
It does not fit the edges of the image when the geometry has been corrected.
However, there is a way to force PhotoLab to behave as ViewPoint standalone.
– Set up the ReShape grid before making geometry corrections (horizon, perspective, volume deformation)
– Drag a point to start the correction – choose it in an area not affected by the upcoming corrections
The grid then follows the edges of the distorted image.
Be careful not to reset the starting point until you have changed the desired points.
Practical examples of how to use ReShape
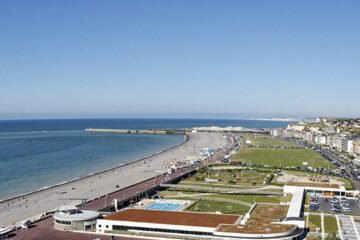
Processing this photo turned out to be more complex than expected. Geometric corrections – lens distortion, horizon and perspective – cut out some of the elements at the edges of the cropped image.

Here, given the uniformity of the sky, ReShape can easily recover the space in the upper part.
Distorting the sky within the limits allowed by the image envelope preserves the upper elements.
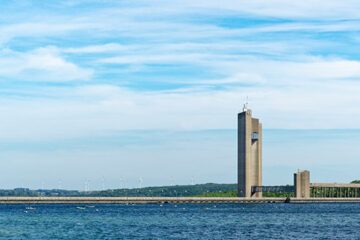
The corrected image highlights a particular point. The main subject, a compass rose controlled by the wind vane above, tilts significantly backwards.
This detail is not really visible in situ, but when it is highlighted by the framing, it gives the very distinct impression of a failed perspective correction in this image. The lack of verticality of the corner tower on the right also contributes to this impression.
Acting on these elements is to modify the subject. But here, the subject is finally more in conformity with the impression that one has on the spot.
The compass rose element is straightened by successively moving the relevant groups of horizontal points from the bottom. The display of the classic overlay grid can be used as a guide.
Use the keyboard arrows to refine these movements. The same principle is used for grinding the tower.
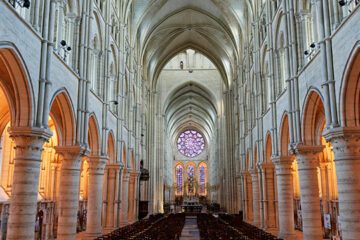
Customize the volume deformation correction
ViewPoint offers two volume distortion options.
* Diagonal correction, which is more natural and well suited for people and portraits as well as landscapes without straight lines
* Horizontal/vertical correction is intended for architectural photos mainly, where diagonal correction curves straight lines
With ReShape, it is possible to use diagonal correction on this kind of image.
The principle is to straighten the curved verticals into straight lines.
It is necessary to choose a grid pitch that allows residual defects to be made barely visible, or even imperceptible.
For this image, which is a little on the edge of the exercise, an 8 x 8 grid was used for the demonstration where some defects remain. With a 16 x 16 grid these defects are no longer visible for a satisfactory rendering.
Implementation in ViewPoint standalone:
– Alignment of each of the grid points on a virtual vertical line connecting the top and bottom points – Use the right/left arrows on the keyboard (the movement is only horizontal). The points of the vertical center line are unchanged
Implementation in ViewPoint integrated in PhotoLab:
For this customization to be possible in PhotoLab, you must first use the workaround described above.
– Creating a ReShape grid, a prerequisite for any geometric correction (volume deformation here)
– Drag a point to start the correction
– Correction of the diagonal volume deformation: the grid follows the distorted contour of the image
– Alignment of individual grid points: same procedure as for independent ViewPoint
TuToDxO.com – All rights reserved – tous droits réservés.