Sommaire
Open the photo
PhotoLab uses the computer’s file system. There is no need to import the photos.
– Select the folder containing the photos in the Photo Library
– Select the photo to develop in the image browser
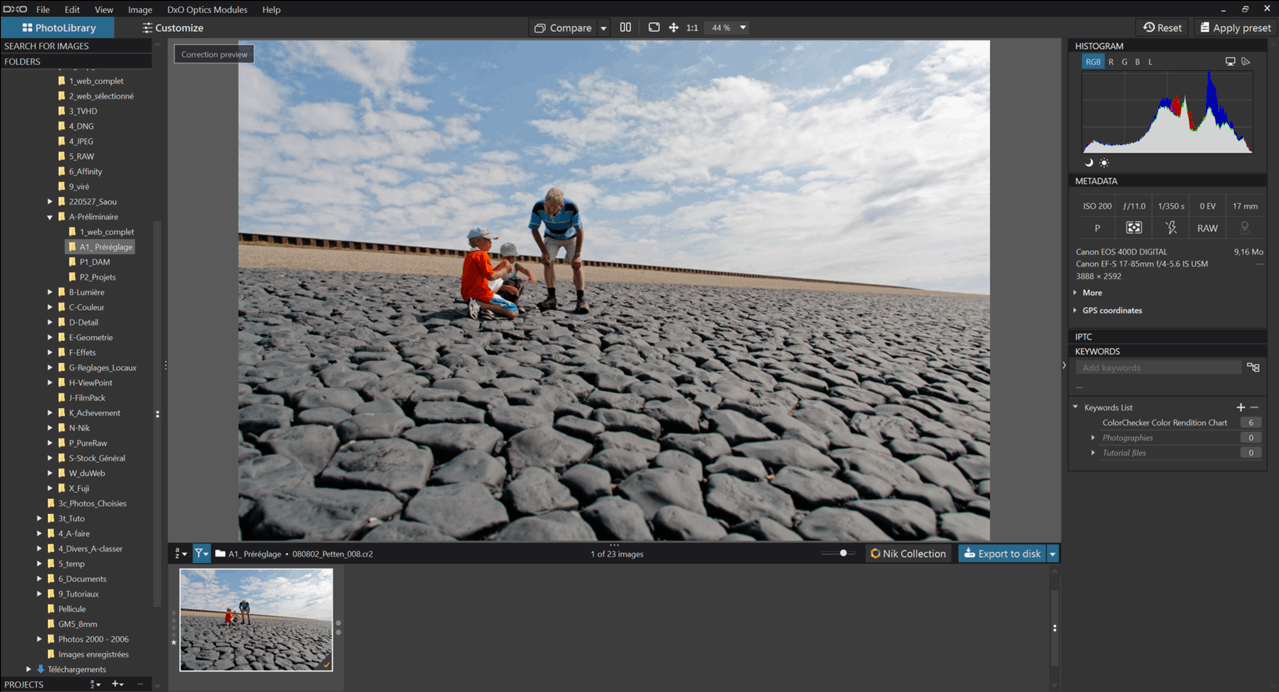
– Double-click on its thumbnail OR “Customize” tab.
PhotoLab enters “Customize” mode.
To discover PhotoLab, it is advisable to use the “DxO Standard” workspace.
The “Basic tools” palette offers the most common corrections.
– Click on the chevron in the left-hand pane to increase the display area
– Hit Ctrl+ F9 to hide the image browser
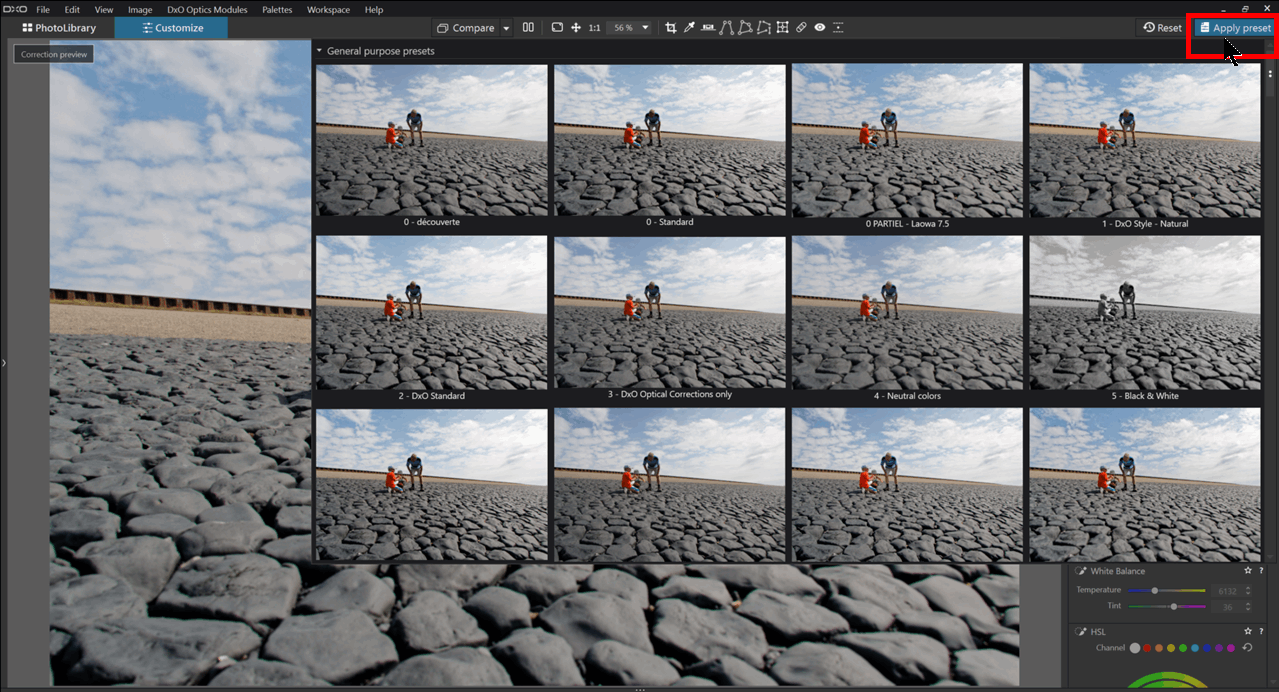
Apply the DxO Standard preset
When an image is opened for the first time, PhotoLab automatically applies the default preset “1- DxO natural style”.
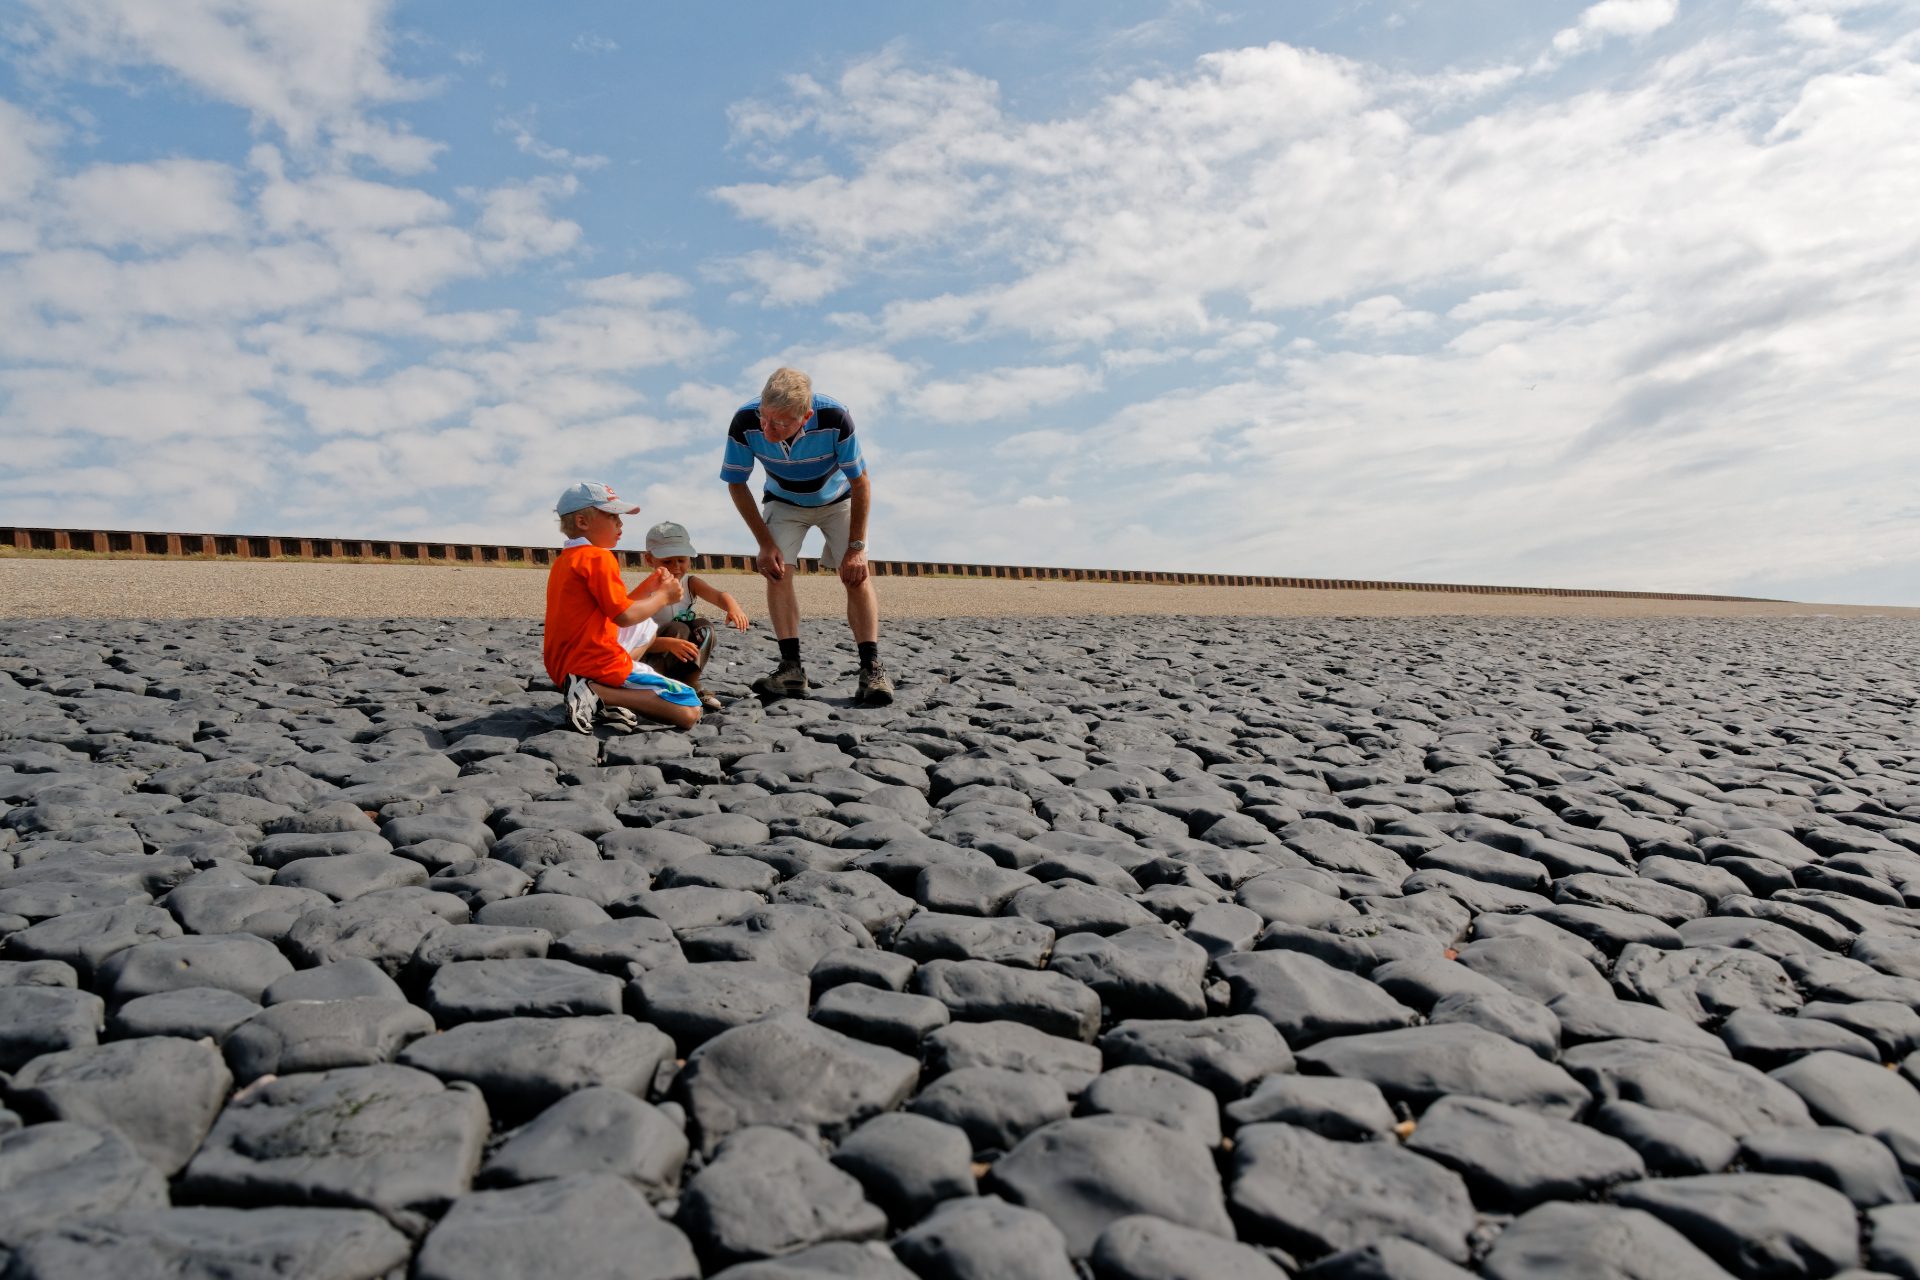
This photo shows a grandfather passing on his knowledge to his grandchildren; in order to stay as close as possible to the camera’s output image, we’re going to use and select the 2- DxO standard preset.
* The 2- DxO standard preset is neutral in terms of color, tone and contrast.
* The PhotoLab preset collection can be accessed via the “Apply preset” button.
PhotoLab makes the most of your photos, especially if the Optics Module (Camera + Lens) has been created by DxO in their laboratory.
PhotoLab is designed for processing raw photos.
The parameters of all available tools are adjusted according to the shooting conditions (optics used, aperture, light and ISO speed).
The corrections activated with the “2- DxO Standard” preset are indicated by a blue square.
In addition to these settings appearing in this palette, PhotoLab :
* Adjusts Lens Sharpness to improve sharpness of the image
* Suppresses Chromatic Aberrations
* Corrects Vignetting depending on the aperture used
* Corrects Lens Distortions
* Protects saturated colors avoiding flattened areas
An overview of these effects is possible by clicking on the “Compare” button.
– Check the “No correction (no geometry)” option
When opening the photo, PhotoLab already offers a relevant solution to the image.
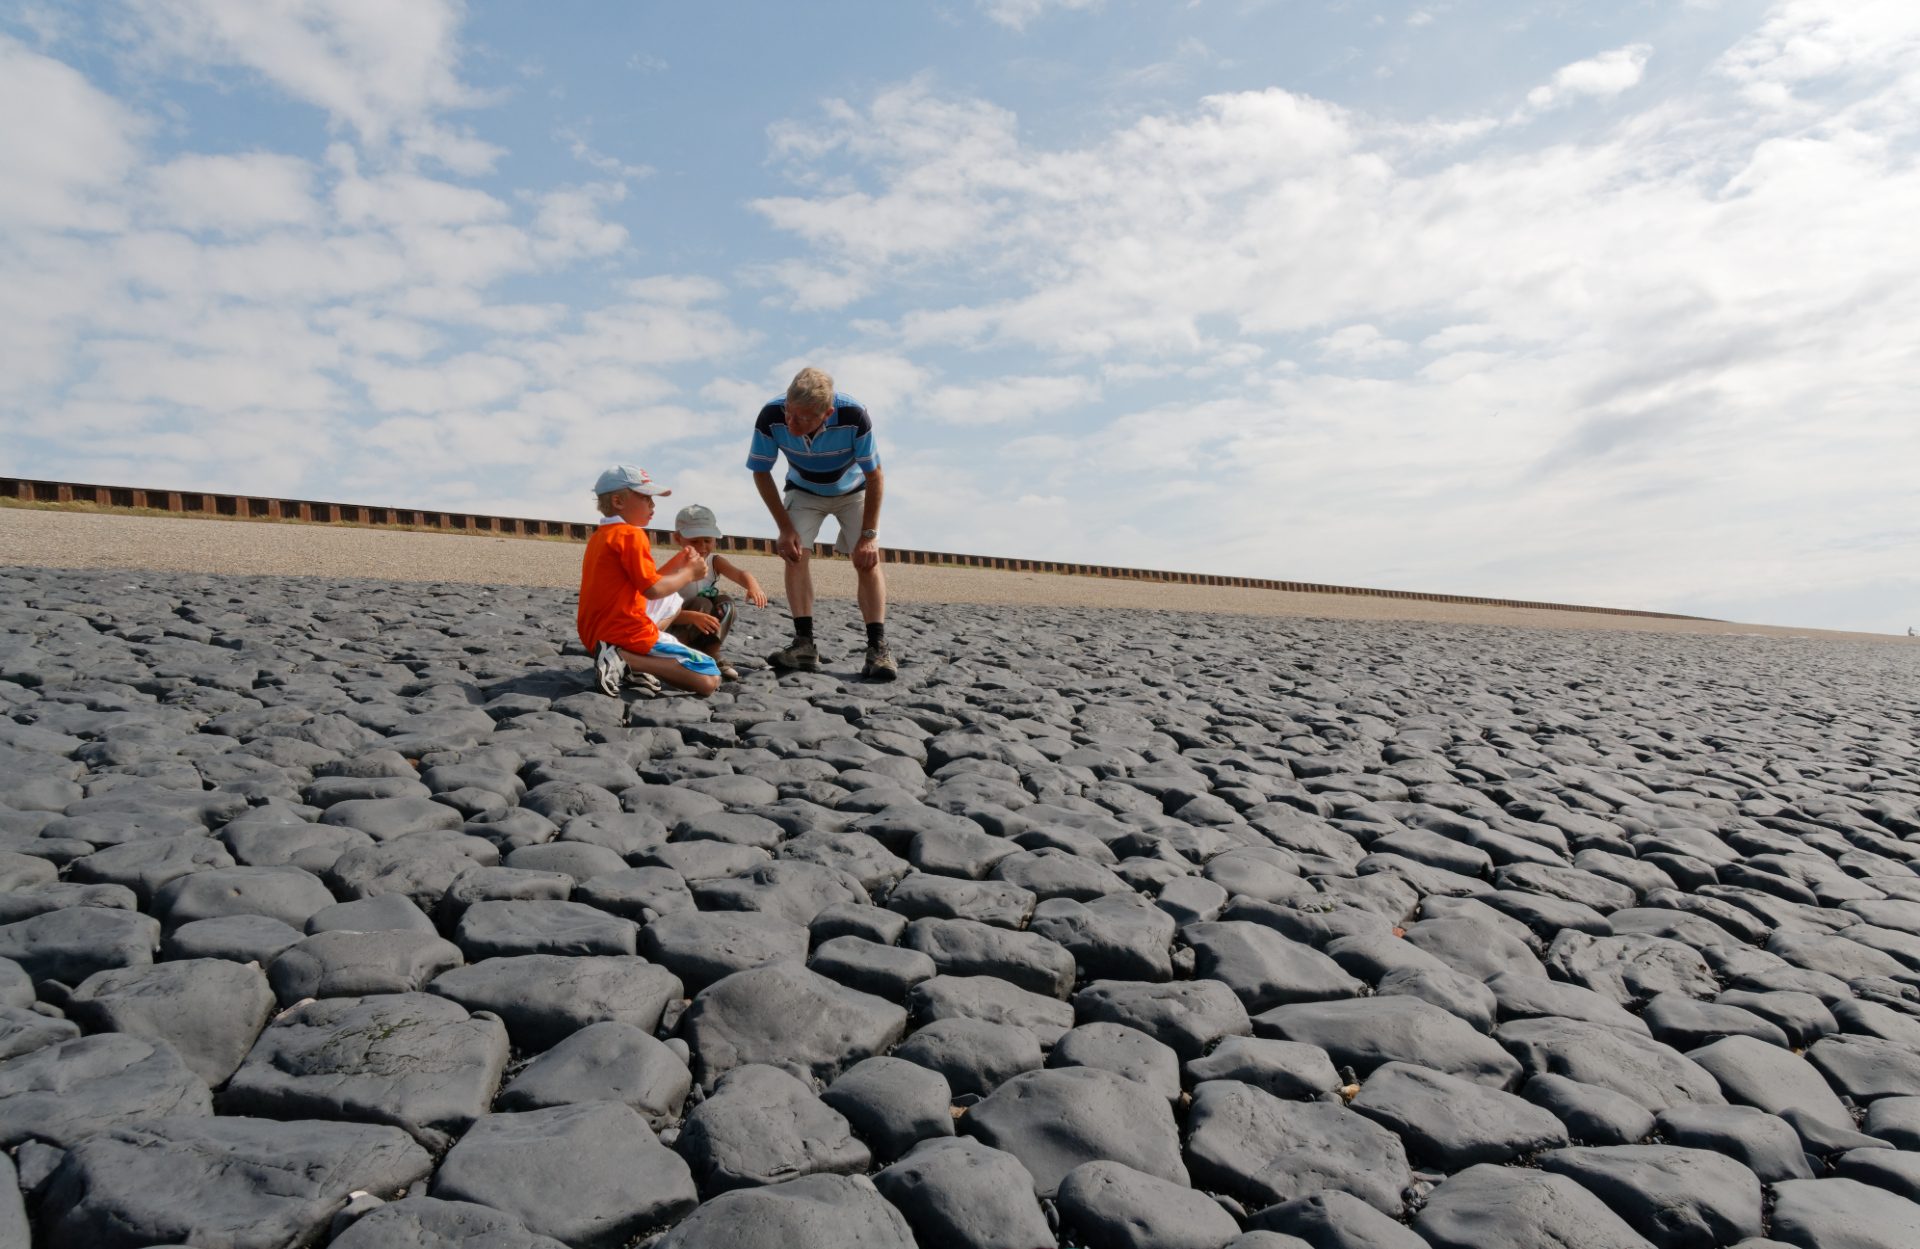
Recover the mood of the shot
PhotoLab brings a global and balanced solution to the image while specifically treating the different areas according to their illumination.
Adjustments are needed for:
* Restoring the atmosphere of the shooting that PhotoLab cannot guess.
* Customizing your image according to your wish.
The “Basic Tools” palette offers the essential tools for processing the photo.
Use the tools in this palette from the top to the bottom.
White Balance: Nothing to do in full summer sun >
We leave it on Original since it corresponds to the shot.
Exposure Compensation: The photo is slightly underexposed >
Increase lighting levels by 0.35 EV
DxO made a mistake by positioning the Smart Lighting after the Selective Tone correction.
Drag and drop it by its title one step higher.See the tutorial “Mastery of DxO PhotoLab – Take control of the Interface” to save this configuration.
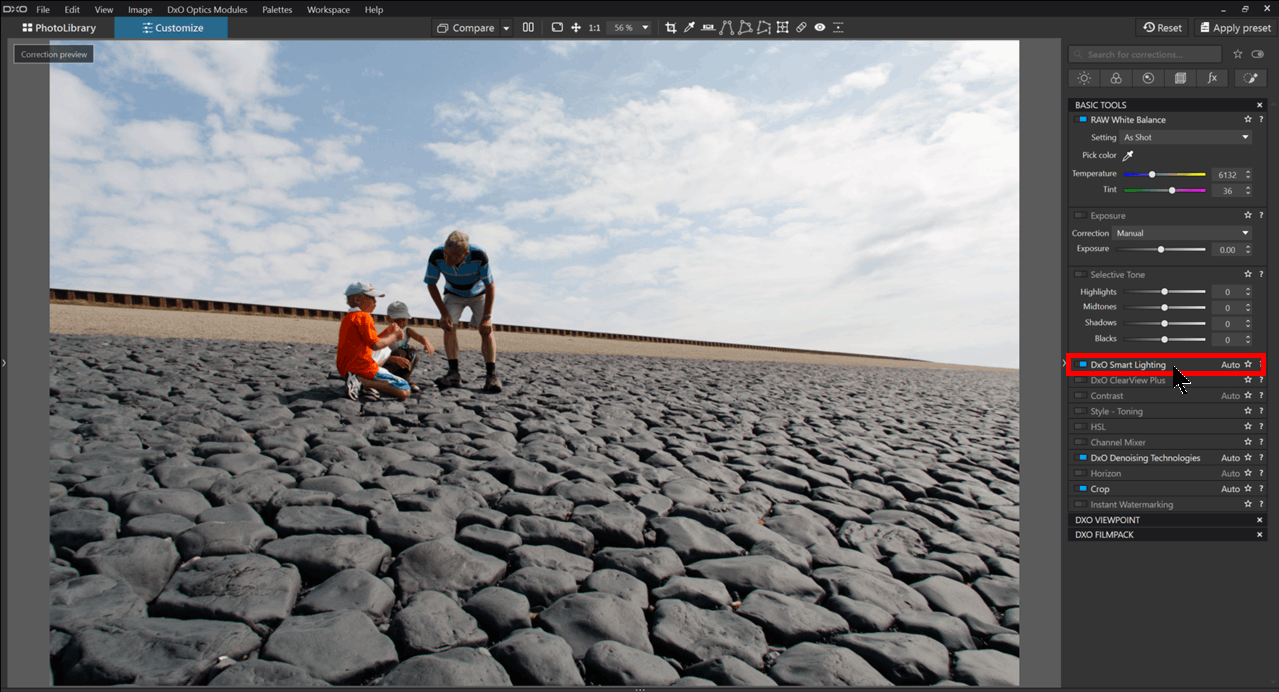
DxO Smart Lighting: This exclusive feature of PhotoLab analyzes the image (brightness and contrast) to balance the global tone over the entire available dynamic range.
The Smart Lighting lightens the shadows by preserving bright areas and retrieves details in clipped areas.
The default is the “Uniform” option.
The scene being brightly lit, the subject is still too dark.
Spot Weighted: This option automatically detects faces – as they are not prominent here, PhotoLab did not find them. But Spot Weighted can be applied to any area of the subject.
– Activate the selection tool (illustration)
– Draw a square on the too-dark man > Select Medium mode
– Press ENTER to disable the tool
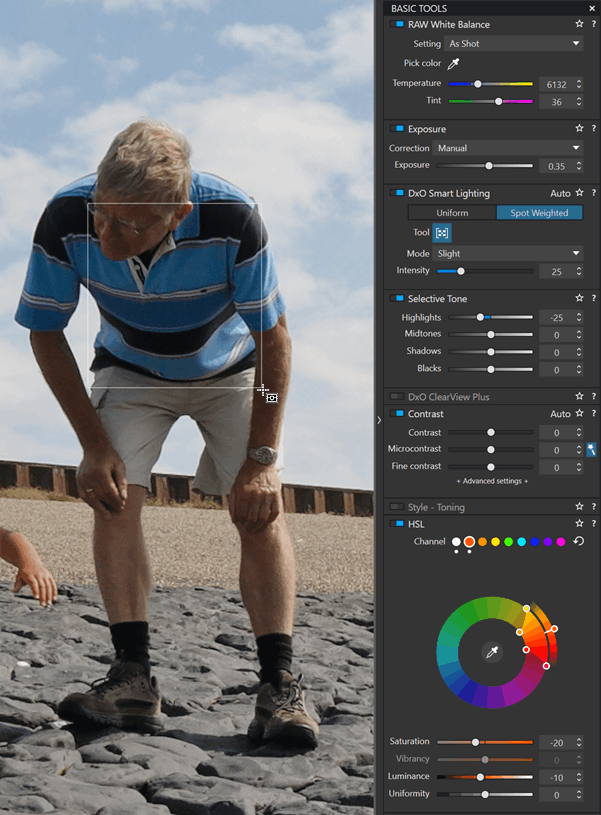
Selective Tone: This correction adjusts the Smart Lighting corrections to recreate the atmosphere of the scene.
The sky lacks density > Highlights -25
The rendering of stones, black tillite, is too bright > Blacks -20
Contrast: MicroContrast accentuates micro-details in the image to give an impression of sharpness.
For this camera + lens used, DxO uses a module measured by the laboratory.
The MicroContrast magic wand proposes 16 as the optimized value.
The magic wand allows you to return to the optimized value for this photo.
The HSL module adjusts the hue, saturation and luminance of image colors. PhotoLab divides colors into 8 channels, as well as a global access (white point).
Color Accentuation – Vibrancy: The very bright afternoon sky lacks saturation > Vibrancy +40
Unlike regular saturation, this correction is designed to limit the increase in saturation on already saturated hues, and to avoid color clipping.
The HSL wheel: Despite the choice of Vibrancy, the boy’s shirt became too shiny orange.
– on MacOS, first select a color channel close to the one to be corrected > here, red
– Activate the sampling pipette
– Adjust its radius > Ctrl + wheel
– Desaturate -20
– Darken a little using the luminance slider at -10
– Type “ENTER” to close the pipette
Noise Reduction (DxO Denoising Technologies): “1- DxO Standard” preset activates it from the beginning.
PhotoLab knows the camera, the selected sensitivity and the lighting of the scene. It will automatically apply an optimized noise treatment to the areas that need it.
We imagine in our image, that it limits its action to dark cobblestones.
All these corrections are explained in detail in the “Efficiency with PhotoLab” tutorial series.
Another series of tutorials is aimed specifically at beginners in photo development.
Improve the image
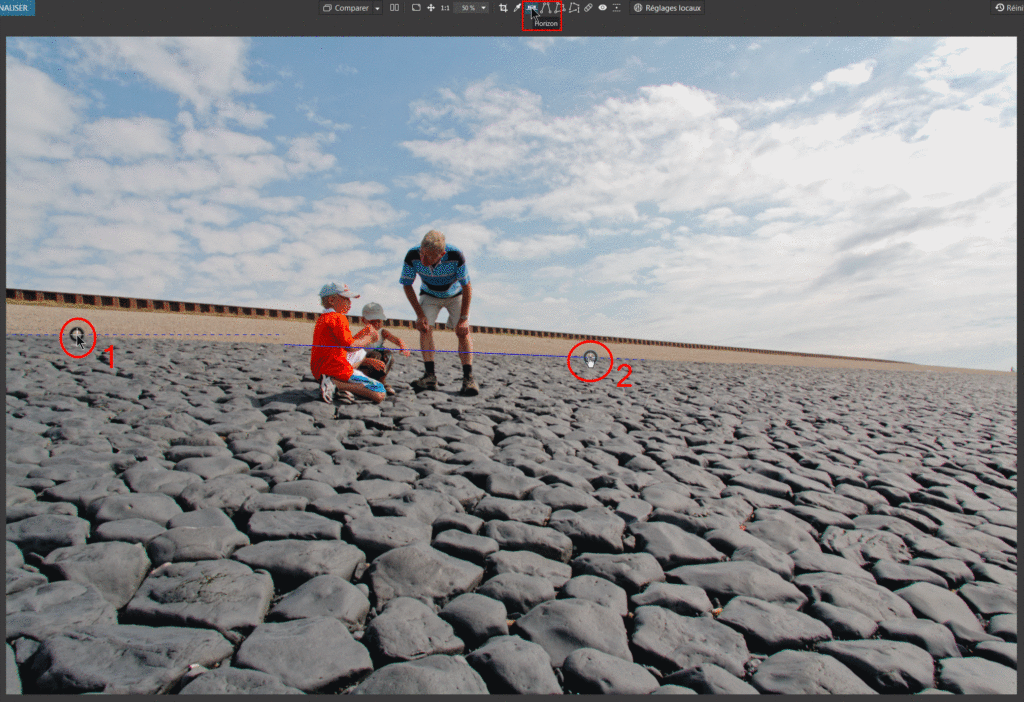
Horizon: A horizontal dam would strengthen the image >
– Click on the “Horizon” tool in the upper bar
– Always try the magic wand.
Whilst generally good at automatic correction, here it used the dike for orientation which has a strong contrast to the sky.
Ignore the blue line proposed by default for a more efficient method.
– 1: Left Click determines the first point. Hold the click
– 2. Drag while holding the click while crossing to the second point
– Release
Cropping: With Crop set to Auto, PhotoLab automatically crops the image with the corrected horizon.
The image matches the mood of the shot.
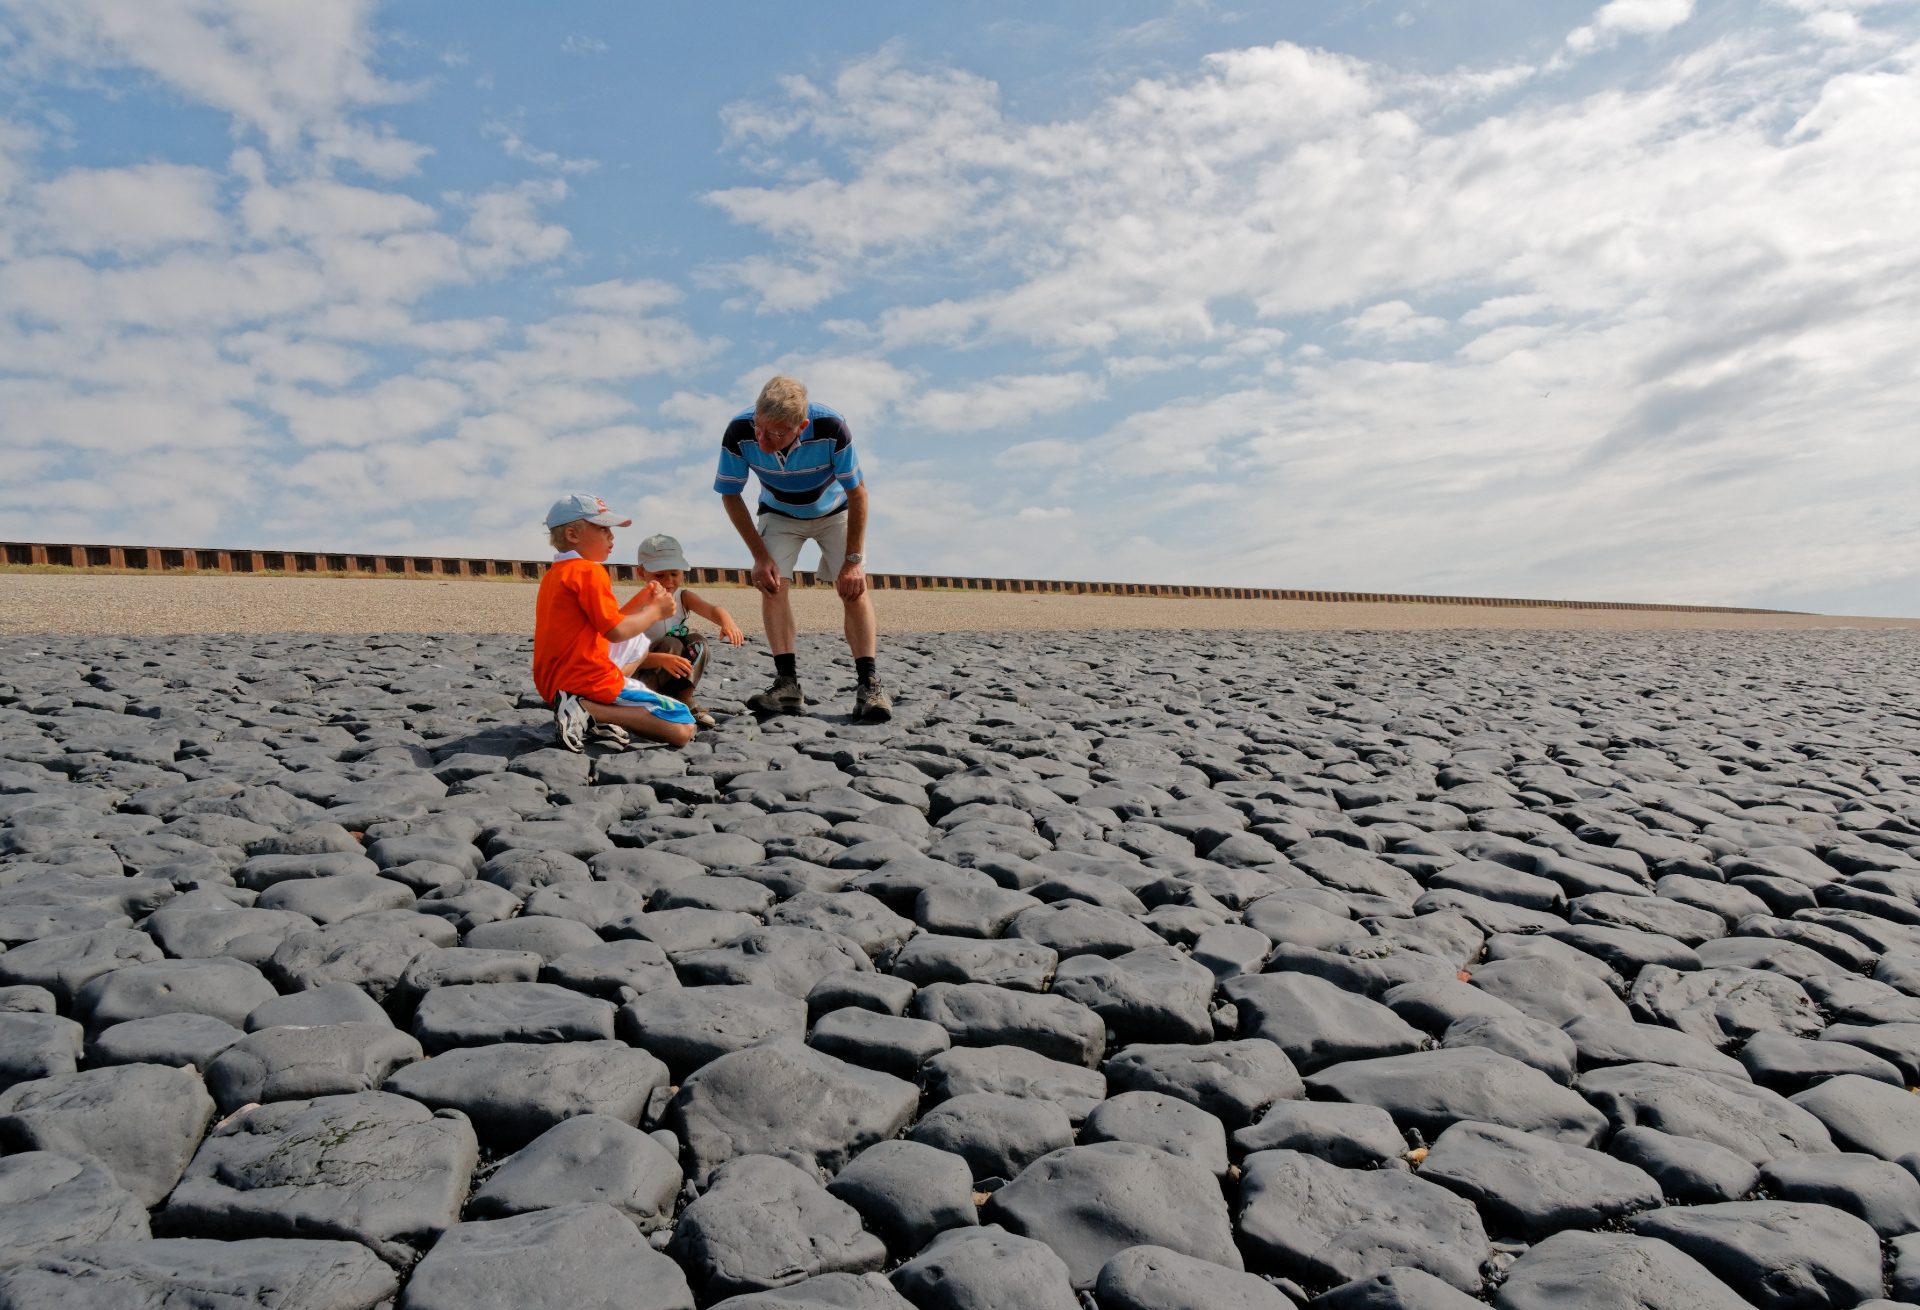
Take ownership of the image
Blurring the too present foreground and unblocking the man’s silhouette help the reading.
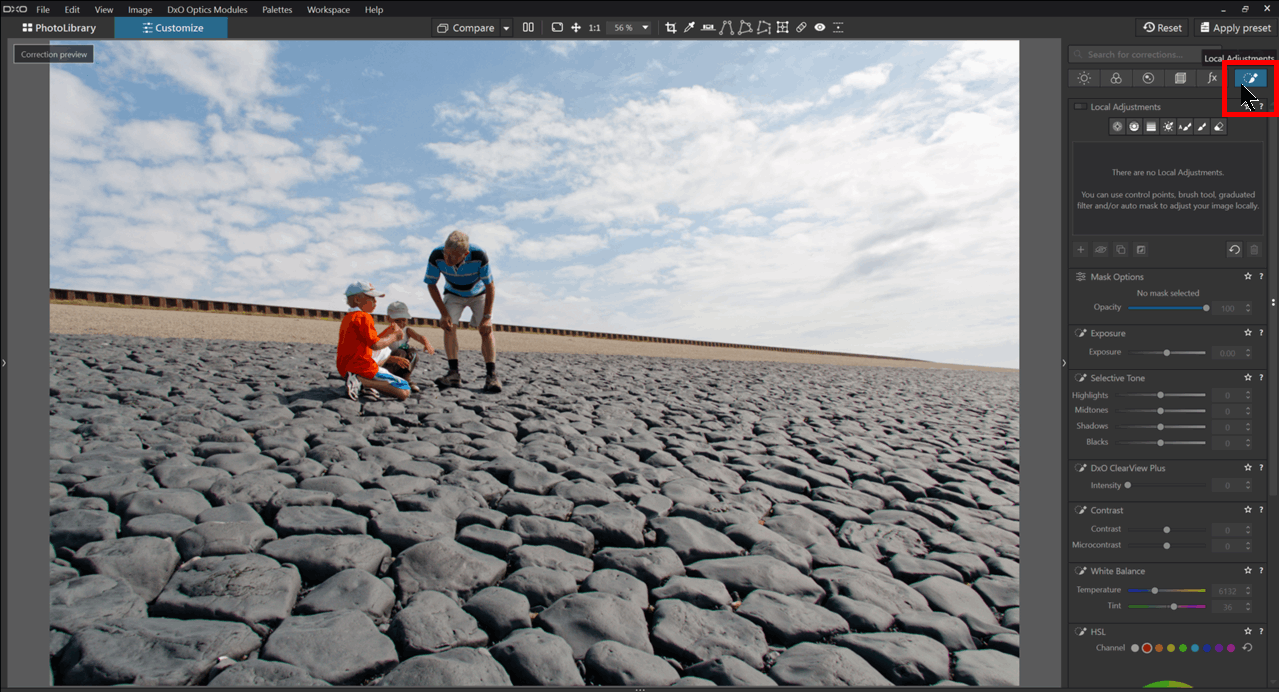
Use Local Adjustments:
Foreground paving stones are too sharp > Blurr them with the Graduated Filter
– Launch the “Local Adjustments” correction in the upper bar
– Select Graduated Filter tool
– Left Click on the bottom of the image
– Drag and hold the click while crossing to the third of the image
– Release
– Press ENTER to exit the mask tool
– Apply a Blur value, +8%
* The generated blur can quickly become too much. We have to stay on low values.
* Rename the mask according to its application.
The man’s face is in the shadow > Use a Control Point
– Choose the Control Point tool
– Left Click on the man’s face
– Select the B&W mask display mode
– Drag to adjust the diameter tool’s area of influence
– Release
– Press ENTER to exit the mask tool
– Increase the Exposure value by +0.5 EV
* Close the Local Settings tool using the button on the top bar.
* Click on the Compare button to check the contribution of Local Settings.
The foreground is a little too light >
– Relaunch the Local Settings correction in the top bar
– Select the Graduated Filter already created. It can be used for a second correction. No need to modify it
– Decrease the Shadows under Selective Tone to -10
Local Settings, the various masks and their use are described in the Local Adjustments tutorial series.
Now the image is well-balanced.
Distribute the image
The aim of all this work is to produce a JPEG version that can be shared by e-mail, posted on social networks or printed.
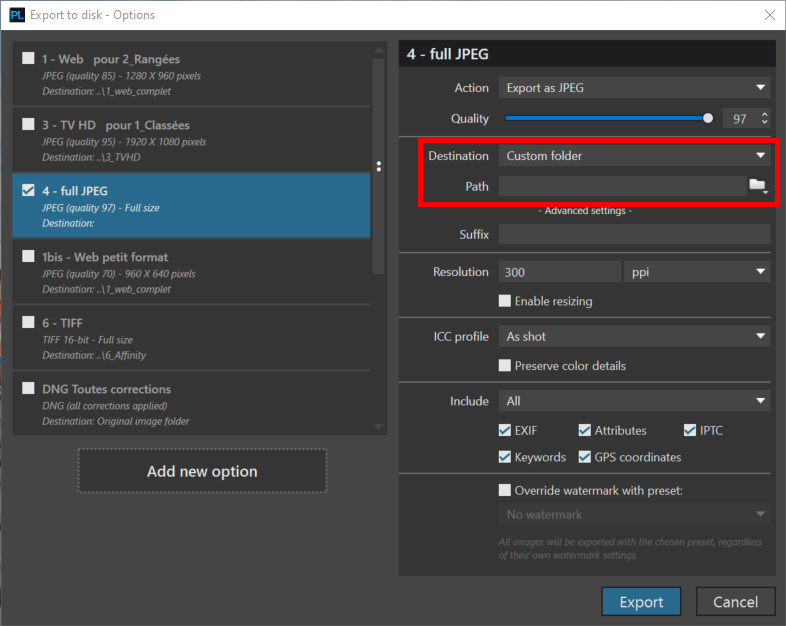
– Click on the Export button, to the right of the Image browser
– Select one or more options
– Indicate the location of the destination folder, so that you can easily find your JPEG image.
– Click on Export button
The Export function is described in detail in this tutorial.
TuToDxO.com – All rights reserved – tous droits réservés.